How to install and use Camera Live V1, Camera Live is a free program for you Windows PC or Mac that can be used to locate its local IP address and to view the camera’s live feed locally and remotely. First download the appropriate installation file from the links below and install the program.
How to install and use Camera Live on a compatible Windows or Mac PC/laptop
Camera Live is a free program for you Windows PC or Mac that can be used to locate its local IP address and to view the camera’s live feed locally and remotely.
First download the appropriate installation file from the links below and install the program.
For a Windows PC click here
For a Mac click here
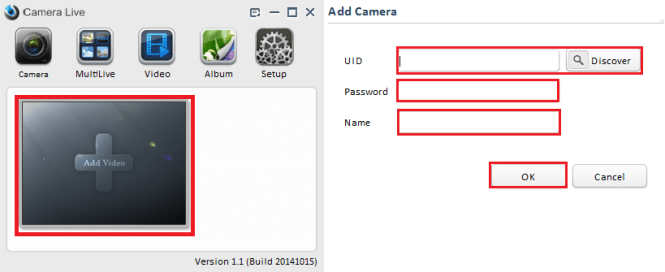
Once you have installed the program, open it and click on Add Video. Then click on Discover to find the cameras UID, or enter it manually ensuring it is correct and all in uppercase. Enter the cameras password ensuring this is correct and in the correct case. Then give the camera a name e.g. garden, drive etc. and click on OK.
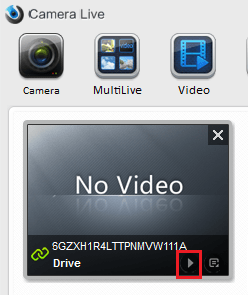
Once added wait for the camera to connect to the program. When it is connected you will see a green icon next to the UID, you can then view your camera’s live feed by clicking on the play icon. You will see the “No Video” message until you have viewed the live feed for the first time and the program can produce a thumbnail image from this.
Forgotten your password or getting a wrong password message?
If a password has been forgotten unfortunately there is no way to recover these as this would compromise the camera security.
The default username and password for the camera will be “admin” e.g.:
Username: admin
Password: admin
We recommend trying these first to see if they allow you to login.
These must be entered all in lowercase and should be double checked as some devices such as iPhones/iPads will set the first letter to uppercase automatically.
When changing the password this should be in alphanumeric characters (i.e. a,b,c… 1,2,3…) only with no special characters or spaces.
If the default password has been changed you cannot recall what you set it to you will need to reset the camera to the factory defaults to regain access.
NB: When you reset a camera it will reset it to factory defaults (and will lose the WiFi details you currently have set) so you should only perform a reset while your camera is connected to your router with an ethernet cable.
To do this can you:
1) Remove all cables connected to the camera.
2) Remove any SD card from the camera.
3) Wait 10 mins.
4) Connect the ethernet cable to the camera and your router, you should hear a click when the cable is connected.
5) Wait 2 mins.
6) Connect the power cable to the camera.
7) Wait 5 mins for the camera to power up.
8) Locate the camera’s reset button or recess.
For the outdoor camera this will be a button on the underneath of the camera or on the end of a cable.
For the indoor camera this will be a recess on the back of the camera that can be pressed with a paperclip or similar.
9) Press and hold for 20 seconds and release.
10) Wait 5 mins for the camera to reset ensuring it remains connected to your router with the ethernet cable throughout.
Then once the camera is reset can you log in to the camera interface using the default username and password which is “admin”
As the camera has been reset it will be at the factory defaults once again, so you will need to setup your camera again with the WiFi details, etc. as if from new.
To do this take a look at the setup guides in the section below.
Having touble setting up your camera to record to SD card/NVR/NAS drive.
Are you looking to setup recording? If so please see the links below for full setup guides for each recording method. If you have already set it up but have encountered an issue it may be worthwile running through the setup once more, to check for any errors or mistakes.
SD card recording
UCAM NVR recording
NAS Drive recording
If you are still seeing an error or it is not working as expected please take a look at the common issues and their solutions in the list below.
SD card not supported or faulty.
Motion detection page not configured correctly
NAS details not entered accurately.
NVR IP address may have changed.
Incorrect Task Management setup
How can I transfer video clips from an SD card in the camera to my computer?
If you are looking to transfer recordings from an SD card installed in the camera to you computer over WiFi this is limited to one file at a time for practical reasons:
1) If your SD card had, for example, 128GB of clips it would not only be very cumbersome to transfer that quantity to your computer over your local WiFi but potentially slow down your local network too. As SD cards have very limited file speeds transferring this magnitude of data may also take a very long time to offload.
2) It is also impractical or unwise to transfer en masse as it would also cause a slow down of the camera’s capabilities for the time while the transfer is progressing, and your camera could miss key motion events from being recorded.
Solutions? There are a number of options available to you:
– You can browse the recordings stored on your camera directly from a web browser and check which recordings are important to keep. You can play back the clips in your browser without needing to download to your computer first. Click here for a guide on how to do this.
– You can set the sd card to auto overwrite so that it automatically deletes the oldest recordings when the card is full, so you don’t have manually delete.
– You can use a number of tasks in the camera to automatically offload clips from the sd card (before they get overwritten) to Dropbox, your own FTP server, etc.
– If you really must download everything off the SD card the easiest and quickest way is to take the sd card out and insert directly into your computer (if it supports SD media) and then simply drag and drop the files off the card to your computer.
These are but a few suggestions. If you need further advice on the full range of recording and playback options do get in touch with our Support Team and they will be delighted to help.
Cannot connect to the camera remotely using the app.
Are you having trouble connecting to the camera using the app on your phone? This may be a p2p error. The camera and app use p2p to connect, if the camera is unable to connect to the p2p server then it will not be viewable via the app. Click here to check and resolve this.
Has the camera been set to a static IP? We do not recommend setting the camera to a static IP as this is not usually required and can render the camera inaccessible if setup incorrectly. Click here to check this has been setup correctly.
Is the UID correct and all in uppercase? If any character in the cameras UID is not in uppercase it will not be able to connect to the app remotely. If this is the case, delete the camera from the app and add it again. For help with this click here for an Android device and click here for an iOS device.
Changed WiFi router or given a new router by your ISP?
If for some reason you have changed/updated your WiFi router your camera(s) will need to be reset to factory defaults and setup again, since the WiFi details and ip addressing on your camera(s) will still be that of your old router.
To reset your camera(s) and start afresh please click here.
NB: Be sure to read and follow the reset instructions carefully to avoid any problems or delay in setup.
Once reset you will need to setup the WiFi connection again. Please follow one of the guides below to complete this.
PC Method
App Method
WPS Method, for WPS enabled routers.
Power LED flashing rapidly and camera offline?
A rapidly flashing green power LED usually indicates that the camera’s firmware has encountered an error. This is rare but can occasionally happen after an unexpected power cut (if the camera is in the middle of performing a task), due to incorrect settings in the camera (too many enabled tasks, conflicting settings etc.), or due to a faulty SD card.
This can usually be resolved with a reset of the camera. To do this first power down the camera and leave it for at least 10-15 minutes, then follow the steps on the page linked below to reset the camera. Note: a reset will clear all changed settings in the camera and revert it back to the defaults.
How to reset the camera
If the reset does not clear the error then you should get in touch with our support team using the “contact us” form as they will be able to advise on the next steps to resolve the issue.
How to install and use Camera Live V1
How to reset a camera.
If you think you need to reset your camera we recommend you first get in touch with us using the “Contact us” form as a reset may not solve your issue and will wipe the camera of any user data, meaning you will need to set the camera up again.
But should you want to reset your camera anyway please use either of the guides below.
NB: When you reset a camera it will reset it to factory defaults (and will lose the WiFi details you currently have set) so you should only perform a reset while your camera is connected to your router with an ethernet cable.
There are two ways to reset the camera: physically by pressing the hardware reset button or digitally via the camera’s web interface….
Physical reset procedure
1) Remove all cables connected to the camera.
2) Remove any SD card from the camera.
3) Wait 10 mins.
4) Connect the Ethernet cable to the camera and your router, you should hear a click when the cable is connected.
5) Wait 2 mins.
6) Connect the power cable to the camera.
7) Wait 5 mins for the camera to power up.
8) Locate the camera’s reset button or recess.
For the outdoor camera this will be a button on the underneath of the camera or on the end of a cable.
For the indoor camera this will be a recess on the back of the camera that can be pressed with a paper-clip or similar.
9) Press and hold for 20 seconds and release.
10) Wait 5 mins for the camera to reset ensuring it remains connected to your router with the Ethernet cable throughout.
Then once the camera is reset can you log in to the camera interface using the default username and password which is “admin”
Digital reset procedure
1) Remove all cables connected to the camera.
2) Remove any SD card from the camera.
3) Wait 10 mins.
4) Connect the Ethernet cable to the camera and your router, you should hear a click when the cable is connected.
5) Wait 2 mins.
6) Connect the power cable to the camera.
7) Wait 5 mins for the camera to power up.
8) log in to the camera interface on a PC, see the guide here on how to do this.
9) Go to Setting, Tools, Backup or Reset.
10) Click on Reset, then when it appears click on Reboot.
10) Wait 5 mins for the camera to power up fully, ensuring it remains connected to your router with the Ethernet cable throughout.
Then once the camera is reset can you log in to the camera interface using the default username and password which is admin (in lower case) for both.
As the camera has been reset it will be at the factory defaults once again, so you will need to setup your camera again with the WiFi details, etc. as if from new. You’ll find the details here: http://ucam247.helpsite.io/categories/3646-camera-setup
Forgotten your password or getting a wrong password message?
If a password has been forgotten unfortunately there is no way to recover these as this would compromise the camera security.
The default username and password for the camera will be “admin” e.g.:
Username: admin
Password: admin
We recommend trying these first to see if they allow you to login.
These must be entered all in lowercase and should be double checked as some devices such as iPhones/iPads will set the first letter to uppercase automatically.
When changing the password this should be in alphanumeric characters (i.e. a,b,c… 1,2,3…) only with no special characters or spaces.
If the default password has been changed you cannot recall what you set it to you will need to reset the camera to the factory defaults to regain access.
NB: When you reset a camera it will reset it to factory defaults (and will lose the WiFi details you currently have set) so you should only perform a reset while your camera is connected to your router with an ethernet cable.
To do this can you:
1) Remove all cables connected to the camera.
2) Remove any SD card from the camera.
3) Wait 10 mins.
4) Connect the ethernet cable to the camera and your router, you should hear a click when the cable is connected.
5) Wait 2 mins.
6) Connect the power cable to the camera.
7) Wait 5 mins for the camera to power up.
8) Locate the camera’s reset button or recess.
For the outdoor camera this will be a button on the underneath of the camera or on the end of a cable.
For the indoor camera this will be a recess on the back of the camera that can be pressed with a paperclip or similar.
9) Press and hold for 20 seconds and release.
10) Wait 5 mins for the camera to reset ensuring it remains connected to your router with the ethernet cable throughout.
Then once the camera is reset can you log in to the camera interface using the default username and password which is “admin”
As the camera has been reset it will be at the factory defaults once again, so you will need to setup your camera again with the WiFi details, etc. as if from new.
To do this take a look at the setup guides in the section below.
Camera is rebooting often
Do you find the camera does not remain online for any length of time? If so this is usually a setup or a hardware error, typically with the SD card or the recording setup. Please take a look at the troubleshooting guides below to help resolve your issues.
SD card not working.
Too many tasks enabled.
Issues with power supply, outdoor cameras.
Cannot view the video from the app.
If you are having trouble viewing video in the app it is likely due to one of the issues listed below.
Poor Wifi connectivity
p2p disabled
Privacy mode enabled blocking access to the live feed.
Live feed or playback is jerky and not smooth
The first thing to check will be that the camera has a strong WiFi connection. This can be checked in the app by going to Edit Camera, Advanced Setting, WiFi Setting and should be at least 50-60%. A poor WiFi signal can cause the playback of the live feed to be poor. Click here for advice if the WiFi signal strength is poor.
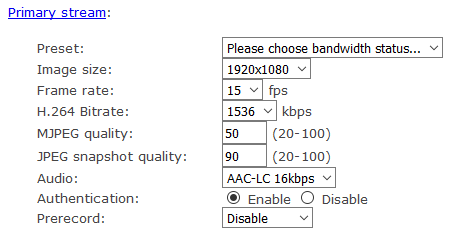
If the WiFi connection is strong, the next thing to check will be that the stream setup is set appropriately for your network. The defaults for this are below and can be found by logging in to the camera’s web interface and going to Setting, Camera, Stream Setup.
The H.264 bitrate should be left at the default of 1536, raising this can cause the camera to send more data than your router can cope with causing a jerky live stream.
The MJPEG stream should not be set higher than the default of 50. This is an uncompressed stream that is used for the cameras motion detection, not for recording or streaming, raising this can cause issues with the streaming as it puts a high load on the camera.
You should also check that you do not have too many tasks enabled, conflicting tasks can cause issues with the camera’s ability to stream well. You should only have one of task 7, 8, 9 or 10 enabled at any one time. For more information on setting up the task management page click here.
NVR IP address keeps changing.
You have setup and NVR with a camera successfully however it stops recording after a short time.
This may be due to your router assigning the NVR a new IP address very often. In this case the best way to prevent this from changing and your details in the Storage Setup page becoming incorrect is by setting the NVR to a static IP address.
To do this please take a look at our setup guide for Setting the NVR to a Static IP address.
Having Trouble With WiFi setup?
Does your WiFi use older WEP Encryption? If so click here
Not getting a wireless connection where you have placed your camera? Click Here for more information.


