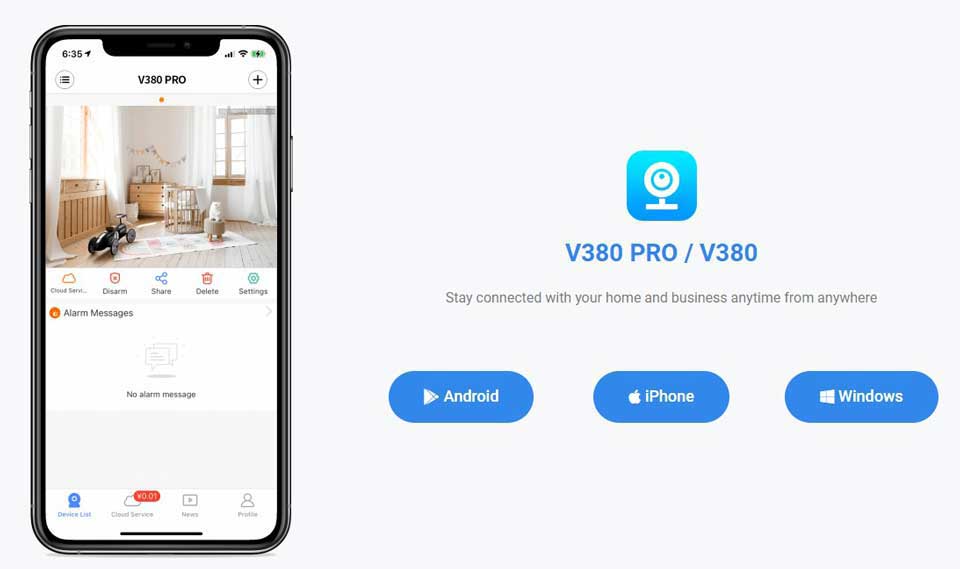
V380 FOR PC Setup User Guide, Our company division WiFi camera products can be used to achieve remote configuration camera, remote viewing, remote playback; It’s your home security housekeeper! ,V380 is a new generation of intelligent household cloud camera free application, can easily realize the remote video monitoring and management.
Stay connected with your home and business anytime from anywhere
Windows

Equipment startup
The device is not on after power connection,the light indicator stays off
1) Replace the power cord and power plug
2) If the power is still not available after replacement, contact the seller to repair the equipment.
No response after the device is powered on
1) Replace the power cord and power plug
2) If you still cannot start after the manual upgrade, you need to repair the equipment
Device does not respond after “System startup”
1) Replace the power cord and power plug
2) Still not available, contact the seller to repair the equipment.
The device restarts repeatedly
1) Replace the power cord and power plug
2) Still not available, contact the seller to repair the equipment.
Must the camera be connected to the power supply
Cameras are distinguished between models with and without batteries. Cameras without batteries can only be used after being connected to the power supply. Please consult the seller for details
Can the camera volume be adjusted up/down
The volume of the camera is fixed and does not support to be adjusted the volume level
How does the camera establish a hotspot mode
1. Devices whose default connection mode is AP hotspot mode
Devices whose default connection mode is AP hotspot mode, no matter what state the device is in (except for the network cable), long press the camera reset button, and it will be in AP hotspot mode after restoring the factory default settings
Devices with speakers have voice prompt: “Restore factory default setting”-“Access-Point preparing”-“Access-Point ready”
If the mobile phone WiFi list can search for the hotspot signal at the beginning of the MV, it means that the hotspot has been established successfully
2. Devices whose default connection mode is station mode
Devices whose default connection mode is station mode, no matter what state the device is in (except for the network cable), long press the camera reset button, and it will be in the wifi smart link configuration state after restoring the factory default settings
Devices with speakers will have a voice prompt: “Restore factory default setting”-“Waiting for WiFi smartlink configuration”
Short press the reset button again to switch to AP hotspot mode, and the device voice prompts: “Access-Point preparing”-“Access-Point ready”
If the mobile phone WiFi list can search for the hotspot signal at the beginning of the MV, it means that the hotspot has been established successfully
Note: When the camera is connected to the network cable, the wireless connection mode will be blocked. At this time, restoring the factory default settings will not change the network connection status of the device
How to turn on/off the system voice prompts
After the APP connects to the camera, click the [Settings] icon in the device list-[Advanced setting]-[Device voice prompt], you can choose to turn on or off the camera system voice prompts. After the settings are completed, return to the previous layer to take effect
Note: Only devices that support this function will show this option in the setting list, and other devices will not show this option
How to set AP hotspot password
1) Connect the camera to the phone APP
2) In the device list, click the [Settings] icon-[Network], and select [AP hotspot mode]
3) Fill in the password under the hotspot name and click [Save]
4) After the setting is completed, the mobile phone connects to the camera hotspot again, and the set password is required to connect
Note:
1) The password must be a combination of 8 or more letters, symbols, or numbers
2) Restore the factory default settings of the camera can delete the hotspot password
How far is the AP hotspot mode connection range
1) The stable connection distance of the indoor camera is 5 to 10 meters
2) The stable connection distance of the outdoor camera is 10 to 20 meters
Note:
1) The above parameters are reference values, and the actual connection effect is affected by the use environment to a certain degree
2) The partition wall connection may greatly weaken the signal, and it can be connected to a longer distance in an open environment
3) Do not use the device in an environment with high electromagnetic interference
The phone cannot find or connect to the AP hotspot
1) Make sure that the device has started normally and is in AP hotspot mode
2) For devices with external antennas, please confirm that the antennas have been connected
3) Confirm that the device is not connected to the network cable, if the network cable is connected, please disconnect it first
4) If the security prompt pops up during the connection process of the Android phone, please confirm that the authorized system is connected to the hotspot
5) For Apple mobile phones IOS14 and above, please confirm that the APP is enabled [Local Network] and [Precise Location] Permissions
6) Please try to restart the device or change other phone connection
7) If you cannot solve the problem after trying the above methods, please contact the seller for after-sales service
Note: AP hotspot is a signal from the camera and cannot be connected to the Internet. Therefore, it is a normal phenomenon for the system prompts “Network unavailable” during the connection to the hotspot
How to check the device ID
· ID number is the unique identification number of the camera, each camera corresponds to only one ID
· The ID number is 8 digits, which can be viewed on the label on the device body
· If you have connected the device in the APP, you can view the ID in the upper left corner of the device list window
How to enable/disable the shake machine self-test function
Please contact the technician to provide the configuration file
When the equipment self-test
1) Upgrade the firmware version
2) If the firmware still cannot be turned after the upgrade, contact the seller for repair.
How to change the system tone language
method 1: After the camera is connected on the phone, on the lower right Corner of the App. Click [Settings] icon – [Device Language] select Mandarin / English
method 2: modify the device configuration by testing the file
please contact technical personnel for the file
Note: The default network mode of the device in English voice mode is hotspot mode
Long pressed reset button doesn’t activate anything
1) Make sure the button is well pressed down
2) Upgrade the firmware of the device.
3) The restore button may be damaged. Contact the seller to repair the device.
How to modify the default network mode
Please contact the technician to provide the configuration file
How to restore factory settings
How to restore factory settings
· Long press the reset button for 6-7 seconds [restore factory settings], device with loudspeaker will speak“restore factory settings” “restore factory settings” mode 1: Part of head shaking devices has a button next to the English mark“RESET” (as shown below)

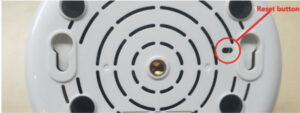
Method 2: Part of head shaking and panoramic machines have a hole on its body with English mark”RESET”beside, press and hold the hole with a pin or something similar for seconds (as shown below)
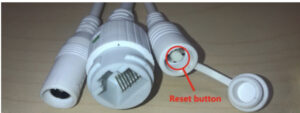
method 3: Outdoor devices and large triangle panoramic devices have wires, one of the wires is cappped,remove the cover and long press the button inside (as shown below)
Note: Restoring the factory settings will clear the configuration information and the device password. After reset, you need to reconfigure the network and set the password.
· Restore factory default settings function
1) Clear WiFi information and IP configuration information
2) Clear user information (username and password)
3) Clear hotspot password
4) Turn on system voice prompt
5) Unbind cloud service
6) Alarm function
a. Set the arming state to off
b. Set the alarm area to All
c. The alarm time period is set to all-day alarm
d. Turn off the alarm tone
7) PTZ function
a. Clear the PTZ power-off memory position
b. Clear the PTZ patrol setting
c. Turn off the movement tracking function
8) Light control function
a. The light control is set to [Auto]
b. Clear the timing switch light setting
9) The image attribute is set to [Auto]
Note: After the device is restored to factory default settings, the network needs to be reconfigured.
V380 FOR PC Setup User Guide
Read More : Imou Life App Setup and User Guide
Network setting
Network configuration
How to configure wireless camera network (Android users)
Preparation before configuration:
1. Power on the camera and set the device to hotspot mode. When the (MV+ID) hotspot signal is found in the WiFi list of the mobile phone, it means that the device is in the waiting configuration state
Configuration steps:
1. Click the “+” button in the upper right corner of the device list -> select [Add Camera]
2. Select [WiFi Smart Camera]
3. Select [AP hotspot connection] and follow the system prompts to continue operation
4. Select the WiFi that the device needs to configure, and enter the WiFi password -> click [Confirm]
5. Below Android 10: Select the device hotspot, and the mobile phone will automatically start network configuration after connecting to the hotspot
Android 10 and above: Click [Connect AP spot] or enter the mobile phone system [Settings], select [WLAN], connect to the device hotspot (MV+ID), and the device will automatically connect to WiFi after returning to the app
6. The camera’s voice prompts “WiFi connecting – WiFi connected” to indicate that the configuration is successful, and the APP prompts “Completed”
How to configure wireless camera network (IOS users)
Preparation before configuration:
1. Power on the camera and set the device to hotspot mode. When the (MV+ID) hotspot signal is found in the WiFi list of the mobile phone, it means that the device is in the waiting configuration state
Configuration steps:
1. Click the “+” button in the upper right corner of the device list -> select [Add Camera]
2. Select [WiFi Smart Camera]
3. Select [AP hotspot connection] and follow the system prompts to continue operation
4. The system automatically obtains the currently connected WiFi, enter the WiFi password -> click [Confirm]
5. Click [Connect AP spot] or enter the mobile phone system [Settings], select [Wi-Fi], connect to the device hotspot (MV+ID), and the device will automatically connect to WiFi after returning to the app
6. The camera’s voice prompts “WiFi connecting – WiFi connected” to indicate that the configuration is successful, and the APP prompts “Completed”
During the configuration process, the device voice prompts “wifi connected”, but the mobile phone doesn’t prompt “Completed”
· The device has been successfully connected to the Internet, just add the connected device to the APP
1. Click the “+” button in the upper right corner of the device list -> select [Add Camera]
2. Select [WiFi Smart Camera] -> [Add device ID]
3. Fill in device ID or scan the QR code on device as prompted by the system -> click [Confirm]
4. APP prompts “Completed”
What if the device fails to connect to WiFi during network configuration
1. The camera can only connect to 2.4G frequency WiFi, and does not support 5G frequency WiFi and mixed frequency WiFi, and does not support connecting to the guest network set by the router
2. Please do not exceed the device connection range, try to configure the network again after the device is closed to the router
3. The WiFi name cannot contain Chinese characters, and the WiFi name cannot be set to hide
4. Check whether the router restricts device access
5. If the device fails to receive configuration information or fails to be configured for multiple times, it is recommended to use AP hotspot mode configuration
How to connect a V380 camera with a network cable
1. Cameras with a network port can use a network cable connected to the network, please use a standard 8-core network cable to connect the device
2. There is no need to configure the network when the device is connected to the network cable. After the network cable is plugged in, the network port indicator will be on, and the device with a system sound will prompt “WiFi Connecting” -> “WiFi Connected” means the connection is successful
3. Click the “+” button in the upper right corner of the device list -> select [Add Camera] -> select [WiFi Smart Camera] -> [Add device ID], follow the system prompts to fill in or scan the device ID -> click [Confirm]
Note: The network cable connection has priority. When the network cable is connected, other connection methods will be blocked. If you need to switch to the wireless connection method, please disconnect the network cable first
How to connect 4G camera
1. Please connect the antenna of the device and insert 4G sim card correctly
2. Power on the device, and the device voice prompts “Cellular network connecting” -> “Successful connection” means that the connection is successful
3. Click the “+” button in the upper right corner of the device list -> select [Add Camera] -> select [4G Smart Camera], scan the code to add or click [Can’t find the QR code on the device?] -> [Please enter device ID] to fill in the device ID
What if 4G camera fails to connect
1. If the device prompts “Dialing timeout, please confirm SIM card status”, it means that the device connection has failed
2. Please make sure that the sim card is available and has remaining data
3. Make sure that the device is connected to the antenna and the 4G sim card is inserted correctly
4. Try to connect the device again where the signal is better
How to connect wifi kit
1. Power on the base station and plug it into the router LAN port
2. Power on the camera that needs to be connected to the WiFi kit, and the camera voice prompts that the connection is complete
3. Click the “+” button in the upper right corner of the device list -> select [Add Camera] -> select [kit] -> click [Next], scan the QR code of the base station body and add the camera connected under the base station to the device list
How to connect the device under the AP station(connecting without router)
Preparation before configuration:
1. Power on the camera and set the device to hotspot mode. When the (MV+ID) hotspot signal is found in the WiFi list of the mobile phone, it means that the device is in the waiting configuration state
Connection steps:
1. Open the WiFi list of the mobile phone, connect to the device hotspot (MV+ID), and the “Connected” status under the hotspot means the connection is successful
2. Open the APP, press and hold the drop-down in the blank of the device list to refresh the list
3. The device card appears in the device list, and the device is successfully added
4. Click the play button on the screen, follow the system prompts to set the password, after that, you can do further operations on the device
Note:
1. To connect the device in the AP hotspot mode, the mobile phone must remain connected to the device hotspot. Please ensure that the mobile phone is within the hotspot connection range to avoid disconnecting the device
2. Device hotspot means that the signal from the camera cannot connect to the Internet, and other networked applications cannot be used when the phone is connected to the hotspot. Please pay attention
Why can’t camera connect to 5G frequency WiFi
The difference between 2.4G WiFi and 5G WiFi
1) 2.4G is a wireless technology. Because its frequency band is between 2.400GHz and 2.4835GHz, it is referred to as 2.4G wireless technology
2) 5G WiFi refers to the wireless technology developed based on the IEEE 802.11ac standard. Because the IEEE 802.11ac technology itself works in the 5G Hz frequency band, it is also called 5G WiFi
The difference between 5G WiFi and 5G communication network
· The 5G in 5G WiFi refers to the frequency band of the wireless signal. In the mobile network, the “G” in 4G and 5G refers to the English word “Generation”, and 4G refers to the fourth-generation mobile phone mobile communication standard, 5G is the fifth-generation mobile phone mobile communication standard
Why can’t the device connect to 5G WiFi
· The WiFi module used by the V380 product only supports connection to 2.4G WiFi, and cannot recognize or connect to 5G WiFi. Therefore, 5G WiFi or mixed-band WiFi cannot be used to configure the device network
Networking settings
How to add the online device to your phone
1. Click the “+” button in the upper right corner of the device list -> select [Add Camera]
2. Select [WiFi Smart Camera] -> [Add device ID]
3. Fill in or scan the device ID as prompted by the system -> click [Confirm]
4. APP prompts “Completed”
How to set static IP
After connecting the device with the mobile phone V380App, click [Settings]-[Device IP] interface setting
requirements in the lower right corner of the device list screen :
1. IP: set according to the gateway itself
2. Subnet mask: 255.255.255.0
3. Gateway : Normally router IP
4, DNS: Generally router IP
Note: After setting the static IP, the device needs to be powered off and restart once to reconnect to the network.
How to connect the device after changing the router connection or modifying WiFi password
· If you did the following operations
a. Replaced the router
b. Modified WiFi username and password
c. Changed the network configuration information
Please restore the wireless camera to the factory default settings and reconfigure the network
How many devices can be added to the device list
→ Theoretically, there is no upper limit for the number of device lists
→ Only one device screen can be previewed at the same time
→ Long-press the device list under local login to manage devices in batches
What if can not add device to the device list
· If the device can’t be added to the device list, or the system prompts “Device already exists” when adding, and the device can’t be found in the device list, please try to uninstall the software and reinstall it to add the device again
Network connection
How to check the network status of camera
· After the device is added to the device list, you can view the camera network status in the device window
1. Connecting: it means that the APP is acquiring the device status, and the current status of the device will be displayed after the acquisition is successful
2. Internet offline: indicates that the device is not connected to the Internet, and the APP cannot connect to the device in this state
3. Internet online: indicates that the device is connected to the Internet, and the APP can connect to the device remotely in this state
4. LAN online: it means that the device and the mobile phone are in the same local area network. In this state, the camera and the mobile phone are connected point-to-point
APP prompts “Device offline” when it connects to the device
LAN offline, Internet offline
1) Please try to restart the camera to confirm that the camera has been started correctly and connected to WiFi
2) Turn off the router AP isolation function
3) Check whether the mobile phone can be connected to the Internet normally, and the APP has obtained the network permission
LAN online, Internet offline
1) Please try to restart the camera and confirm that the camera is already in station mode
2) Check whether the router is connected to the Internet
3) Check whether the router restricts the device from connecting to the Internet
4) Turn off functions such as router firewall, blacklist, mac address binding, etc.
5) If the above methods fail to solve the problem, please contact the technician
What to do if the image always keeps loading
1. Please try to close the APP and open it again
2. Please try to power off and restart the camera once
3. Please do not exceed the router connection range, try to connect the device close to the router
4. Please log in to the router background to check if there is a restricted device connection
What to do if the image freezes when connecting
· Network fluctuation or insufficient mobile phone memory during connection may cause the screen to freeze
1. Please do not exceed the router connection range, try to connect the device close to the router
2. Please try to switch the screen to SD stream preview
Connect Tutorial
What if WiFi can not be connected to the router?
· Please try to configure the network near the router.
· The V380 wireless camera can only connect 2.4G frequency WiFi signal.
· Do not use Chinese characters for the router name.
· Check whether the router has device connection restrictions.
· Some routers may be difficult to configure, AP hot spot mode is recommended for the configuration
How to connect a V380 camera with a network cable
→ camera with network interface may use a network cable connected to the network
no configuration is needed–plug in the cable,the light indicator turns on, device with loudspeaker will speak “connecting” –”connected”, the camera is connected
Note : The network cable connection has priority. When the network cable is connected, other connection methods will be blocked.
How to connect the camera to the router with WiFi smart link?
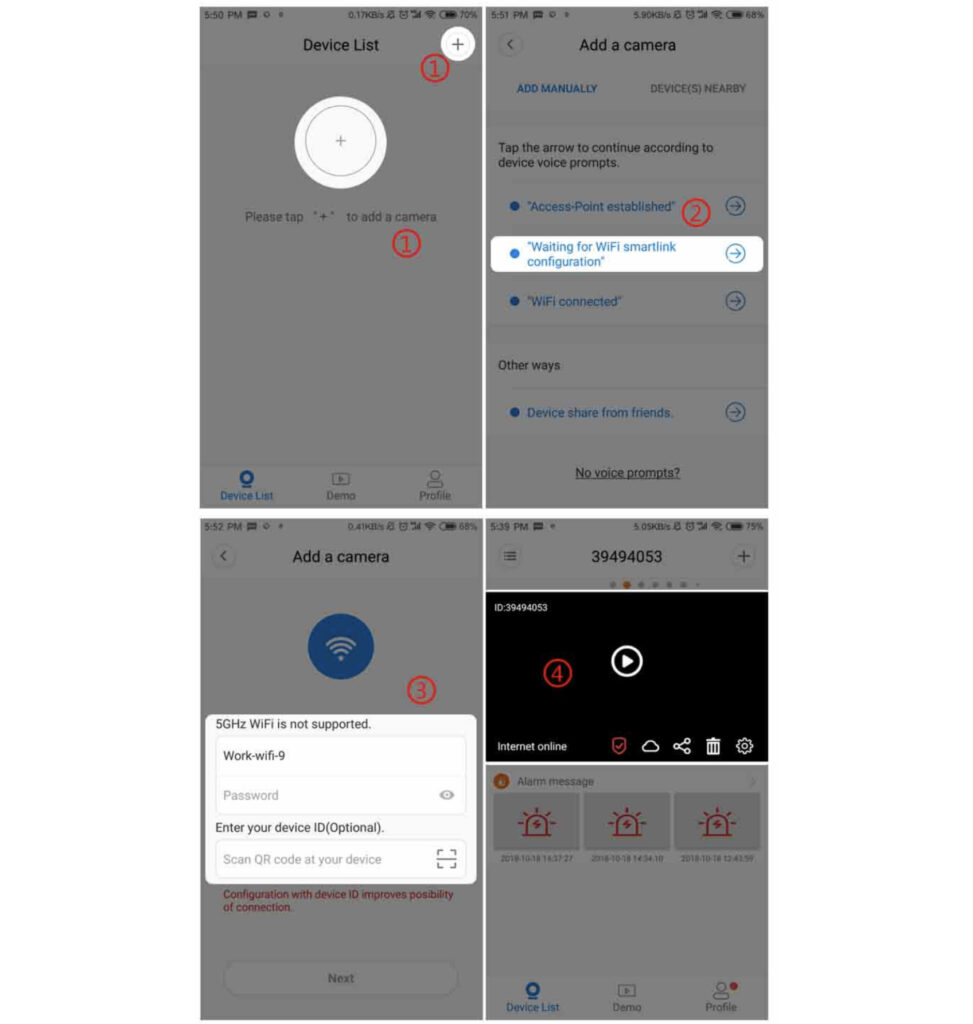
[Click on “+” in the upper right corner] -> [Please use Wi-Fi Smart to connect] -> [Enter the WiFi password] -> [Scan to add the device ID (optional)] -> Click [Next] – > After the connection is successful, the camera voice prompts “WiFi connected”. The device appears in the device list. Click the device to view the image.
How to switch wireless camera connection mode?
A, switch AP hot spot mode to station mode
1, indoor wireless camera:
a) Method one: [Long press the reset reset button of the tail line for about 7s] to restore the device to the factory settings, that is, switch to the station mode.
b) Method 2: When the device is connected to the network, in the lower right corner of the V380App device list screen, set [Setting] – [replace device network] – [switch the device to routing mode and select the route to fill in the password] – [OK].
2, outdoor wireless camera:
(a) Method one: [Long press the reset reset button for about 10s] to restore the device to the factory settings. wait until the tail indicator light which flashed rapidly turns to constant on, Short press the button again,When the tail indicator flashes slowly, the device has been switched to station mode.
(b) Method 2: In the state that the device is connected to the network, in the lower right corner of the V380App device list screen [Settings]-[Change Device Network]-[Switch device to route mode and select route to fill in password]-[OK].
B, switch station mode to AP hot spot mode
1, indoor wireless camera:
a) Method one: [Long press the reset reset button on the tail line for about 7s] to restore the device to factory settings. When the device prompts “waiting for WiFi smart link configuration”, press RESET once to reset the button. The device prompts “access point established, That means the camera is in Hot spot mode already.
b) Method Two: In the state of the device connected to the network, in the lower right corner of the V380App device list screen [settings] – [replace device network] – [switch device to AP mode] – [OK].
2, outdoor wireless camera:
(a) Method one: [Long press the reset reset button for about 10s] . Press the RESET button for 10 seconds to reset the device to the factory settings. The tail light indicator which flashed quickly turned to constant on,it means the camera is in hot spot mode.
(b) Method 2: When the device is connected to the network, in the lower right corner of the V380App device list screen, set [Setting] – [Change Device Network] – [Switch Device to AP Mode] – [OK].
How to use the ap hotspot configuration to connect the camera into the route?
1. Android user: Click [+] in the upper right corner -> [Access-Point established] -> [Select device] -> [Select the route to be connected and enter the route password] -> [Click OK] After successful connection,
The camera will show a prompt “WIFI connection completed”, the device list appears on the device -> [Click on the device to view the image]
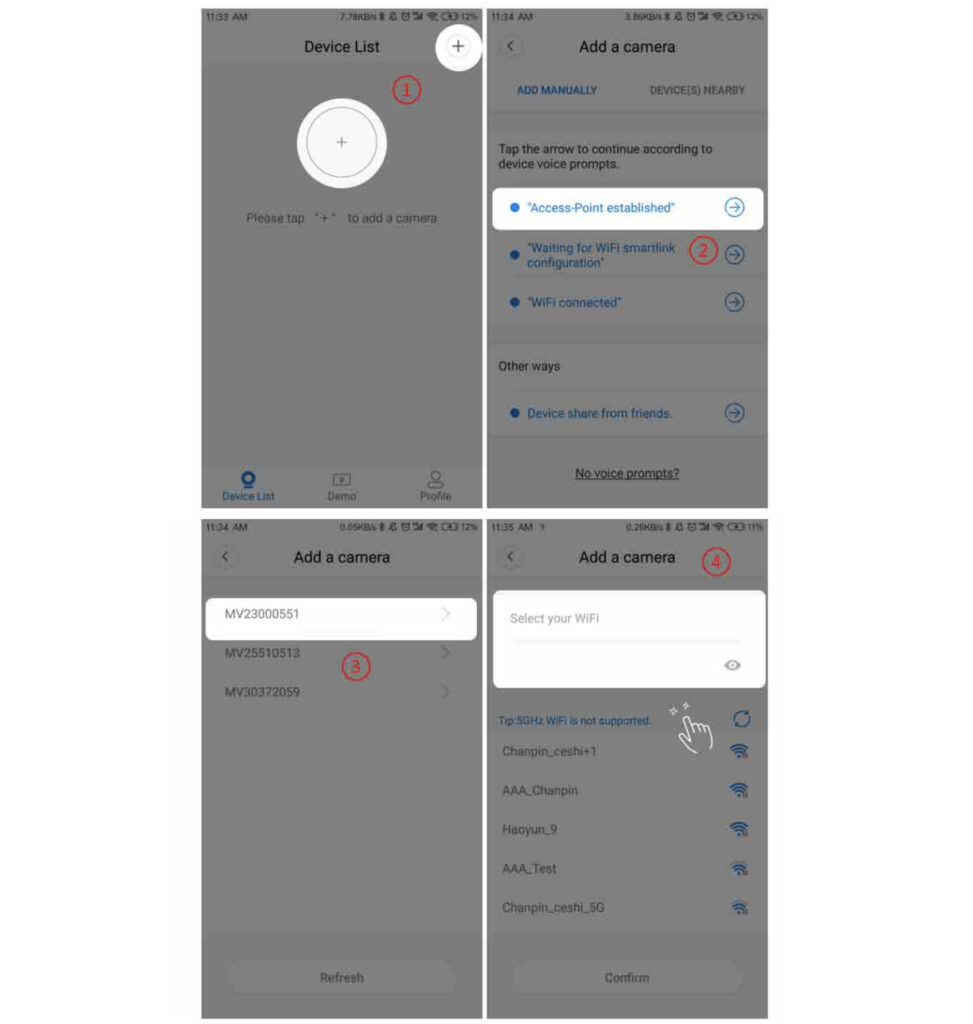
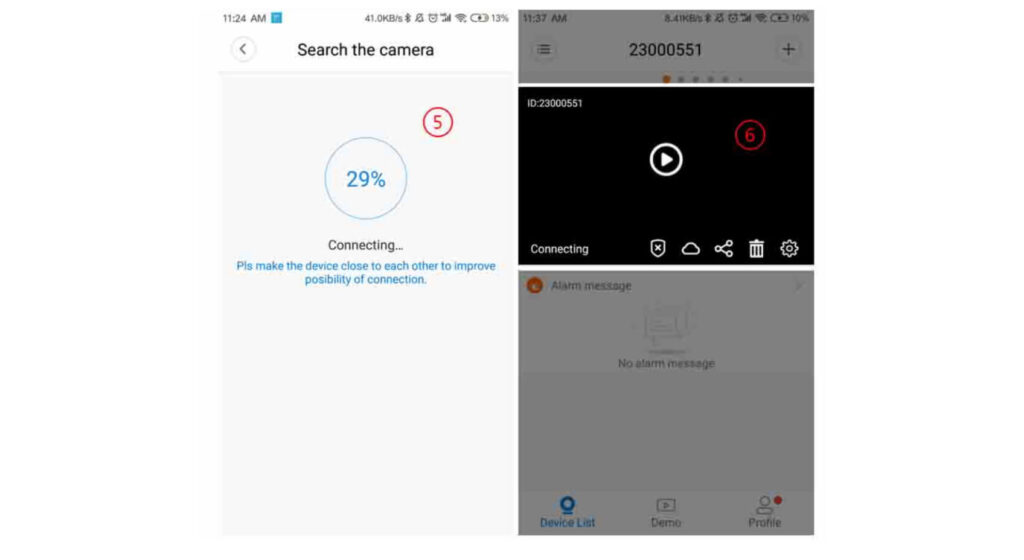
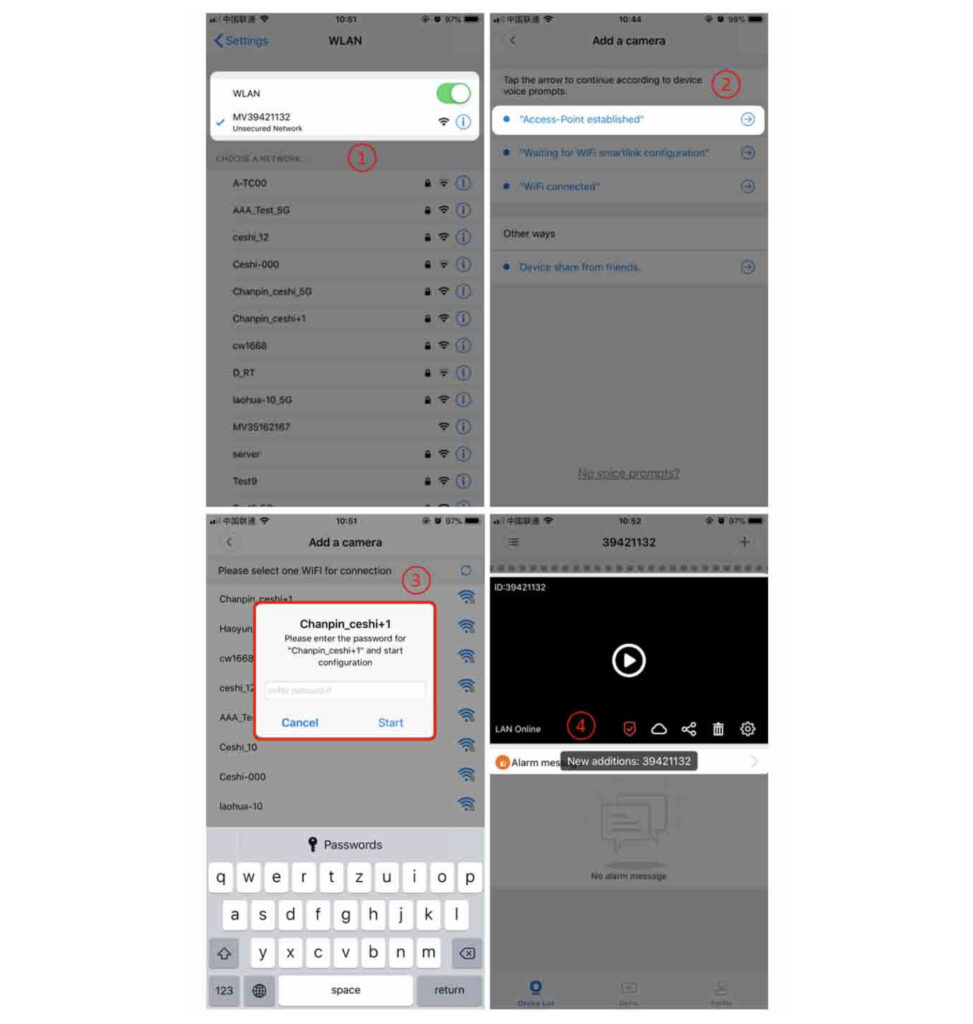
2. Ios user: enter the phone to set the connection [device hotspot (hot spot at the beginning of the MV)] -> [click the “+” in the upper right corner -> [hotspot is established] -> [select the route to connect and enter the route password] – > [Click OK] .
After the connection is successful, the camera will prompt “WIFI connection completed”.
Networking issues
Which protocols are supported by the wireless camera
→ The protocols supported by the V380 wireless camera include: TCP/IP, UDP, RTSP, HTTP, DDNS, DHCP, FTP, NTP, and ONVIF (other protocols are temporarily not supported)
Note:
1. Only Anyka and GM support the ONVIF protocol. Other solutions do not support ONVIF protocol can not connect to NVR
2. Anyka 2505 version, GM 3505 firmware does not open RTSP protocol, if you need to connect NVR please contact the technician to provide upgrade package to open RTSP
Device can not be added to the device list
·If the device can not be added to the device list, or the system prompts “The device already exists” when adding, the device cannot be found in the device list.
Method One: Close the software completely and restart it. Open
Method Two: Uninstall the software and reinstall it.
How far is the hotspot mode connection range?
→ The general connection distance is 10 to 15 meters, depending on the use of a certain deviation, can be further in a open empty space
Can’t see the image after modifying the routing password or changing the router
After changing the routing name, password, or changing the router, the network information has changed and the wireless camera needs to be reset to the factory and reconfigure the network.
How to check the device ID (device number)
→ ID is the 8-digit device number, which can be tagged on the device body, or viewed in the list of software devices.
During the configuration process, the device voice prompt “wifi connected”, but the mobile phone prompts “device connection timeout”
Method one: According to the voice prompt “wifi connected”
→ Click [Next] system automatically searches for devices connected to the same LAN and the new device will show up in the device list, click [Next] if the App can not find any new devices automatically, the page turns to device manual adding page automatically, input or scan device ID [Add], the system jumps to the device list, the newly added device is displayed in the device list first
Method 2: Add LAN (Only if the camera and the mobile phone are connected to the same network)
→ Return to the [Device List] interface
→ pull down the screen to refresh the device list
→ The system automatically searches for the LAN device and then adds the device to be displayed in the device list first
Can not find Hot spots on App or mobile phone
Make sure the camera has started without problems and is in hot spot mode.
1) the device will be in hot spot mode after the camera speaks”access point established”
2) Outdoor all in one devices will right be in hot spot mode after factory reset, the tail indicator light of outdoor all in one devices without Internet port will be on.
• Make sure antenna is well installed if the device has external antenna.
• Make sure the device is not connected with Internet wire,if it is connected with a wire, other ways of connection will be screened.
• Try change phone connection or Upgrade the firmware version of the device
· Contact the seller to have the device repaired if none of the above works
How to add a networked device to your phone
Method one: Manually add
1, open the [device list] interface, click [+] in the upper right corner
2, select [WiFi connection completed] or [other ways]
3, after entering the ID and password [OK add], the system jumps to the device List, the newly added device is displayed in the first place in the device list.
Method 2: Local Area Network Addition (Only if the camera and the mobile phone are connected to the same network)
1. Open the Device List screen, Pull down the screen to refresh the device list.
2. The system automatically searches for the LAN device and automatically adds the device display. In the first place of the device list , successful adding, the preview needs to enter the correct access password (as shown below)
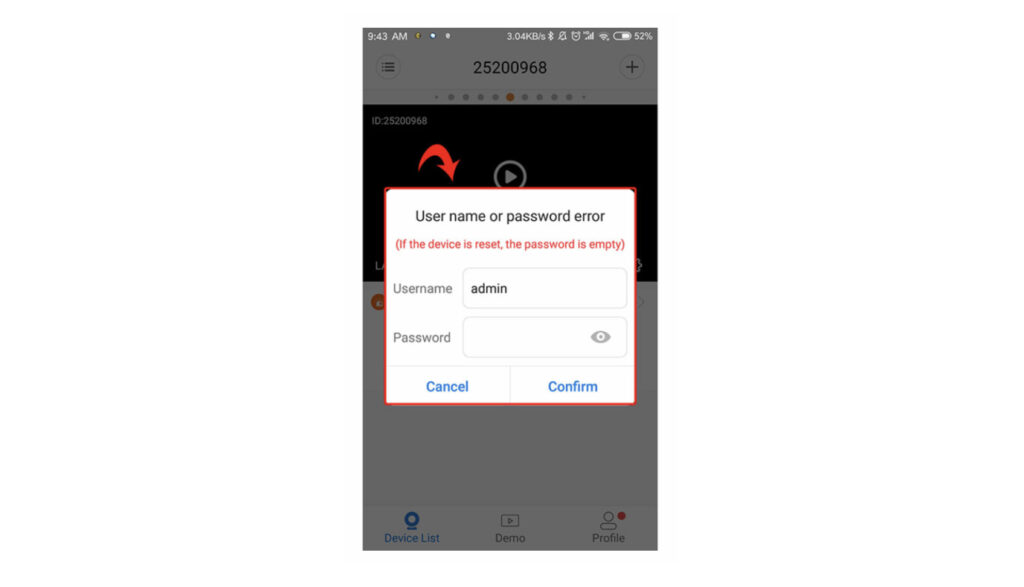
3, the device’s first networked device password is empty, need to set a password
Password setting
When the software is logged in, the system prompts “Incorrect username or password”
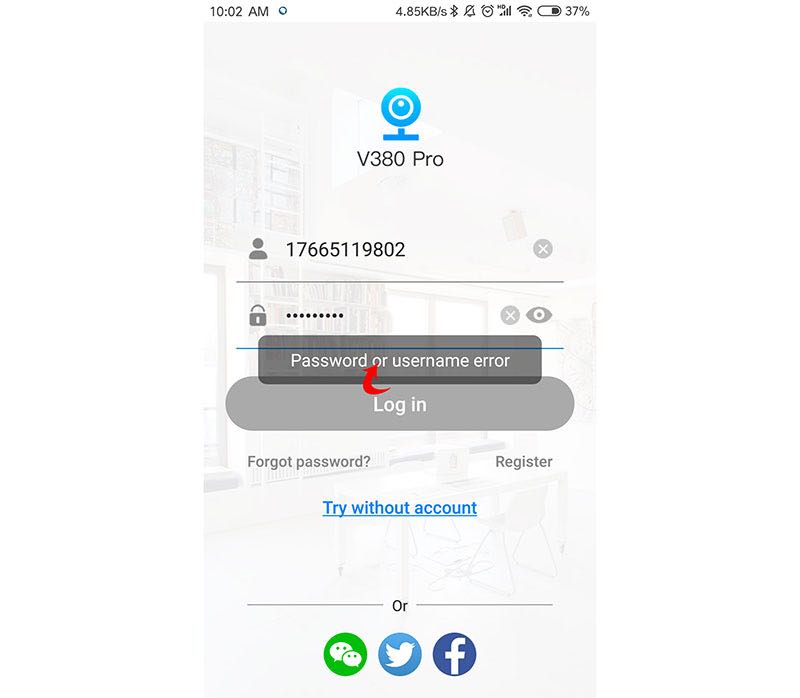
→ Please try to enter the correct user name or password. If you forget the password, click the [Forgot Password] button in the lower left corner of the password box to retrieve the password.
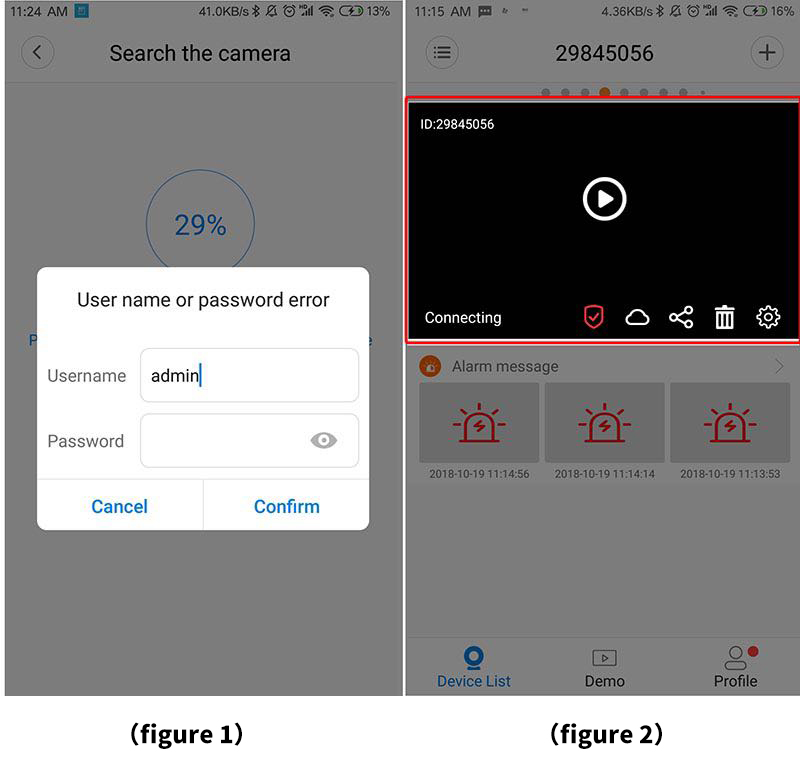
“User name or password is wrong” shows up when the App searches the device after camera speaks “access point established”
1. “user name or password is wrong” shows up when the App searches the device. (Figure 1)
Cause 1: The device has been added to the device list (Figure 2) , you already set a password to it before, and a different password from the existing one is put in
Cause 2: The device list is not added to the device, But you already set a password to it before.
2. When the problem occurs Solution
1: Enter the correct device password in the system box in Figure 1.
Method 2: Remove the device from the device list. , Reconfigure the network after resetting the camera to factory settings
The system prompts “User name or password is wrong” when connecting the camera
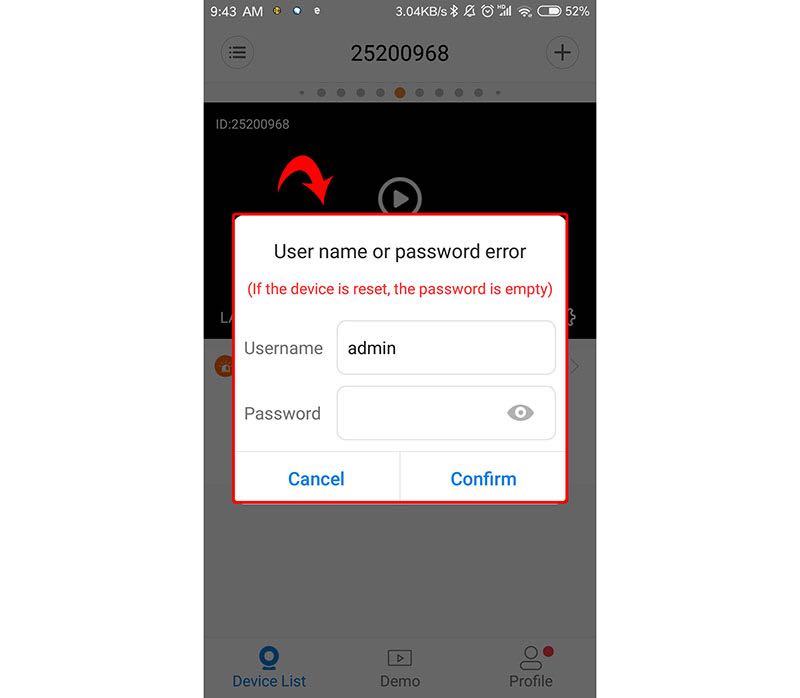
1. When the user name or password is wrong when clicking on the device list preview, it is necessary to fill in the [user’s name] and [access password] of [correct] in this window to connect the wireless camera
2. If the password is empty, set the password, V380 PRO The software must set the password.
3. If you cannot confirm or forget the password, you can delete the device in the device list. Reset the camera to factory settings.Empty the password and reconfigure the network.
How to modify the login password of the V380 account?
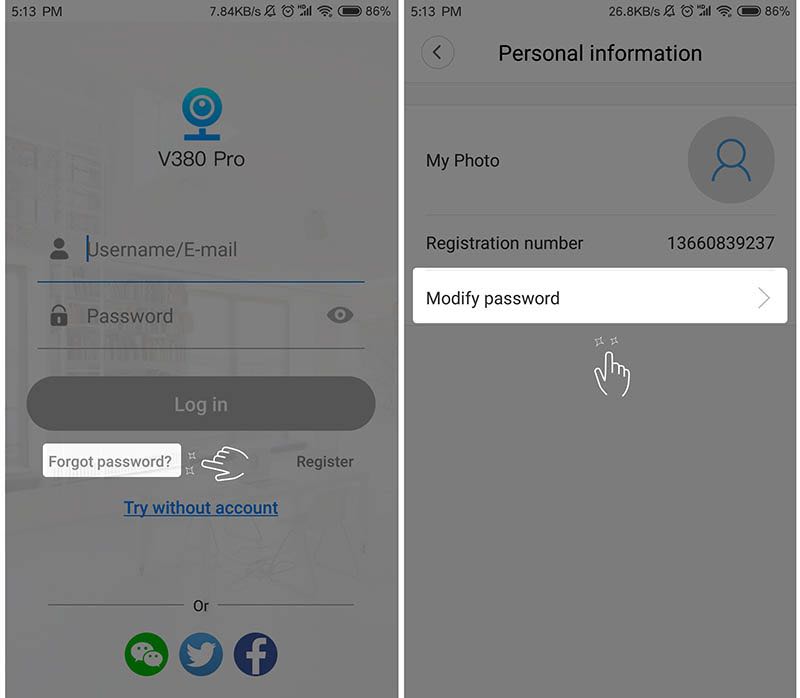
1. After logging in to the V380 account, select [My] and click on the top avatar to enter the [Personal Information] interface and click [Change Password].
2. If you forget the password, you can click the [Forgot Password] button in the lower left corner of the password box on the login screen. Password
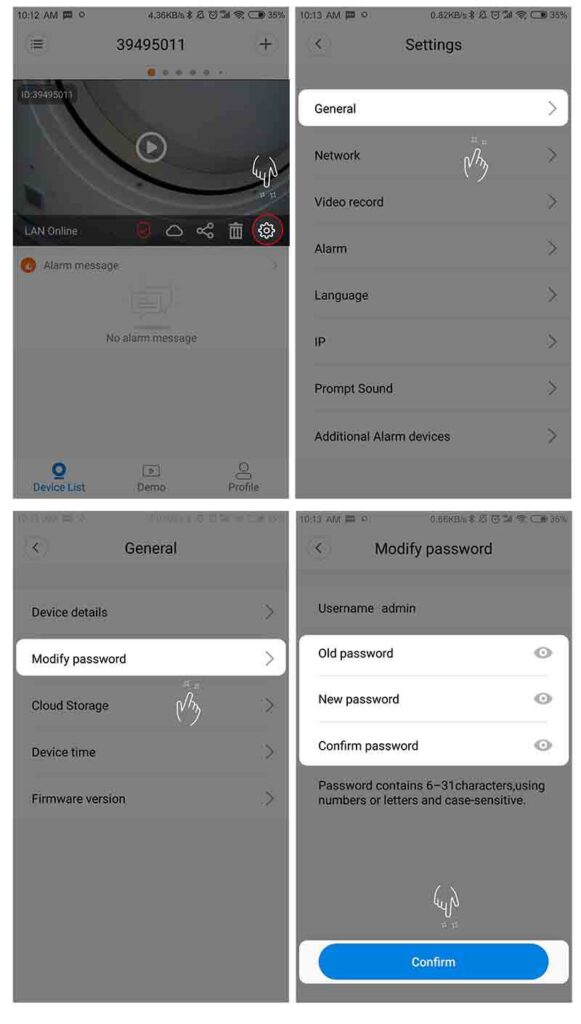
How to set or modify the wireless camera password
1. Click on the device list device settings screen lower-right corner [Settings] -> [Device Information] -> [Change Device Password]
2. Enter the device’s current device password at [Previous Password]
3. If you cannot confirm or forget the password, you can delete the list. Device, restore the factory settings, clear the password, and reconfigure the network
Do you have to set a password for the V380 Network Camera?
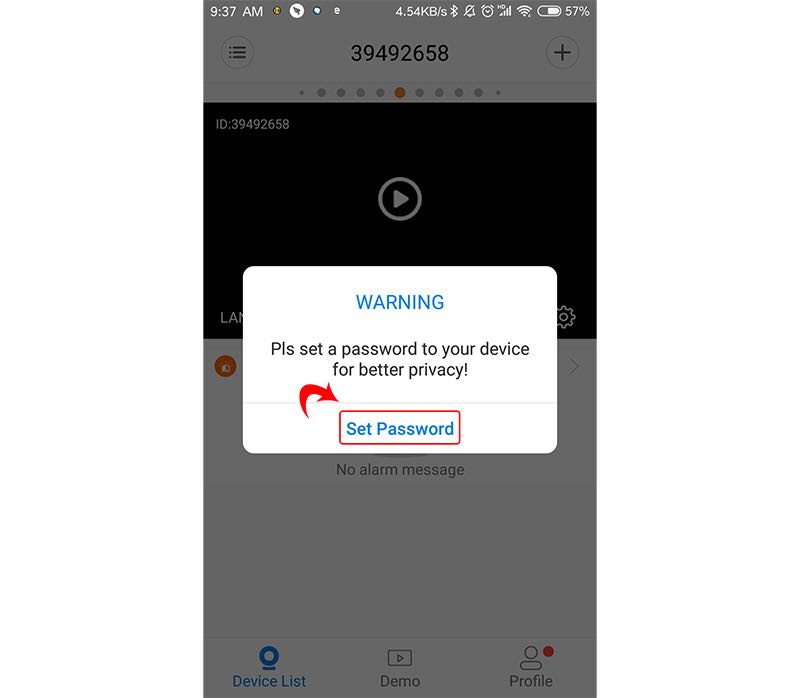
In order to protect customer privacy and improve system security, you must set a password to connect to the device.
When the device password is empty, opening the real-time preview will pop up a security prompt.
Click [Set Password] to set a password for the device (as shown below)
How to set a password to AP Hot spot
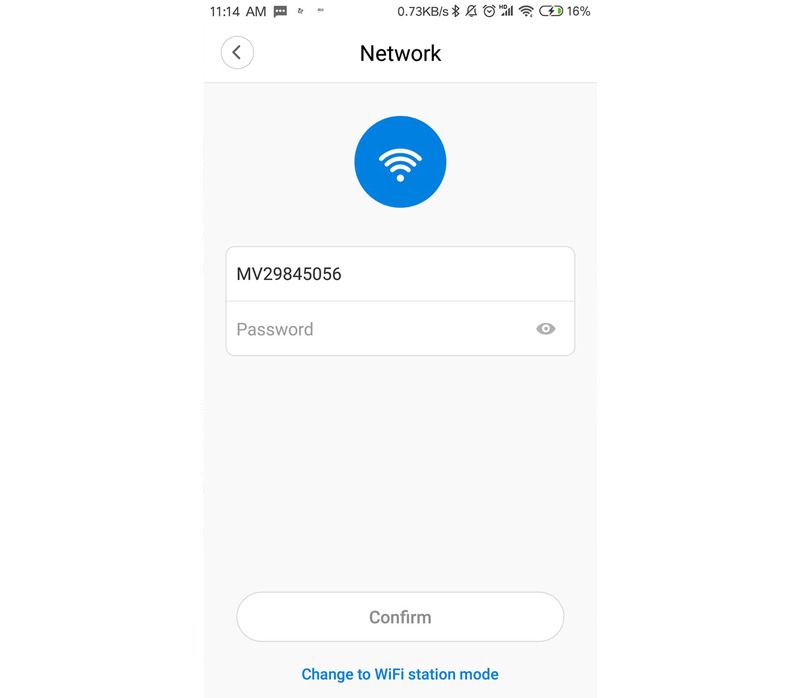
1) After the camera is connected to the camera, you can click the [Settings] button [Replace Device Network] interface to set the hotspot password in the lower right corner of the device list screen.
2) Switch the device to AP mode (hotspot mode). Fill in the hotspot password under the hotspot name. (8 or more letters, symbols, or combination of numbers), click Save when completed
Mobile phone does not receive verification code
1, please try again later to receive
2, please contact technical staff processing
Real-time preview
Image display problem
Huaping or serious color cast
If there are large abnormal color patches,flashing stripes,or blurred screen,generally it’s hardware problems, please contact the seller for repairment
Color mode inversion
You need to modify the device configuration with a test file.
Contact technical personnel to obtain the test file.
Image left and right mirror
On some devices,when the image is inverted ,it appears to be left and right mirror image.
This phenomenon is a hardware feature and cannot be adjusted.
Image is red during the day or dark at night
You need to modify the device configuration with a test file.
Contact technical personnel to obtain the test file.
Unusual or jittery playback screen
1) Attempt to replace the power plug to reconnect with the power cord
2) Upgrade the device firmware version
3) If it is not resolved Contact the seller to return the equipment
Can a wireless camera zoom?
V380 network camera does not have automatic zoom function at present, the mobile phone real-time preview can use digital zoom, that is, use two-finger zoom screen view
Device time does not match current time
· After the wireless camera is connected to the mobile phone, set the time in V380App [Device Configuration] – [Time Setting]
· If the device time changes automatically, please try to upgrade the firmware version of the device
Note:
1) if the device is in AP mode or station mode,but the router has no access to the Internet, it will cause the time to revert to 1970 or 1979.
2) Video time needs to comply with the Internet time, without Internet access, the recording time can not be correctly set, just tap to view real time video, time will be set to comply with Internet time.
3) Time need to be corrected after each reboot of the device
Live preview black screen
· Try restarting the device with power off
· Please upgrade the APP to the latest version
· For network reasons, please use the hotspot mode to connect the device
1) If the hotspot mode can output images, please try to reconfigure the network or change the network connection
2) If the hotspot mode Under the black screen, please try to upgrade the firmware version.
• If the system time in the upper right corner is normal or normal voice intercom is available, but the image is black, it is a hardware problem. Contact the seller to repair the equipment.
The picture has white jitter noise
· Noise is generally caused by overheating of the device or malfunction of the sensor chip.
The noise of the picture frame affects the picture quality and causes the device to alarm frequently.
1) Try to shut down the device for a while and then restart the device.
2) Try to upgrade the device firmware.
3) If the upgrade fails to be resolved, contact Seller repair equipment
Live preview black screen
· Try restarting the device with power off
· Please upgrade the APP to the latest version
· For network reasons, please use the hotspot mode to connect the device
1) If the hotspot mode can output images, please try to reconfigure the network or change the network connection
2) If the hotspot mode Under the black screen, please try to upgrade the firmware version.
• If the system time in the upper right corner is normal or normal voice intercom is available, but the image is black, it is a hardware problem. Contact the seller to repair the equipment.
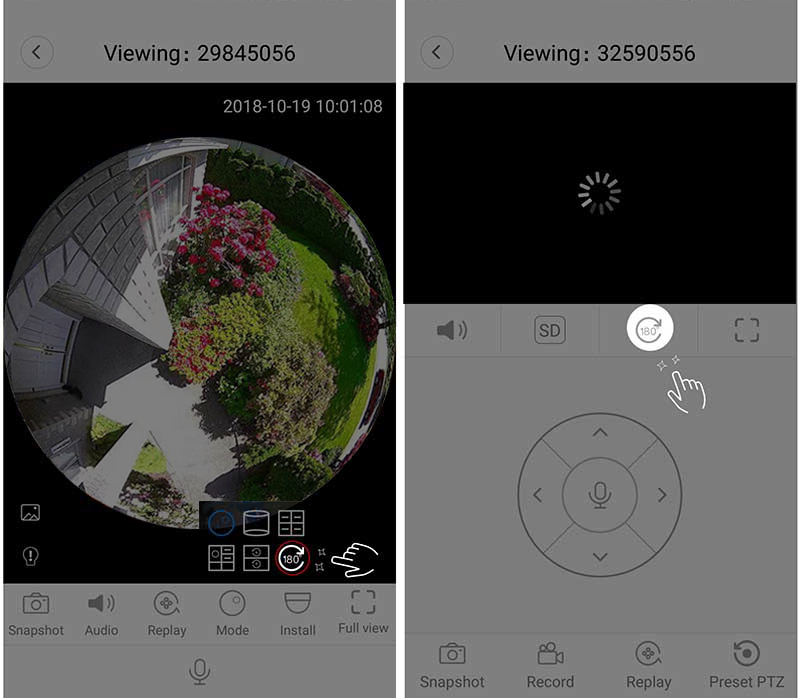
The image flips upside down
Please click [Invert] button in the real-time preview interface to flip the image to normal direction
The preview is blurred and the image is not clear
1) The lens does not focus, you can use the hand to adjust the lens to clear the picture
2) Some equipment Fixed lens can not be screwed Contact the seller to repair equipment
Feature settings
How to use the “voice control platform”
☞ [Apple Phone] Click [Sound Control PTZ] to enable voice control and speak the following commands to the system:
[Left] PTZ Rotates Left
[Right] PTZ Rotates Right
[Up] Device PTZ Rotates Up
[Down] PTZ Rotates Down
[Enlarge] Enlarges the Current Display
• [Zoom Out] Reduces the Current Display
• [Continue] Repeats Last Control Command
• [ Screen Shot] Screenshot Saved to Album
·【Close】Close voice control function
Normal video view at LAN, but“ Internet offline”
1) Check the router is connected to the Internet
2) Check if the router has any restrictions on the device Internet access
3) Please contact technical staff for help
Unable to control PTZ rotation
1) Please try to upgrade the device firmware version
2) If you still cannot turn to hardware after upgrading, you need to contact the seller for repair.
The device has no sound in real-time talkback
· Check if the device can speak when restarting the device
· Upgrade the firmware version of the device · Try to use the hotspot mode to connect, if there is a voice in the hotspot mode, it is generally a network problem
· If it still doesn’t work after trying the above methods,the loudspeaker may be damaged
Real-time preview of mobile phone without sound
· Make sure the phone system sound is turned on
· Upgrade the device firmware version
· Upgrade the App version
· Try to use the hotspot mode to connect, if there is a sound in the preview mode of the hotspot mode, it is generally a network problem
· Still no sound after trying the above may damage the device pickup
Preset position cannot be used
You need to modify the device configuration with a test file.
Contact technical personnel to obtain the test file.
How to use “light control function”
· Single lamp (white light only) and dual light (white light and infrared light) are available for
light bulb products .[Single Light Bulb] screen only have a color mode, and the white light automatically lights up when the environment is dark.
[Dual Light Bulb] Automatic shift between color mode and black-and-white mode according to environment brightness, infrared light turns on in black-and-white mode, white light turns on when alarm is triggered or the light is switched on manually, screen turns to color mode and infrared light turns off automatically
. Bulb can be switched on/off manually or auto switch through“light control function”interface (as shown below)
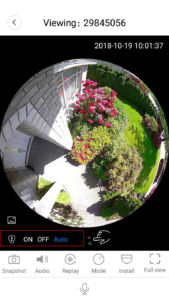
· If the bulb product is turned on, the real-time preview interface does not find the light control switch. Please contact the technician for processing.
Note: The light control function can only be used on the mobile client, the computer client does not support
How to use “image attributes”
There is “Image Properties” function in real-time video in Starlight products
. Click “Image Properties” button to expand [Full Color] [Black and White] [Auto] Three Options
Full Color: Fixed full color view, star light effect under weak light
black and white: Fixed picture is black and white mode
Auto: Image attributes are automatically adjusted by the system
Where live screenshots are saved
Screenshots saved in the phone, can be viewed in the V380 software – [My] – [Album], or in the phone album search saved screenshots
Real-time video problems
Where is the live preview video saved?
The video is saved in the mobile phone, and can be viewed in the V380 software – [My] – [Album], or search saved video files in the local album of the mobile phone
Real-time preview of video without sound
1) Make sure the mobile phone multimedia volume is turned on
2) Confirm that the device is previewed in real time
The system prompts “Cannot play” when opening a video
The video file is corrupted and cannot be played. Try to re-record or reinstall the V380 PRO software version
Do all devices support live preview video?
· Ordinary shaking machine and bolt device support real-time preview video function
· Panorama (180°/360°) device does not support real-time preview video function
What format is the live preview video?
Video saved as mp4 format file
Video problem
Video setting problem
How to set the memory card recording
· Open the V380App and click the [Settings] button in the lower right corner of the device list screen. -> [Device Recording]
1) Only open the automatic recording. The recording time is continuous. The recording file is usually 10 minutes.
2) Only the alarm recording is enabled and the mobile alarm is triggered. Video recording, video recording time is not continuous, recording duration is uncertain, no more than 10 minutes.
3) Simultaneously open automatic recording and alarm recording. Recording time is continuous. Recording duration is indefinite and does not exceed 10 minutes.
4) After the setting is completed, no matter if the equipment is connected to the network, As long as the device is powered on, it will start recording.
Note: When the device is not connected to the Internet, it is necessary to open the real-time preview synchronization device time to ensure that the recording time is normal.
Where is the memory card slot
[Ordinary shaking machine] The slot is next to the power supply
【 Q6 shaking machine 】 The slot is on the side of the head
【 Ordinary panorama 】 The slot is on the side of the camera body
【 Outdoor bolt 】 The slot is in the camera body and needs to be disassembled and removed
【 Panoramic bolt machine] The card slot is at the bottom of the device. Remove the waterproof cover and take it out.
Which Memory Card Does the V380 Camera Use?
· Use TF card (macroSD card), maximum support 64G capacity), format is FAT, no special requirements for brand, read and write speed
The system prompts “The SD card read/write status is abnormal”
1) format the card on computer, then insert back into the camera , and try again
2) try a new card if still doesn’t work
3)if it still doesn’t work, please contact the seller to have it repaired
Notes : The camera supports maximum 64G memory cards (200W and above pixel products support 32G memory cards)
Memory card video file format
1) The video file in the memory card is in AVI format
2) The video file downloaded to the phone is in MP4 format
The system prompts “The device does not have an SD card inserted”
1) The memory card is formatted on a computer, plug it back in to restart the device after the device is still prompt
2) operate normally try to replace the memory card
3) abnormalities may still be prompted for the memory card slot required to contact the seller to repair damaged equipment after changing the card
Notes : The camera supports up to 64G memory cards (200W and above pixel products support 32G memory cards)
Recordings auto coverage when the SD card is full
· If the memory card is full, It will automatically write over previous recordings dated earliest
. If the video is full, it cannot be overwritten automatically. Please format the memory card on the computer and plug it back in to the device.
Device does not record to SD card
1) Check the status of the SD card in the App Settings -> Device Recorder is enabled; check the status of the SD card in the Device Information -> Card Capacity Test
2) please try restart the camera
3) take the SD card out and format it on the computer,then insert it back into the camera and reboot the device
One day’s video file memory size
· According to the scene of the screen
1) 130w_H264 device single-day video file capacity range is between 0.5G~2.5G
2) 200w_H265 device single-day video file capacity range is between 1.0G~3.0G
3) 300w_H265 device single-day video file capacity Range between 3.0G~5.0G
4) 500w_H265 device single-day video file capacity range from 5.0G to 7.0G
Video file is too big
· If the capacity of a single video file is large and 50M, the video file is too large
· There may be too much noise on the screen. (For example, thermal noise may occur when the device is not properly cooled.)
· If the screen shows a lot of noise, make sure the device is cooling properly or try Upgrade the firmware version of the device . If there are still some noises after the upgrade, it may be a hardware problem. Please contact the seller to repair the device.
How to clear memory card video files
Method 1: After the device is connected to the mobile phone, click the [Settings] button in the lower right corner of the device list screen -> [Device Information] -> [Card Capacity Detection] Click [Format Memory Card]
Method 2: Remove the memory card and use the card reader Put the SD card on the computer to view or modify the contents of the SD card
Note: After the SD card is formatted, the video recording cannot be restored. Please exercise caution.
Video playback problem
How to playback video
· Mobile phone video playback
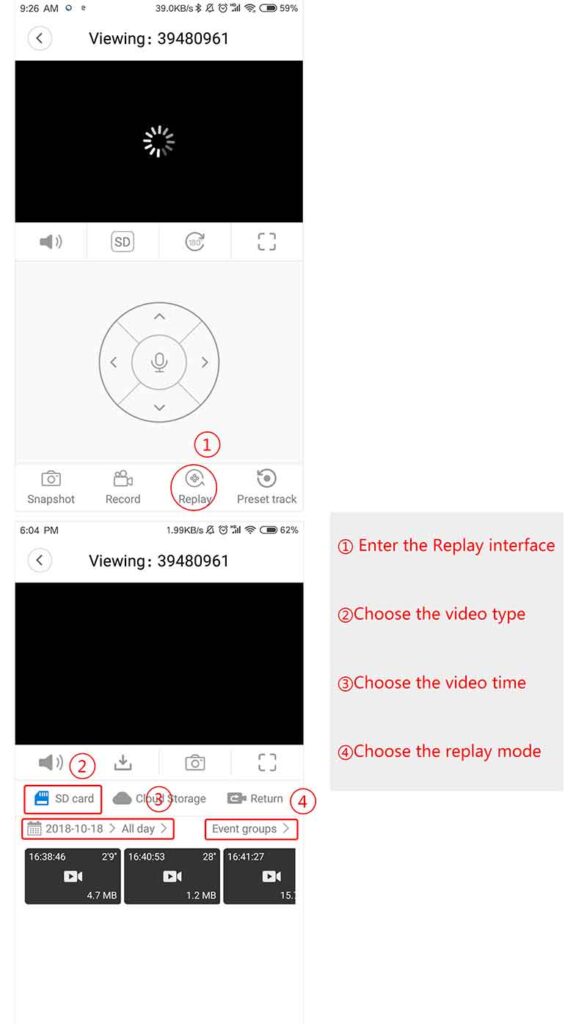
Mobile App can’t find video files
1) Put the SD card on the computer Check If there are any recordings in the card
2) Upgrade the firmware version of the device
3) take the SD card out and format it on the computer,then insert it back into the camera and reboot the device.
Video playback black screen
1) Try connect in Hotspot mode,if video can be viewed normally, there may be network problems,Please check the network to which the device is connected.
2) If the hotspot mode playback also has a black screen phenomenon:
Method 1: Upgrade the device firmware version
Method 2 : take the SD card out and format it on the computer,then insert it back into the camera and reboot the device
3) If not resolved contact technical staff for help
Why is the recording time 1970 or 1979?
1) if the device is in AP mode or station mode,but the router has no access to the Internet, the time will be restored to 1970 or 1979.
2) video time needs to comply with the Internet time, without Internet access, the recording time can not be correctly set, just tap to view real time video, time will be set to comply with Internet time
Note: Time need to be corrected after each reboot of the device
There is no sound in memory card playback
1) Make sure the mobile phone multimedia volume is turned on
2) Confirm that the device’s real-time preview can receive normal audio
3) Click [Setting] button -> [Device Video] interface in the lower right corner of the device list screen to confirm that video audio has been turned on
Can recording replay be controlled
Memory card video playback only supports dragging progress, stop/play, and switch video functions; fast forward, rewind, zoom, and other operations are not supported temporarily
Video Download Issues
“Connecting” or “Connection failed” while downloading video
· Generally a network problem:
1) Try to download the video file again
2) Restart the device after a power failure
3) Try to replace the network connected to the device
Where are the downloaded recordings saved?
The downloaded video is saved in the phone and can be viewed in the V380 software – [My] – [Album] or search saved video files in the phone album
Downloaded video system prompt “Can’t play”
The video file is corrupted and cannot be played. Try to download the video file again
Cloud storage issues
Cloud Service Tutorial
How to buy cloud storage service?
Click [Cloud Storage Service] -> [Buy Service] -> Select a Package to Purchase -> Click [Binding] and the binding is completed.
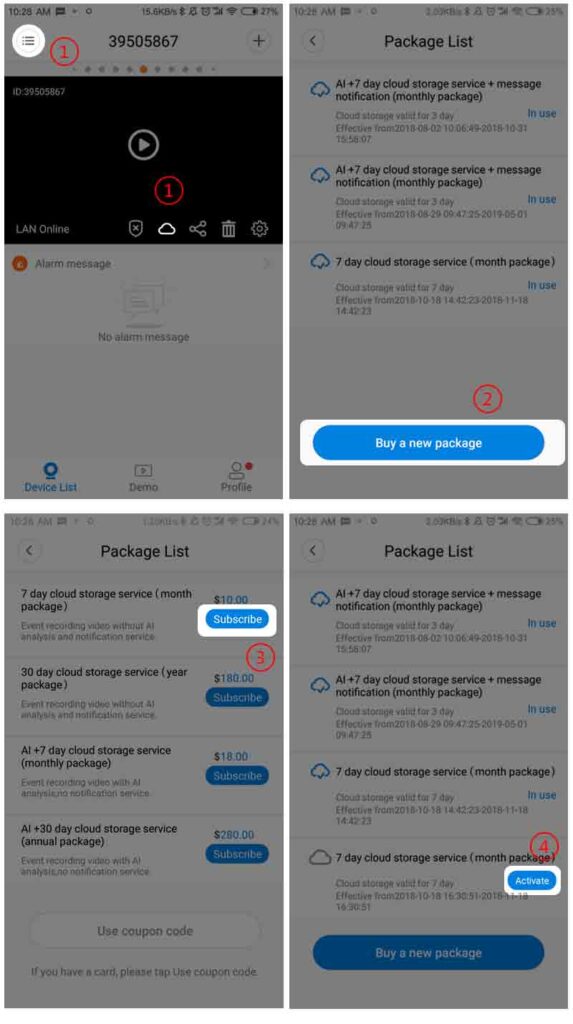
Tips:
Before binding the device to the cloud storage service, pay attention to:
1. Does the current firmware version of the device support this feature?
2. Whether the current account has purchased the cloud storage service package
How to unlock device cloud storage services?
1. Mobile phone number login user: Click [cloud storage service] -> [unzip service] -> [Yes] -> [Get verification code and enter the verification code] -> [Click OK] to finish unbinding.
2. E-mail login user: Click [Cloud Storage Service] -> [Unbundling Service] -> [Yes] -> [Get Verification Code and enter Verification Code] -> [Click OK] to finish unbinding.
Cloud Storage Package Problem
Cloud Storage Package Fees
1)【$2.9/month】Videos are reserved for 7 days. Package service period is one month.
2)【$4.6/month】Videos are reserved for 30 days. Package service period is one month.
3)【$29/year】Video is reserved for 7 days. The package service period is 12 months.
4)【$46/year】The video is reserved for 30 days. The package service period is 12 months.
Note:
1) The use period of the package is calculated from the purchase time of the package. After the package expires, the equipment stops uploading videos,but users can still access the recorded videos during retention period
2) One cloud storage package can only be bound to one device
How to check the valid period of the cloud service
1) Select the device that needs to view the cloud storage package information in the [My Device] list.
2) Click the [] cloud icon in the lower right corner of the device playback window to enter the cloud storage service interface. You can view the cloud service package details of the device.
Note : Package valid period starts from package purchase time
Buy cloud storage package payment
1) Chinese mobile phone system defaults to domestic cloud storage service, supports WeChat payment, and AliPay payment two payment methods
2) Non-Chinese system defaults to foreign cloud storage service, only supports PayPal payment
Cloud storage package replacement and renewal method
【Cloud Storage Package Replacement】
· After getting the new package, you need to untie the old package first, and then bind the device to the new package
【Cloud Storage Package Renewal】
· Click the cloud storage icon in the lower right corner of the device playback window to enter the [Cloud Storage Service] interface
· Select [Renew this service] to renew the package and follow the system prompts (below)
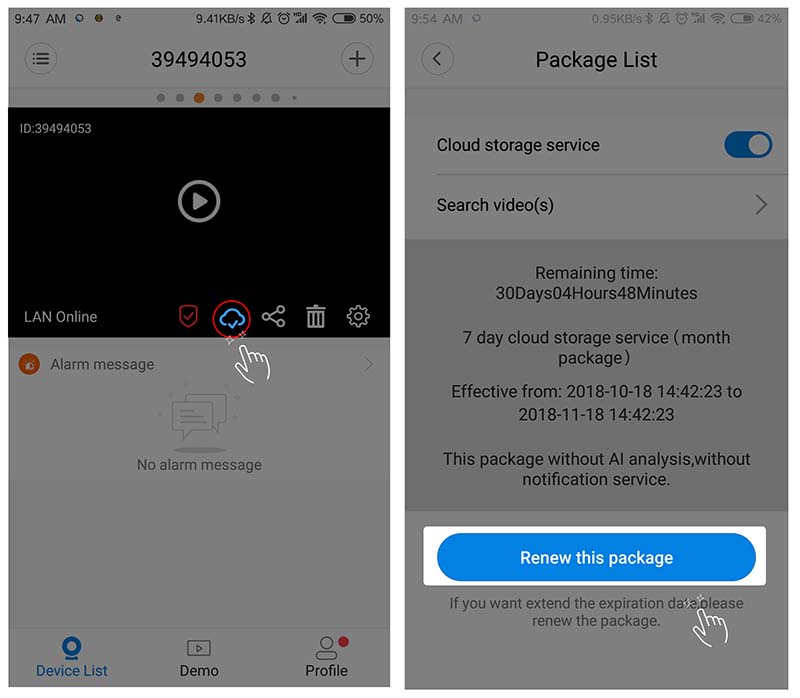
Note: Package renewal can only continue the type of package already bound, and can not be overlaid with other types of packages. If you need to change the package type, please refer to the cloud storage package replacement method.
Buy multiple packages at once, the list shows only one package
· Only one package comes into effect at one single purchase, if you want to buy several same packages,please pay at one time by changing the package quantity, and the valid time will accumulated,if pay you pay them separately,the valid time will still be the same with one package
.If you want to buy several different packages,please pay them separately.
What is “artificial intelligence” and “message notification service”
【Artificial Intelligence】
· After the artificial intelligence package is bound, the alarm mode is artificial intelligence detection. Artificial intelligence is recognized by the deep neural network system. The person in front of the camera will trigger the alarm and greatly reduce the false alarm rate
【message notification service】
· Once the package is bound to camera,when the alarm is triggered,system will send notification message to users,based on login way,SMS(phone account login user),e-mail(e-mail login user) or “my message”on the App(third party login user)
Can overseas users use cloud storage services?
Overseas users already support international cloud storage services
Reminder still expires after the package renews
Try to untie the package and re-bind it
How many devices can be bound to cloud storage package
· One cloud storage package can only be bound to one camera
· Within the package valid period, the bound device to the package can be changed, before linking the package to a new device, you should unbind it with the current device
· One camera can only be bound to one Cloud storage package
· If you want to change for another package,you should untie the current one, then tie a new one.
Note: The cloud storage service can only query the recording files of the current bound device.
Cloud storage video issue
Cloud storage does not have video
1) Confirm that the device is connected to the Internet
2) Attempt to power off and restart the device
3) Unbind the device Cloud storage package Rebinding
4) Confirm [Settings] – [Device Alarm] – Normal setting of alarm area
Why cloud storage video is not continuous
· The working mode of cloud storage is alarm recording. Advanced motion detection is used to trigger recording when there is a movement of the object on the
screen. · The device does not trigger an alarm when the screen is stationary. The cloud storage does not record video.
· Each phase of cloud storage is recorded for more than 10 seconds. Up to 2 minutes, discontinuous in time
Cloud storage video how to download
· Download button on the video playback interface, the downloaded video is saved in [My] – [Album] – [Video]
Cloud storage video how to delete
Cloud storage videos cannot be manually deleted. After the reservation period expires, the system will automatically clear the recording files.
Cloud storage video can control playback
· Cloud storage video support drag progress, stop / play, switch video, zoom and other functions
· Panorama device supports playback using panoramic mode window
Can I still view videos after expired/unlocked cloud storage packages?
After the cloud storage package expires, the video file will no longer be uploaded.
You can still view the videos within retention period if you haven’t disconnect the storage package, once you disconnect it,the server will delete recordings in hours,will not be able to view anymore
Alarm problem
How to turn on/off the alarm function
Method One: Click the [Device List] device playback screen [ Arbitration /Disarming] button, tick to open Arming (Figure 1)
Method Two: Click [Settings]->[Device in the lower right corner of the screen Alarm】 【open/close interface】 【disarm switch, blue open (Figure 2)
Mobile App Fails to Receive Alarm Screenshots
1) On the [Settings] – [Device Alarms] screen, confirm that the device is armed
2) Make sure the arming time and arming zones are set correctly
3) Make sure the device is connected to the phone and can be previewed in real time
4) Try to close the software completely and reopen it
5) Trying to upgrade the device firmware version or restart the device
Mobile phone does not receive alarm information push
1) Confirm that the mobile phone can receive the alarm picture
2) In [My] – [Settings] – [New message push] to confirm the push function has been opened
3) Confirm the mobile phone has opened the software’s push notification authority
4) Try to uninstall the software Loading
note: Due to system reasons, some mobile phones are not compatible with push service and therefore cannot receive alarm information. If you are inconvenienced, please understand.
Alarm picture cannot be opened
1) There is a network fluctuation, please try to refresh and reload
2) Please try again later to open the picture
How to delete the alarm screenshot
The alarm picture is stored in the cloud and cannot be manually deleted. The system will clear the alarm picture periodically (a week or so).
The old alarm picture will be deleted on its own
How to turn on or off the wireless camera alarm tone
After the mobile phone is connected to the device, click [Settings]-[Device Alarm] in the lower right corner of the V380App device list screen to turn on or off the [Alarm Alert] switch
Why do devices alarm frequently?
1) The device moves or the screen shift will cause an alarm
2) The screen mode switching or light changes will cause an alarm
3) Too much noise in the screen may also cause an alarm
4) Try to restart the device or upgrade the device firmware version
Does the wireless camera support external alarm equipment?
Some wireless cameras with 433 functions can be connected to external alarm devices supporting 433 protocol, please confirm with the seller before buying
433 alarm connection instructions
1) After the mobile phone is connected to the device, click [Settings] – [Alarm Settings] in the lower right corner of the device list screen, click [Zone Settings] to enter the linkage device add interface
2) Click the right plus sign to enter the configuration interface, and at the same time open the Configure the linkage device (such as: access control, smoke sensor, etc.) and trigger the alarm.
3) After the alarm is triggered, the device can automatically search for your linkage device. when the research ends and the device shows up, click the configuration button, set the name and alarm parameter to add the device.
4) Enter the PTZ page of the camera which has been connected to linkage device,set preset position on the top right corner and apply, then save
Note:
1) Only 433 protocol supported linkage device works
2) Set the rate to 1~~2K if you are using oscillating resistance adjustable linkage products before configuration.
3) Some products use 9V square batteries,so please prepare if necessary
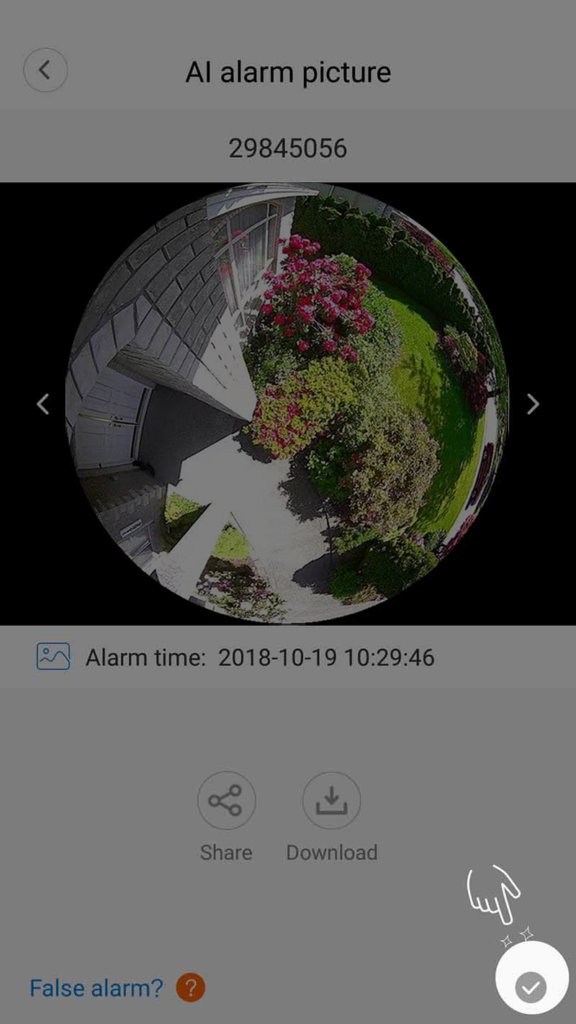
AI false positives
Artificial intelligence alarm identifys human shape in the picture by deep neural network algorithm, there may be possible false alarm. Reporting false alarm pictures can help us to optimize the system and reduce false alarms
Tick the lower right Corner, and go back to previous page,false alarm image will be reported.
NVR problem
Does the V380 camera support network video recorders?
· GM and anyka V380 products support connection to network video recorders (NVR)
· Other solutions products do not support access to network video recorders (NVR)
· 200W and above resolution products do not support access to network video recorders (NVR) temporarily.
· If the device The firmware version is anyka 2505, GM 3505, etc. or above. RTSP is not enabled by default and cannot transmit images. Please contact technical personnel to obtain upgrade packages.
What video recorder can connect V380 camera?
The V380 camera can be connected to mainstream video recorders from HIKVISION ,dahua, Techwell, etc.
Note: The NVR must support the standard Onvif_2.0 protocol.
In what way can a V380 camera be connected to video recorder
· The V380 camera can be connected to the VCR via cable (with network port) or wirelessly.
· If to be connected to router, the camera and video recorder should be connected to the router of same gateway,if to be connected to switch, an IP address is needed to be assigned to camera.
Network video recorder (NVR) connection method
· Connect the camera and NVR to the LAN and add the device through automatic search.
· If the NVR does not find the device IP, please confirm that the network cable is connected and the camera is the same as the NVR gateway
Note: The onvif protocol is selected for the network protocol, and the port 8899 is selected for the network port.
NVR found device IP but failed to connect
· If the device firmware version is 2505,3505 or later, RTST is not enabled by default and cannot transfer images. Please contact technical personnel to obtain upgrade package upgrades
. Try to fill in the video stream path directly (0.0.0.0 is the device IP address, which needs to be manually filled in)
[Sub Stream]rtsp://0.0.0.0/live/ch00_0
[Master stream]rtsp://0.0.0.0/live/ch00_1
Network recorder (NVR) manual connection method
· If the recorder cannot automatically search for connections, please use the manual connection method
1) Set a static IP address for the device
2) Open the NVR Manually add a device interface
3) Fill in the connection parameters
. Device IP: Fill in the device’s static IP
. Connection Protocol: ONVIF
Port: 8899
Image format: H.264
Connection method: TCP
Video source path: /live/ch00_1
User name: admin
Password: Empty
other questions
How to check the device firmware version
· After the camera is connected to the mobile phone, check [System Software Version] on the V380App-[Device Configuration]-[Device Upgrade] screen.
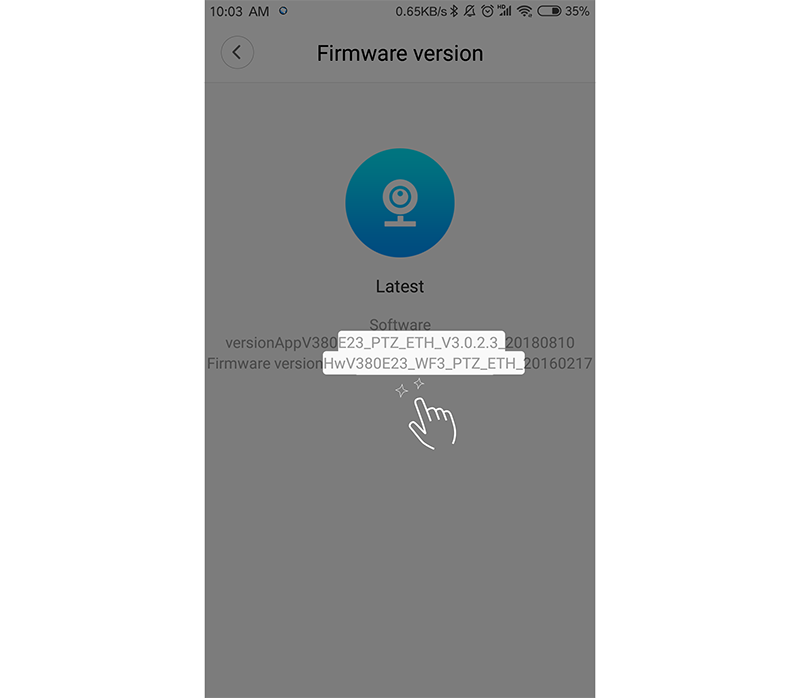
How to upgrade the device firmware version
· Method 1: After the camera is connected to the mobile phone, click the [Settings] button in the lower right corner of the V380App device list screen – enter the [Device Information] screen – click [Firmware Update Detection], click the blue button to start the upgrade after searching for the upgrade file
. Method 2 : If the device cannot be upgraded online, contact technical personnel to obtain the upgrade package.
POE power supply problem
The device itself does not reserve this function. This function can be implemented through an external transfer splitter.
Note: You cannot directly wire from the network port to the power connector on the circuit board. This can result in insufficient system voltage.
How to add a networked device to your phone
Method one: Manually add
1, open the [device list] interface, click [+] in the upper right corner
2, select [WiFi connection completed] or [other ways]
3, after entering the ID and password [OK add], the system jumps to the device List, the newly added device is displayed in the first place in the device list.
Method 2: Local Area Network Addition (Only if the camera and the mobile phone are connected to the same network)
1. Open the Device List screen, Pull down the screen to refresh the device list.
2. The system automatically searches for the LAN device and automatically adds the device display. In the first place of the device list
, successful adding, the preview needs to enter the correct access password (as shown below)
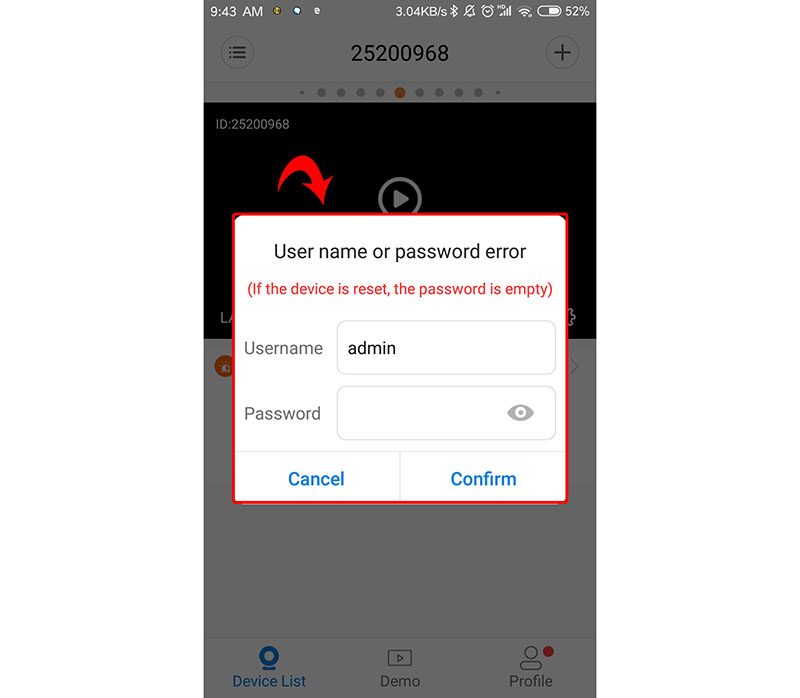
4, the device’s first networked device password is empty, need to set a password
Can a V380 account login on several different devices at the same time?
· V380 account can not login on different devices at the same time, if you login on a second device, the account on the first device will be forced out
. If you want to view on different devices,please use different accounts or use“local login”.
V380 camera resolution
· 1MP products (720P_normal): 1080×720
· 1.3MP products (960P_normal): 1280×960
· 1.3MP products (960P_pano): 960×960
· 2MP products (1080P_normal): 1920×1080
· 2MP products (1080P_normal): 1080×1080
· 3MP products (1536P_pano): 1536×1536
· SD sub-stream (VGA): 640×480
Camera speaks”abnormal WiFi module”
· The network connection is abnormal. Try to restart the device or restore the factory settings.Reconfigure the network.
Does the V380 camera have to be connected to external power?
The V380 product has no built-in battery and cannot be charged. It must be connected to an external power supply to supply power to the system.
Note: Please use a power supply that has a stable voltage and meets the safety standards to supply power to the device. Failure to do so may result in the device failing to start up or functioning abnormally.
Does the V380 PRO software support third-party login?
· V380 PRO software supports V380 account and login to software through a third party
· You can enjoy cloud synchronization, cloud storage and other services through the login software
