P6SLite EasyVMS Installation Guide, Support cloud device addition and management,Provide streaming media storage and playback functions, monitor the playback connection status, and provide relevant status notifications,The system is more streamlined, more convenient to operate, green and ad-free
P6SLite For Pc software name is EasyVMS, you can download the software here, support Windows PC.
P6SLite For Pc Function
- Support cloud device addition and management
- Support APP account login and registration
- The system is more streamlined, more convenient to operate, green and ad-free
- Realize centralized user management, fault management, system maintenance and TOPO navigation
- Provide streaming media to distribution function
- Provide streaming media storage and playback functions, monitor the playback connection status, and provide relevant status notifications
- Maximum performance of the software
- Maximum number of device logins: 64pcs real-time preview channels: 36 channels
- Maximum number of access channels 256 channels Number of remote playback channels 1 channel
- Maximum number of search devices: 256pcs Remote recording query channels: 1 channel
- Maximum number of local users 16 Number of local playback channels 1 channel
- Maximum number of cloud accounts 1 Number of local recording query channels 1 channel
System operating environment
Operating system: Microsoft Windows 7, 8.1, 10 compatible with some XP systems
CPU: Intel AMD 32-bit or 64-bit
Memory: 2G or higher
Note: Due to the different operating systems and hardware of the PC platform, the smoothness and functionality of the software are affected to varying degrees
P6SLite EasyVMS Installation Guide
Read Next :
- AVTECH CMS LITE Installation Guide
- VIGI Security Manager Setup Guide
- Gamut Surveillance Client Guide
Install and login to P6SLite For Pc
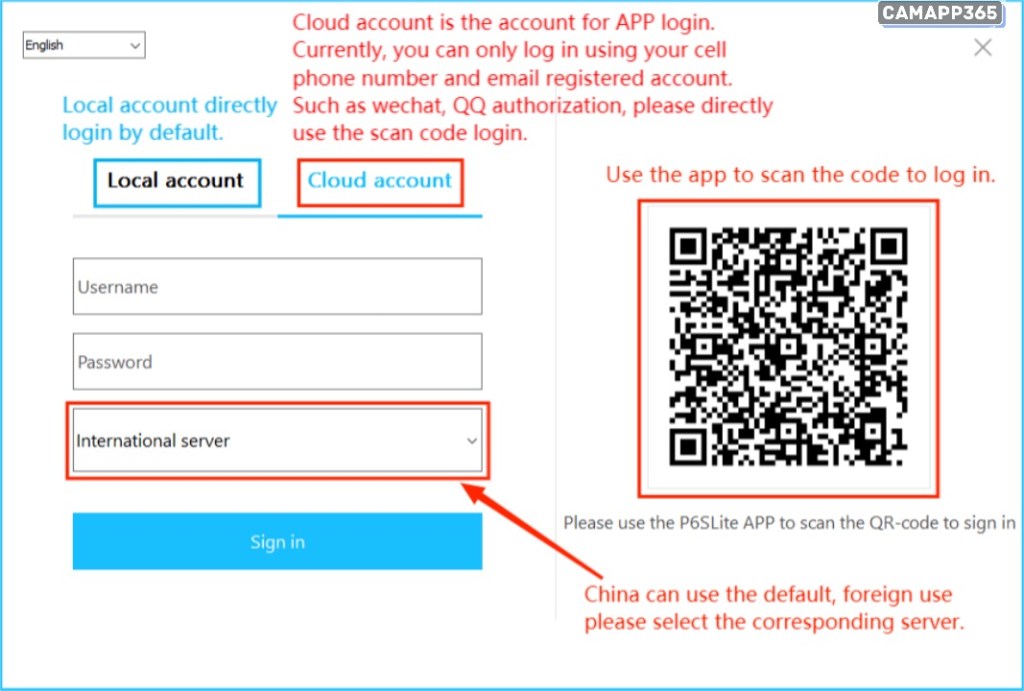
Find the file  in the software directory, double-click the EasyVMS installation file to install the client software, and the login dialog box will pop up, as shown below. The current page will be adapted according to the full Chinese and English systems.
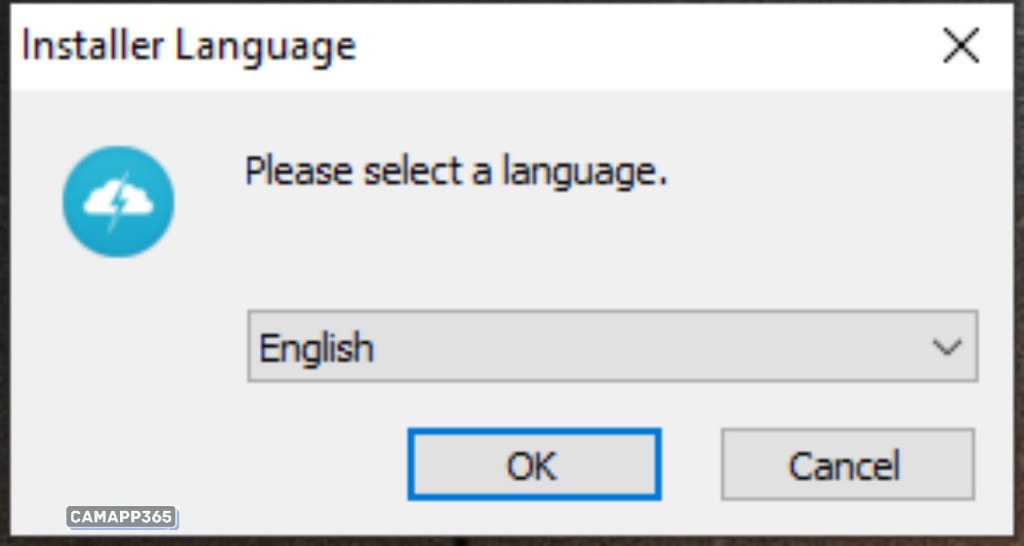
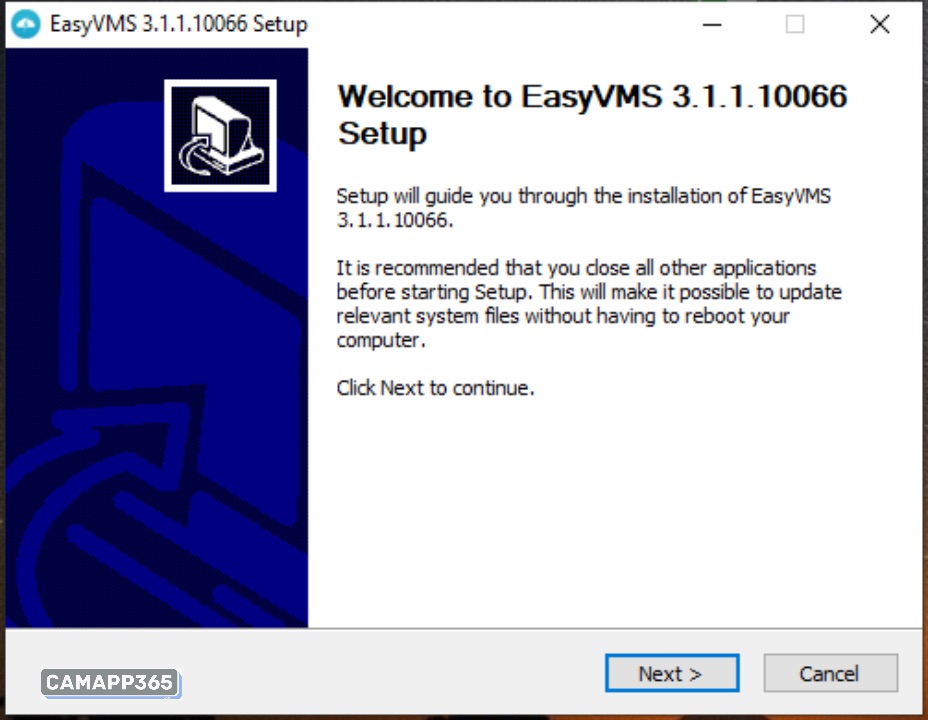
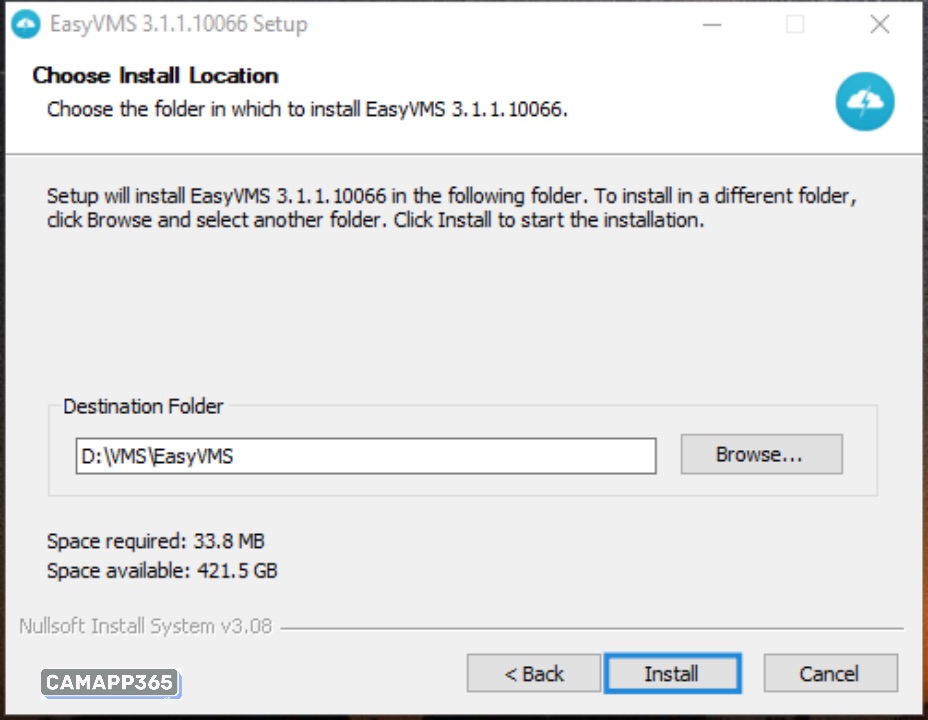
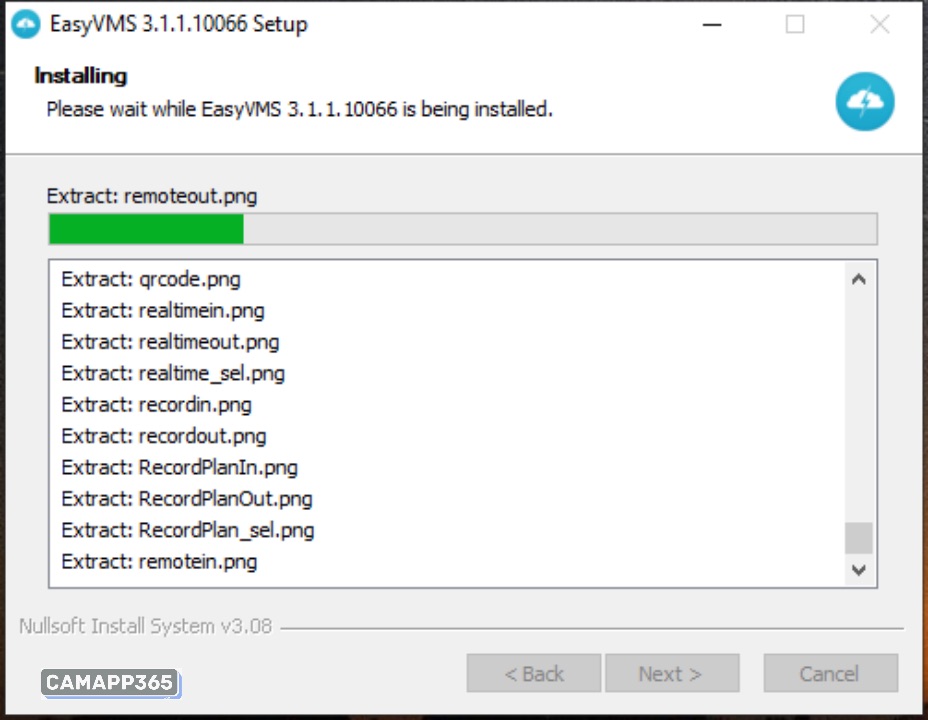
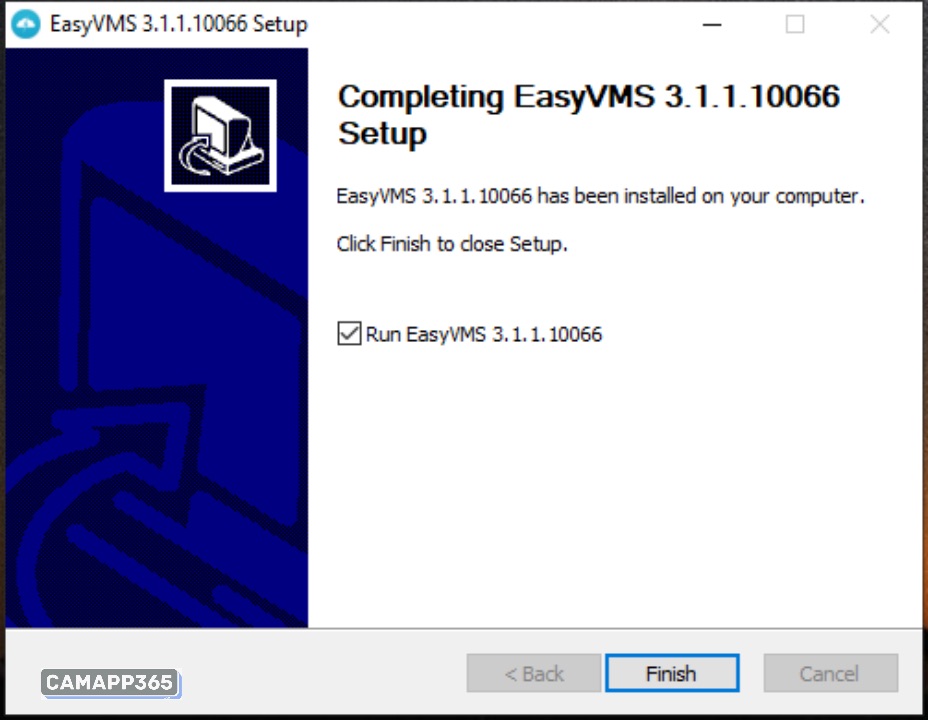
Then click Run EasyVMS software  and choose the language that suits you to log in to the system;
Local login user name default: admin, password default: empty; After logging in, select the software in the upper right corner  to log out of the software;
Cloud account login, please enter APP P6SLite account, currently supports scanning code login and manual account input (manual input requires attention to the choice of server)
Interface Introduction
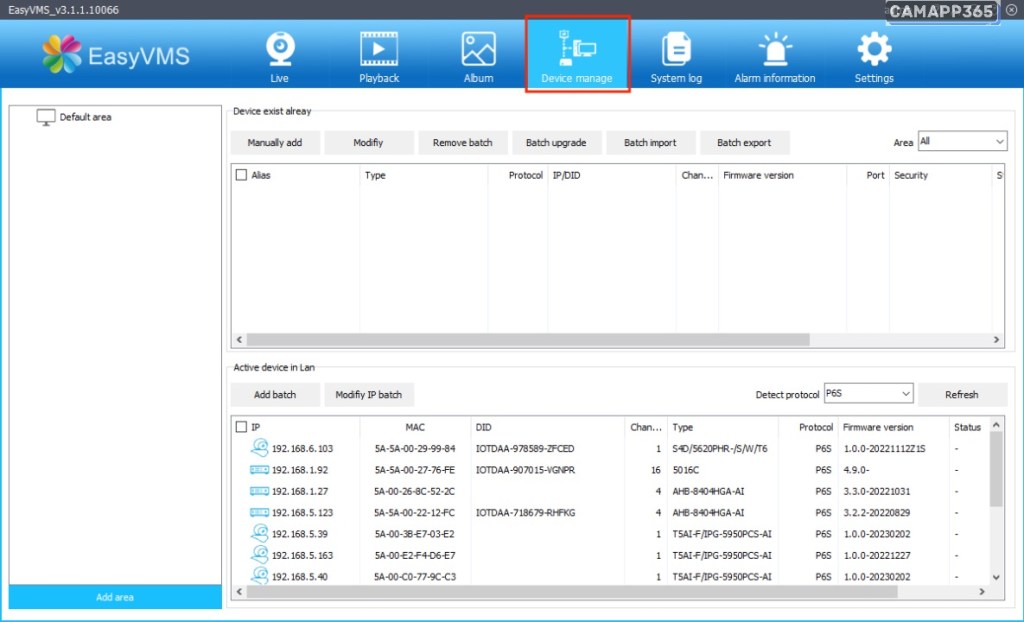
The main navigation buttons at the top of the interface are real-time preview, remote playback, electronic album, device management, system log, alarm information, plan recording, system settings, click the navigation button to enter the corresponding configuration interface. On the left side of the interface is the device navigation, on the right is the display area, and in the upper right corner are the help, logout, minimize, maximize, and close buttons. Start with device management and add devices.
Device Management
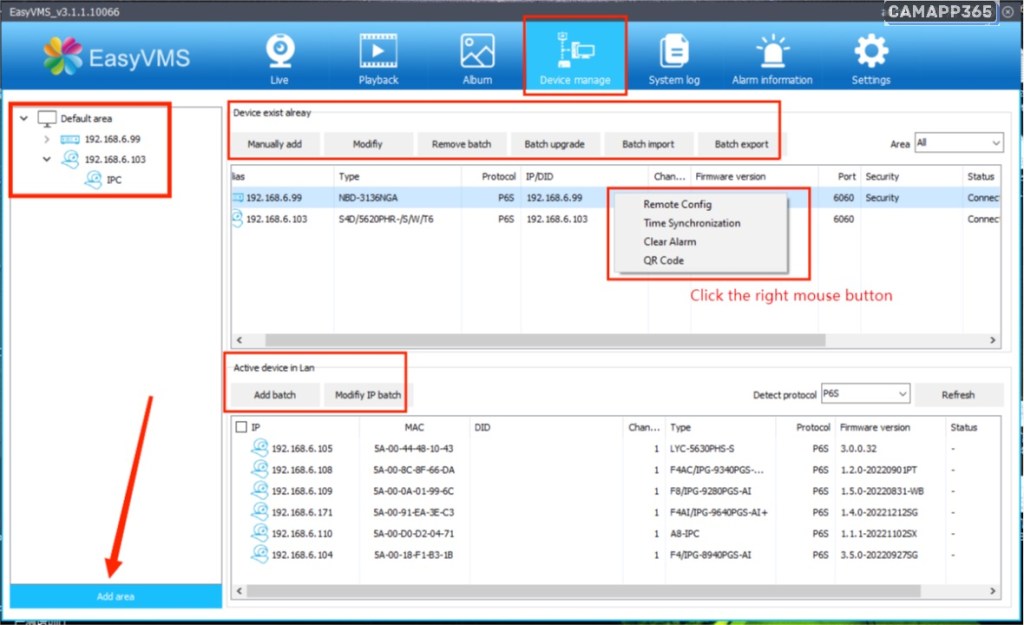
Click the Device Management button to enter the Device Management page, as shown in the following figure; On the device management page, you can perform manual adding, modifying, batch deleting, batch upgrading, APP cloud account management, region adding, as well as batch adding, batch modifying IP, and successfully added devices, right-click remote settings, time synchronization, clear alarms, display QR codes and other functions.
Zone configuration
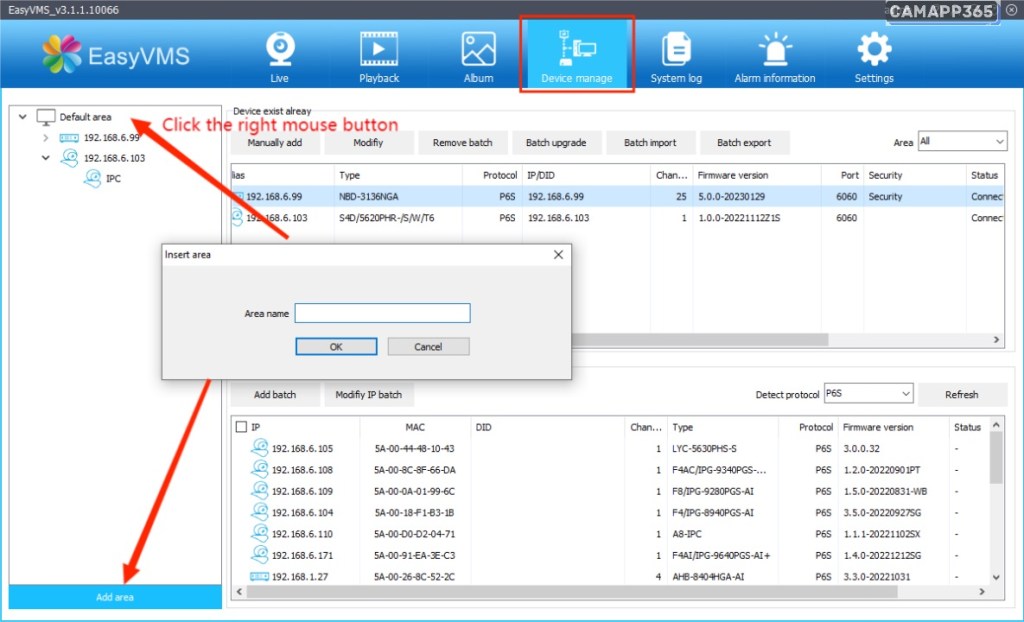
For easy zone device management (the default zone is preferred when added by camera), you can right-click the default zone to customize the new zone, or click Add Zone below.
ADD P6SLite Camera
Click the refresh button in the lower right corner to search for the P6SLite camera
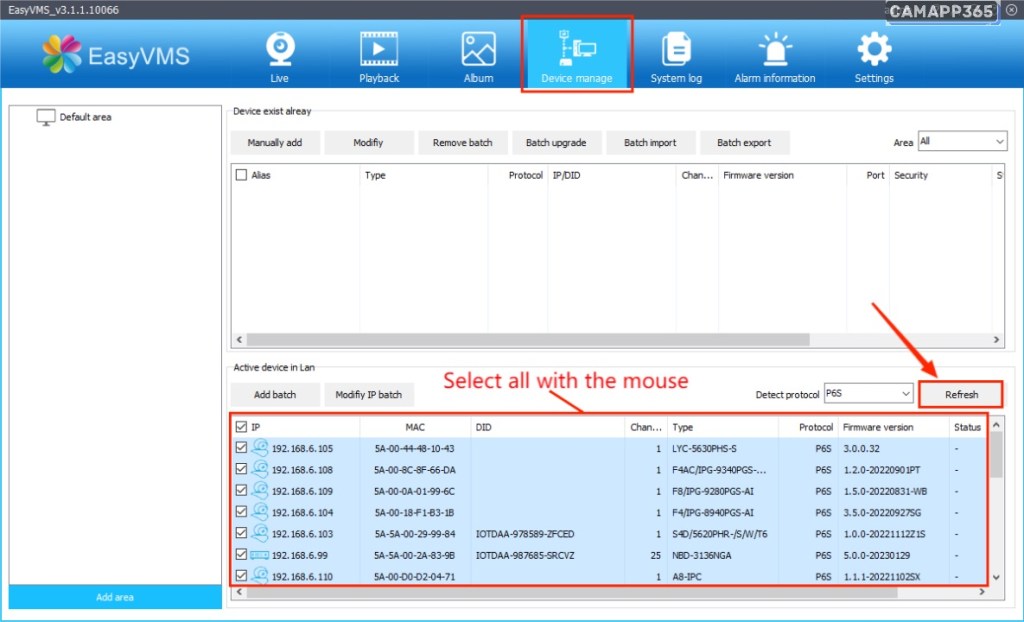
Select the IP address of the camera, then click “Batch Change IP” to modify the IP address of the camera.
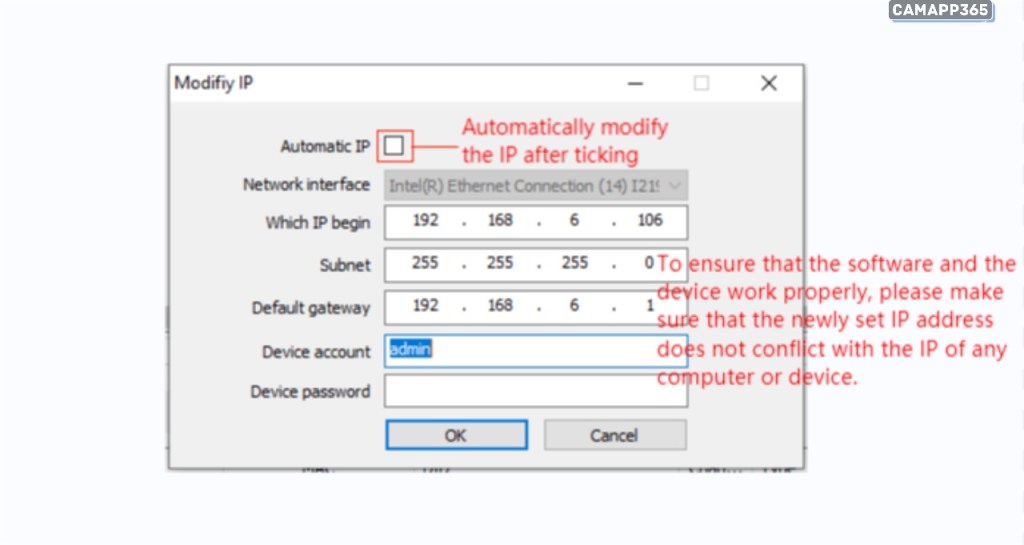
If you don’t know how to modify the IP address, please check the “Refer to the computer network card to set the IP” software will automatically modify the IP address according to your network environment, of course, you can also manually modify the IP address.
The default user name of the device: admin, password: empty, click Confirm, save the modified IP address, and then click the refresh button again, search for the new IP address again, and then select the IP address and click Add in bulk.
See also How To SetUp P6SLite Camera (Complete Manual )
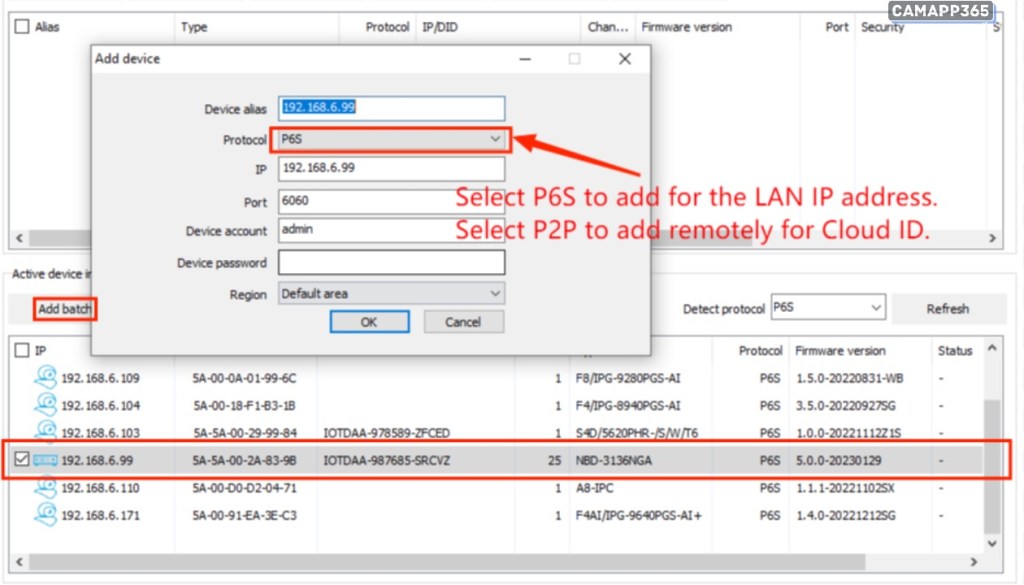
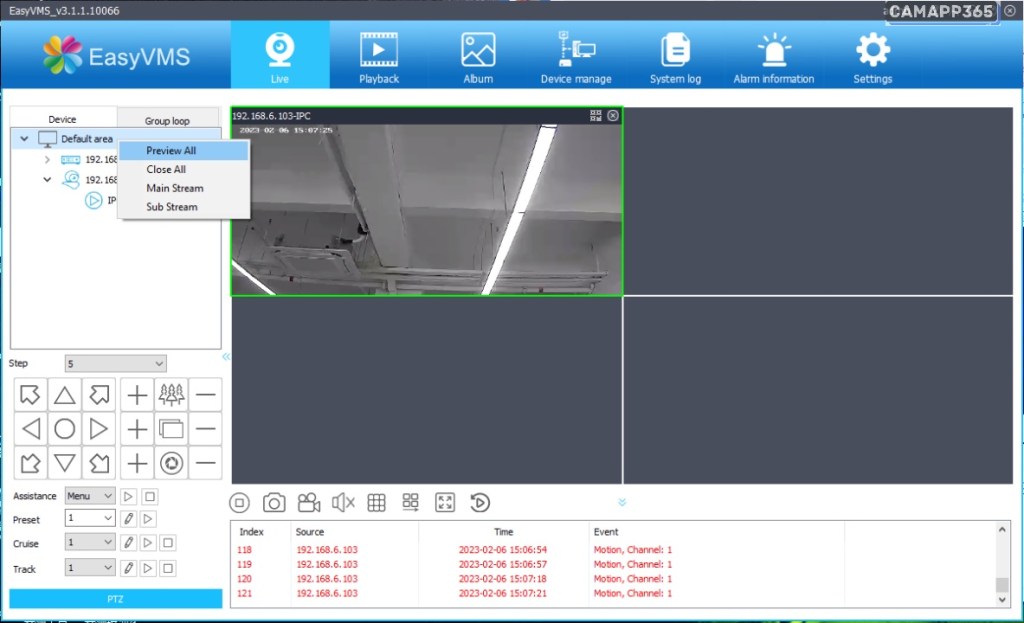
Then click the real-time preview button to enter the preview interface
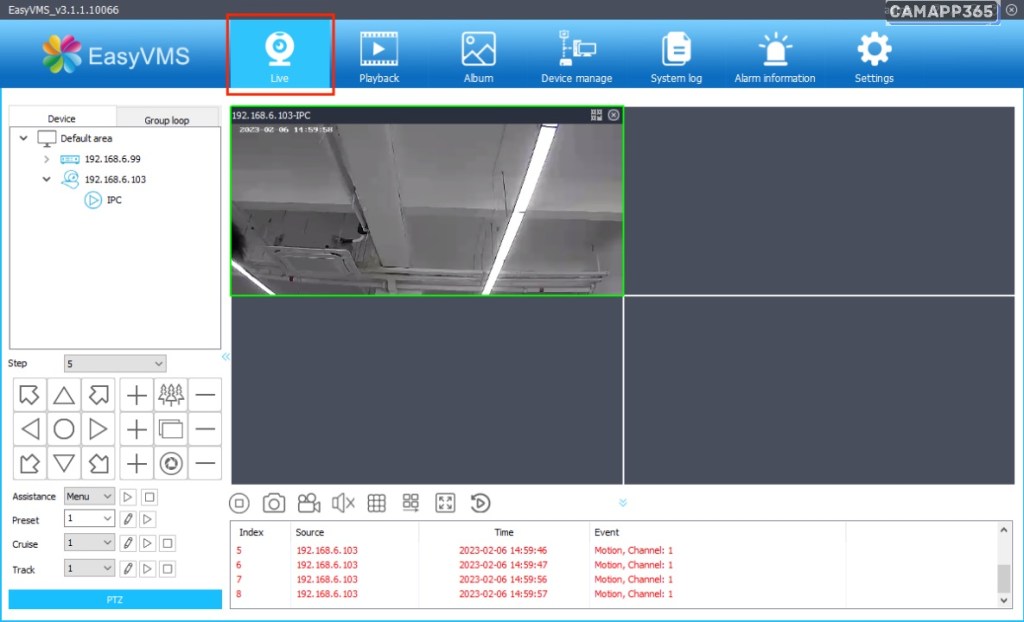
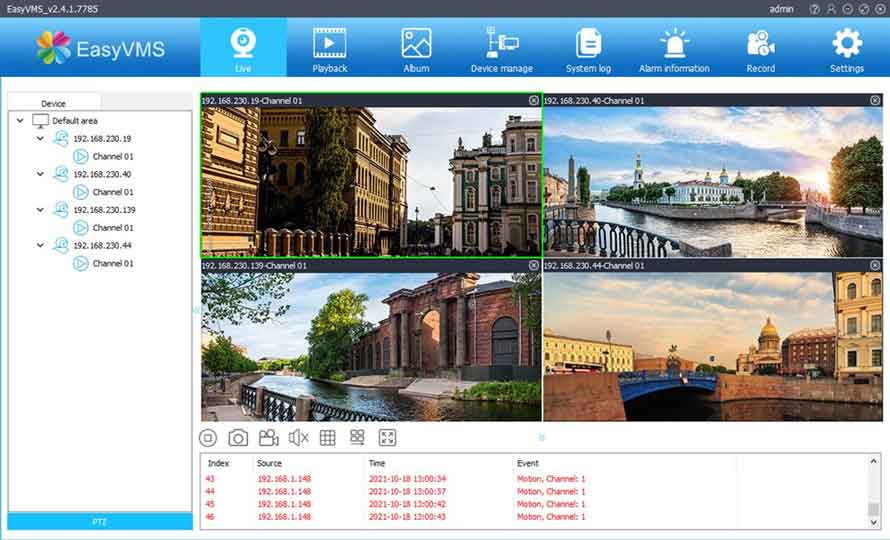
Double-click the IP address of the camera on the right, and the video will be automatically displayed in the surveillance screen on the right.
If you add multiple devices, you can select the Default Region context menu and select Turn on automatically, Open by region, Close preview by region.
Delete Camera
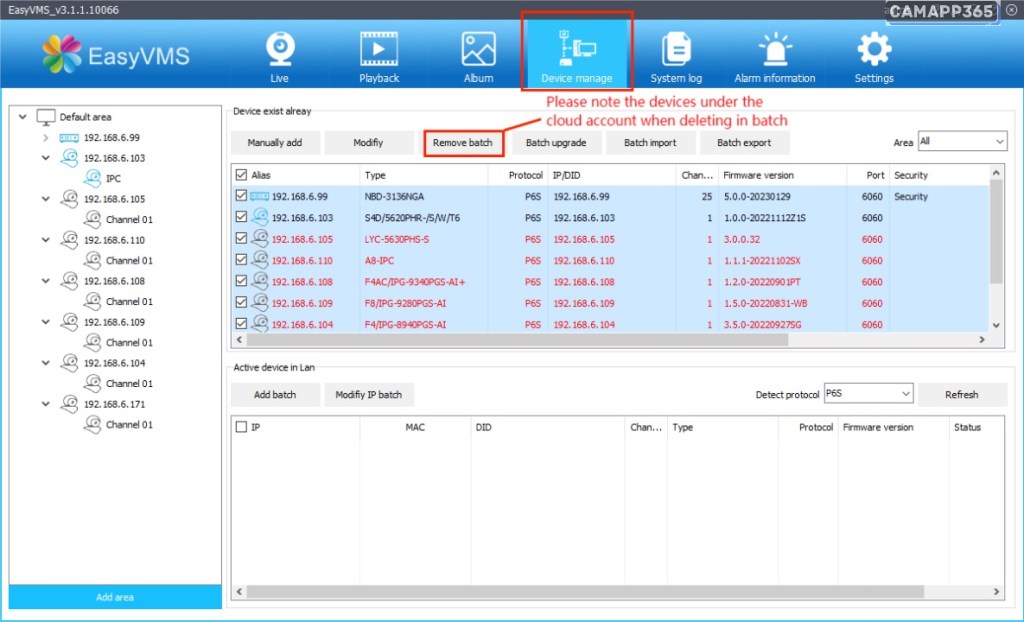
Select one or more devices to be deleted in the device list, click the Delete button, the system will prompt whether to confirm the deletion of the device, click the [OK] button, the device on the default zone list will be deleted.
Upgrade Camera
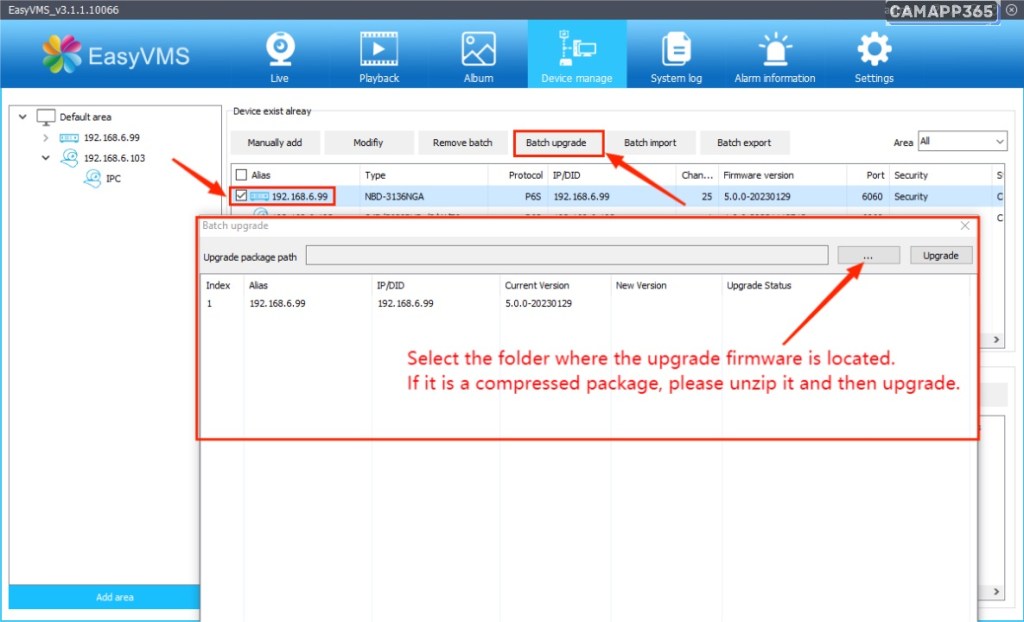
Local upgrade: Select the device you want to upgrade in the list of added devices, and then select Bulk upgrade. Be sure to restore the factory settings after the upgrade is successful.
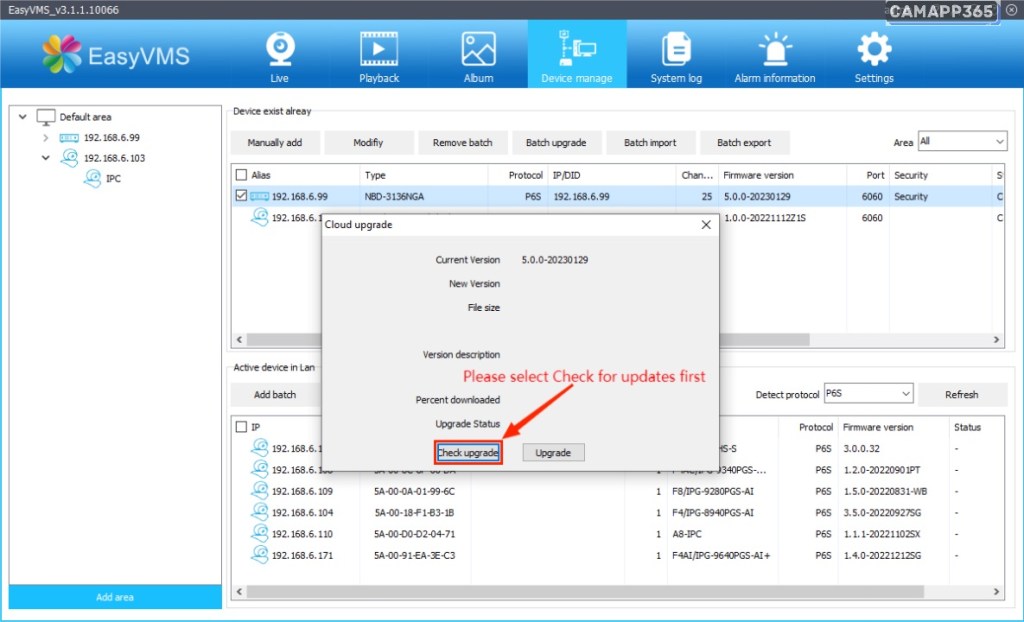
Cloud Upgrade: Select the device to be upgraded in the list of added devices, and then select Cloud Upgrade (whether the device supports cloud upgrade), otherwise the Cloud Upgrade page will not be prompted
Remote playback
Video retrieval
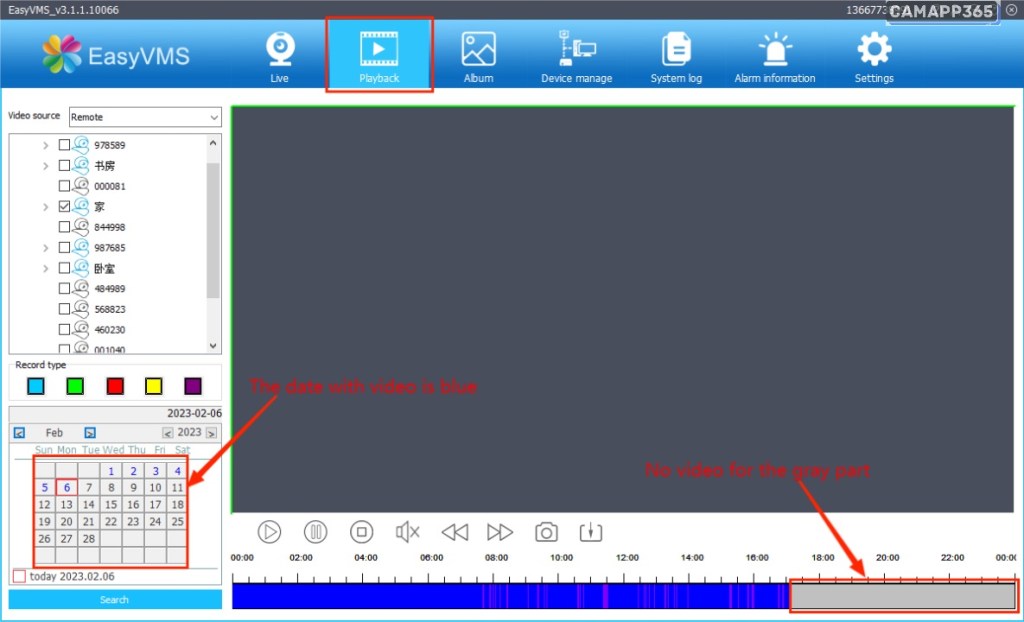
Enter the remote playback interface, select the channel that needs to be played back on the left device tree (Note: currently only supports one playback all the way), select the date on the calendar, click the “Search” button, the system starts to search for the recording in the hard disk recorder (or local hard disk), and display the search results in the search results panel. As shown in the following figure:
Playback control

Control Buttons
 Play button, tap when the recording stops to resume playback.
 Pause the playback button, tap the playback pause while the recording is playing, and tap again to resume playback.
 Stop playing button, tap while playing to stop the screen.
 Audio control button, tap to turn on/off audio playback during playback.
- Choose
 hasten
  Slow down Fast/slow rate control is possible.
 - Click
 Playback capture button, you can take a screenshot of the playback screen.
Timeline operations
(1) The scale on the timeline is 0-24 points.
(2) Mouse over the timeline to scroll to zoom in and out of the timeline.
(3) Double-click the timeline to play it directly.
Device control
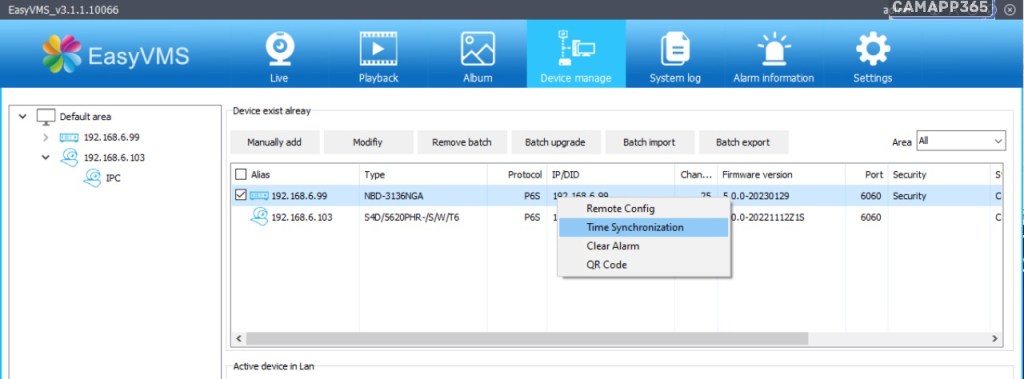
The device management interface can also control the device, including: time synchronization, camera restart, clear alarm, etc.
Time synchronization
In the Device Management > the Added Device interface, select the device and click the [Time Sync] button to synchronize the device time with the PC time.
System settings
Click System Settings to enter the local settings of the software.
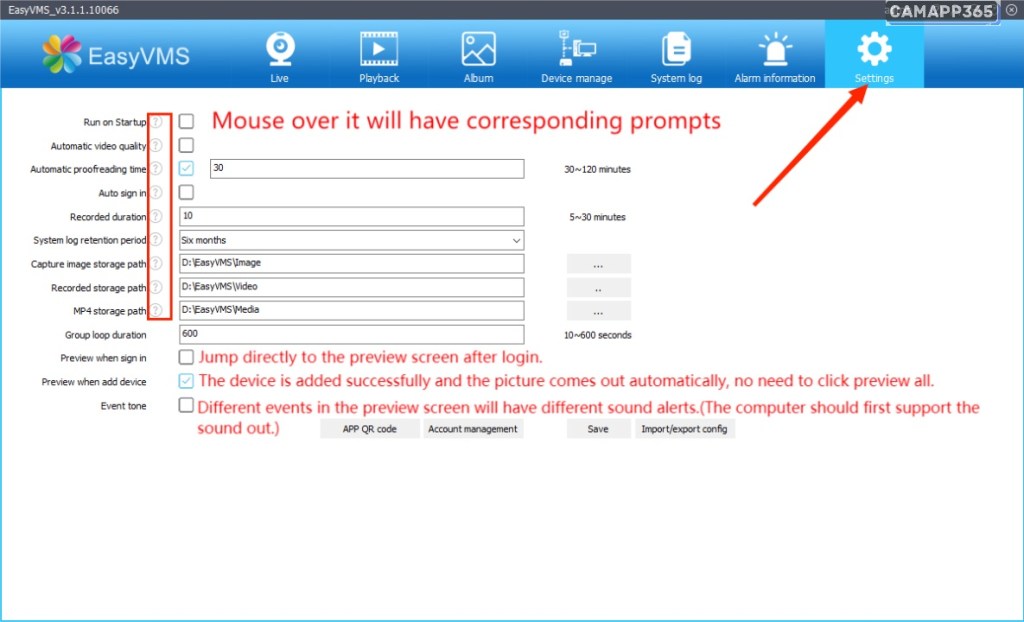
- You can set the EasyVMS software to automatically open at startup, check the button
 , and save. After saving, EasyVMS will automatically run after the next boot.
 - You can set the automatic calibration interval time of the device, check the button
 , and enter the interval time (such as: 120). After saving, each device will automatically calibrate every 120 minutes. It is recommended to calibrate every 30 minutes
 - You can set the local recording duration, select the recording duration input box, and enter the recording duration (for example: 30). Once saved, each recording is saved with an interval of 30 minutes. You can also set the recording format and select the recording format (e.g. PRV/AVI). After saving, the local recording format is . PRV. A dedicated PRV player can be downloaded on the official website
- You can set the log retention period and directly select the recording duration (e.g. six months). Once saved, logs are retained for six months.
- You can set the capture and video saving path, click to select the path, such as (G: EasyVMSImage/ G: EasyVMSVideo). After saving, the capture path is set to G: EasyVMSImage, the recording path is set to G: EasyVMSVideo.
Account management: Enter the system settings interface to manage local account login, including creating operator users, creating guest users, modifying user passwords, and deleting devices.
See also How To SetUp P6SLite Camera (Complete Manual )
Click the “System Settings” button, click the “Account Management” button, click [Create], enter the new user name, password and user group (such as operator) to save, the user group will have one more new user “user1”.
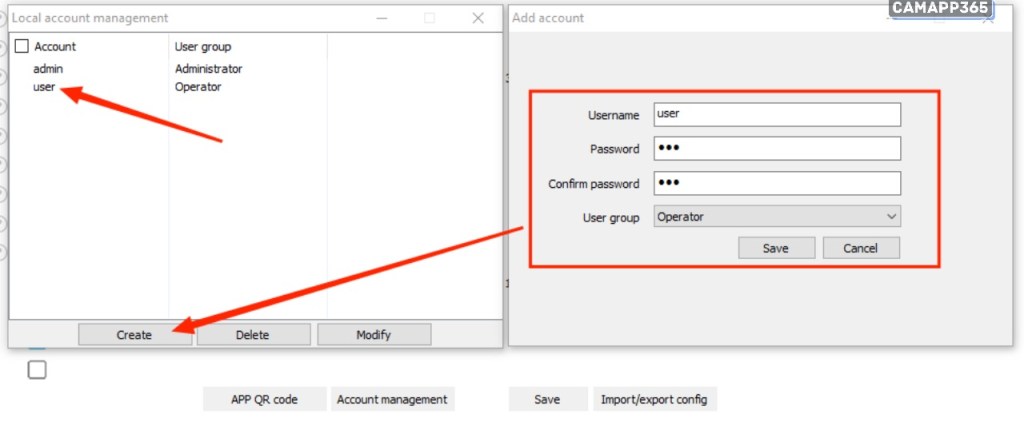
Click the [Account Management] button, select the operator user user1, and click [Delete]. After deletion, the new user disappears.
Currently, there are three levels of user permissions:
- Administrator: Administrator privileges, which can perform device management, user management, video monitoring, video playback, log query, switch users, and log out of the client.
- Operator: Video monitoring, video playback, log viewing, user switching, password modification.
- Guest: Video monitoring, switching users, password modification.
Real-time preview
Real-time preview
Double-click the device name in the left device to open a preview of all channels of the device on the right preview interface, as shown below:
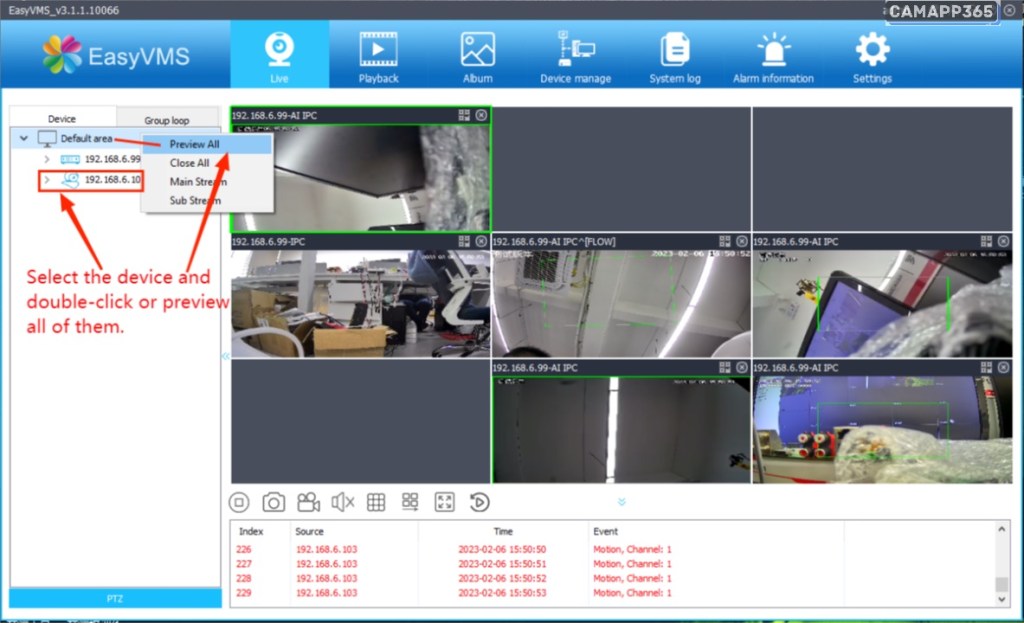
To turn off single-way preview, you can right-click “Close Preview” on the list that pops up the video channel to turn off the channel preview.
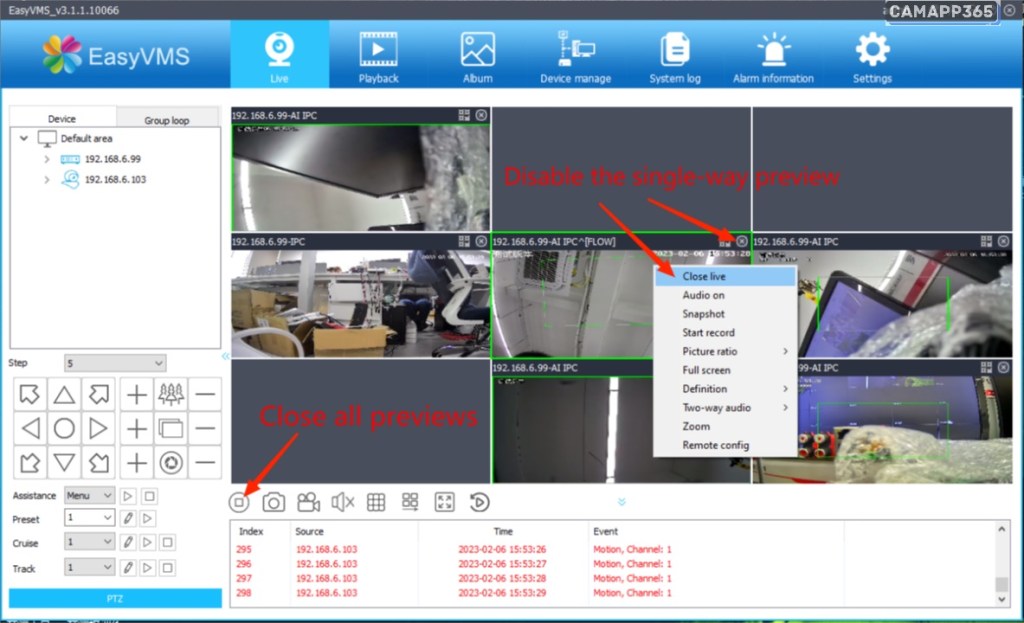
Right-click the default region in the device bar on the left and select “Turn off preview by region”
Preview controls
On the Preview Actions tab, the following figure is shown.

- The icon
 is to turn off the full channel preview button, clicking it will close all preview screens.
 - The icon
 is the capture button, click to capture the current channel image to the local computer.
 - The icon
 is the on/off full-channel recording button, clicking it will enable/disable full-channel recording.
 - The icon
 is the on/off audio button, clicking it will turn channel audio on/off.
 - The icon
 is the screen split button, click to set the number of screen split paths, currently supports single screen, four screen, nine screen, sixteen screen, twenty-five screen, thirty-six screen road preview.
 - The icon
 is a preview of the next video screen, which can be used in single screen, four screen, nine screen, sixteen screen, twenty-five screen, thirty-six screen, etc.
 - The icon
 is a full-screen toggle button, click to switch to full-screen preview. In full screen, you can right-click “exit full screen” or press the keyboard ESC key to exit.
 - The icon
 is a group tour, and you can group the picture in the case of many cameras or NVR images. Then make a grouped preview
Right-click menu control
Select the real-time preview channel on the preview interface and right-click to bring up the right-click control menu, as shown below:
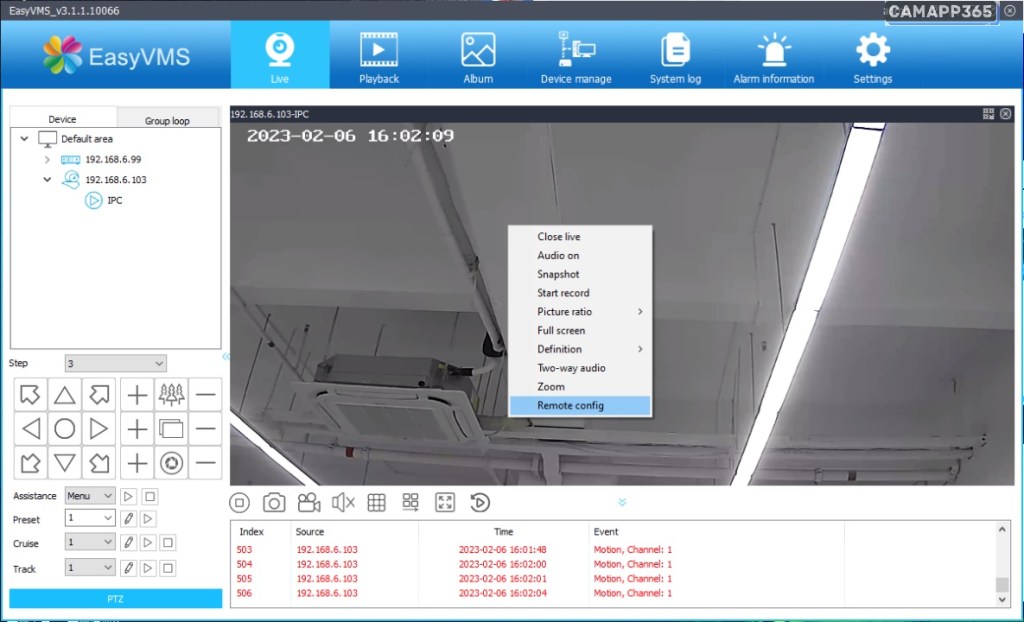
- Click the [Close Preview] button, and the preview of the current channel screen will be closed.
- Click the [Turn on sound] button to open the audio preview for the current channel.
- Click the [Capture] button, the capture of the current channel is turned on, and the image is saved locally.
- Click the [Start Recording] button to enable single-channel recording on the current channel, and save the recording to the local computer.
- Click the [Screen Scale] button to set the current preview screen scale to the original scale or fill scale.
- Click the [Full screen] button to switch the preview screen to full screen. Consistent with the Full Screen feature in the toolbar below the preview action page.
- Click the [Clarity] button to set the channel quality as the main stream/substream (valid only for P2P (added by ID number) settings).
- Click the [Voice Intercom] button to shout to the front-end camera.
- Click the [Electronic Magnification] button to perform electronic amplification operation on the channel.
- Click the [Remote Configuration] button to set the camera parameters
Set up P6SLite camera
OSD settings
you can add the name of the current camera and the placement of the moving time; Click the red font to move
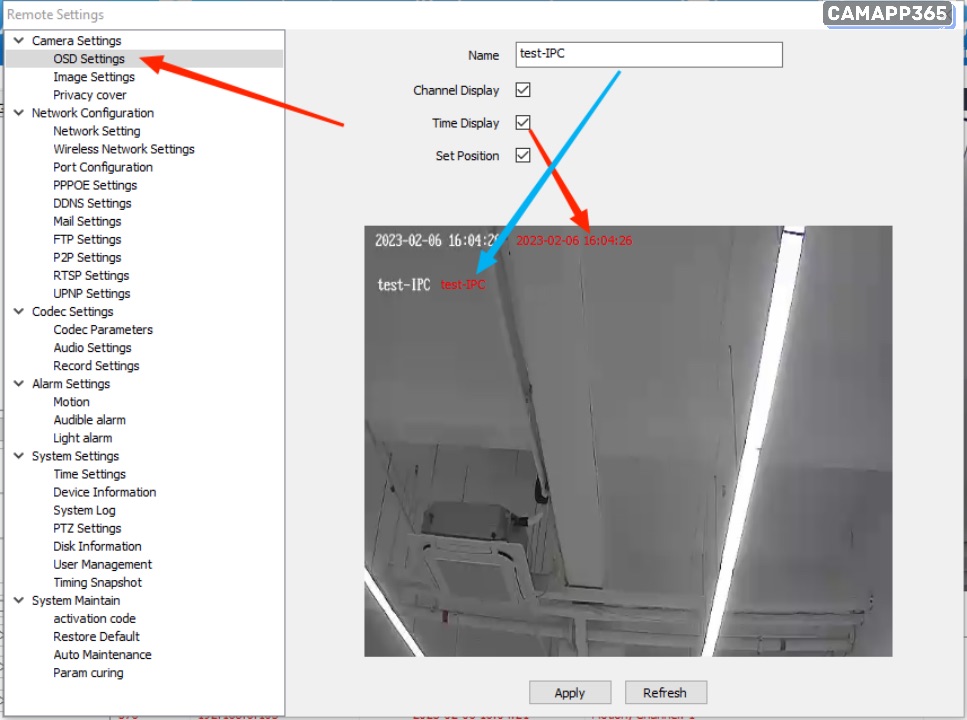
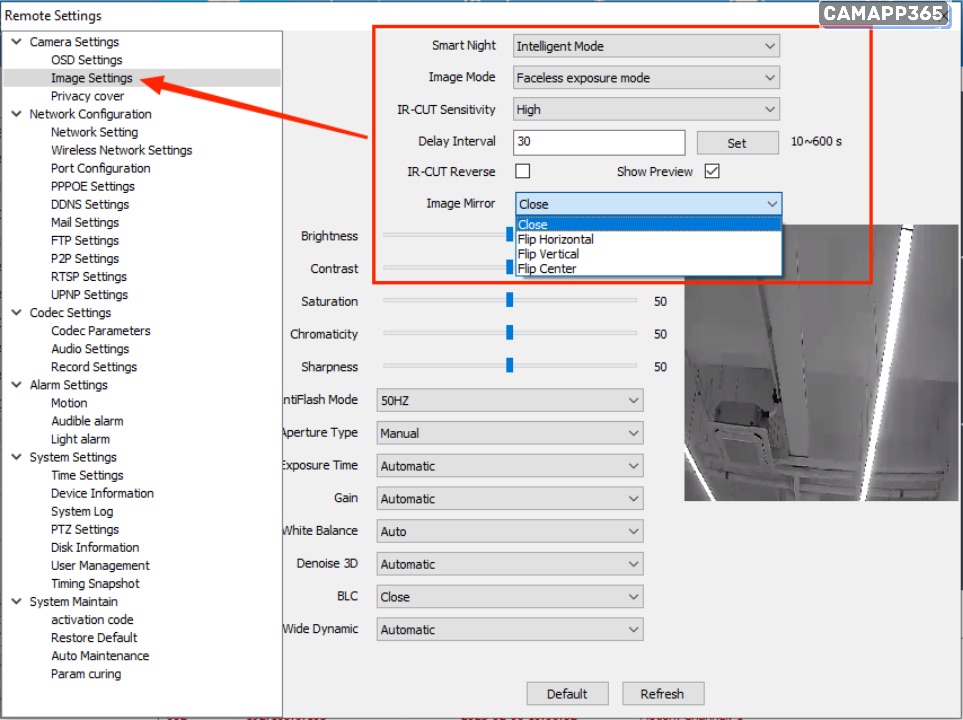
Image settings
Night vision mode; Set the night market mode on a dual-light device to achieve a full-color image at night.
IR-CUT sensitivity (the higher the modified value, the higher the sensitivity): The earlier the black and white image is switched at night.
IR-CUT switching time (the larger the modification value, the longer the switching time): Extend the time to switch black and white images.
The image is flipped, and the image can be selected to be corrected by software when the camera is hoisted.
Network configuration
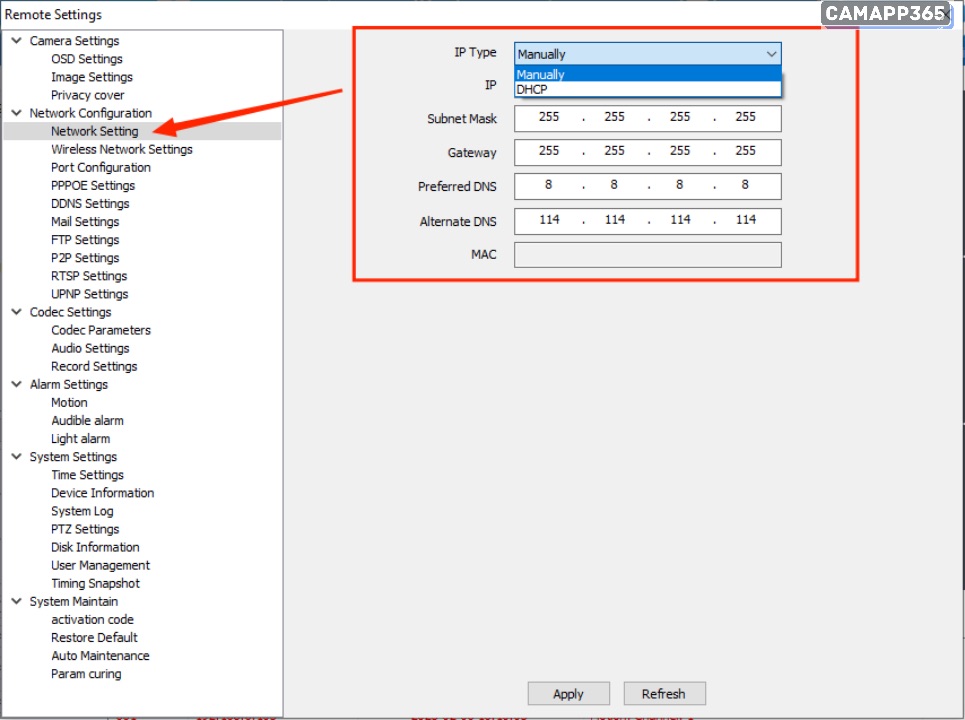
Network Setting
modify the IP address required by the camera in the network
See also How To SetUp P6SLite Camera (Complete Manual )
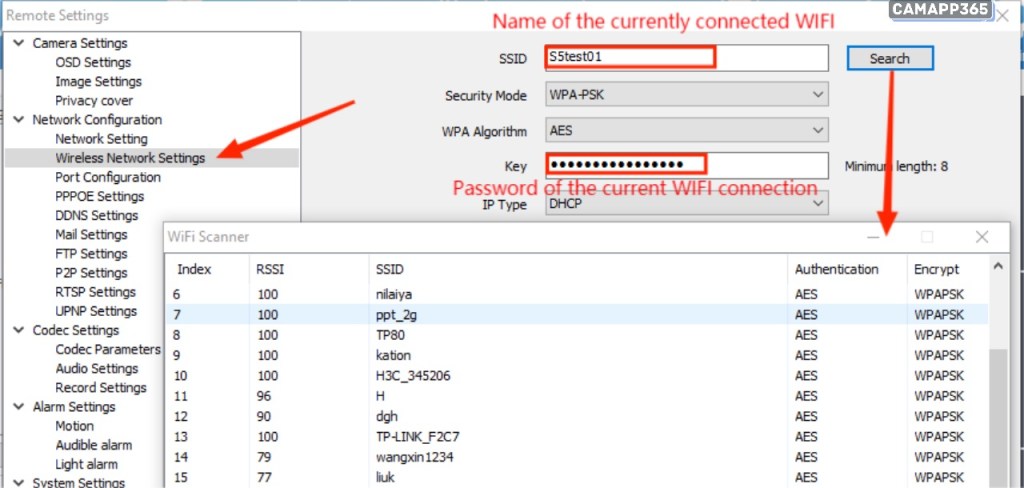
WiFi settings
Select SSID (wifi name), click search, enter wifi password.
After filling in the wifi name and password, select Check wireless settings, it will pop up to check the validity of wifi configuration (display failure, please check wifi password or refresh the page) If the wifi configuration is successful, then unplug the wire, the real-time preview screen will be black or stuck after about 30 seconds to return to normal (the camera is switching network card)
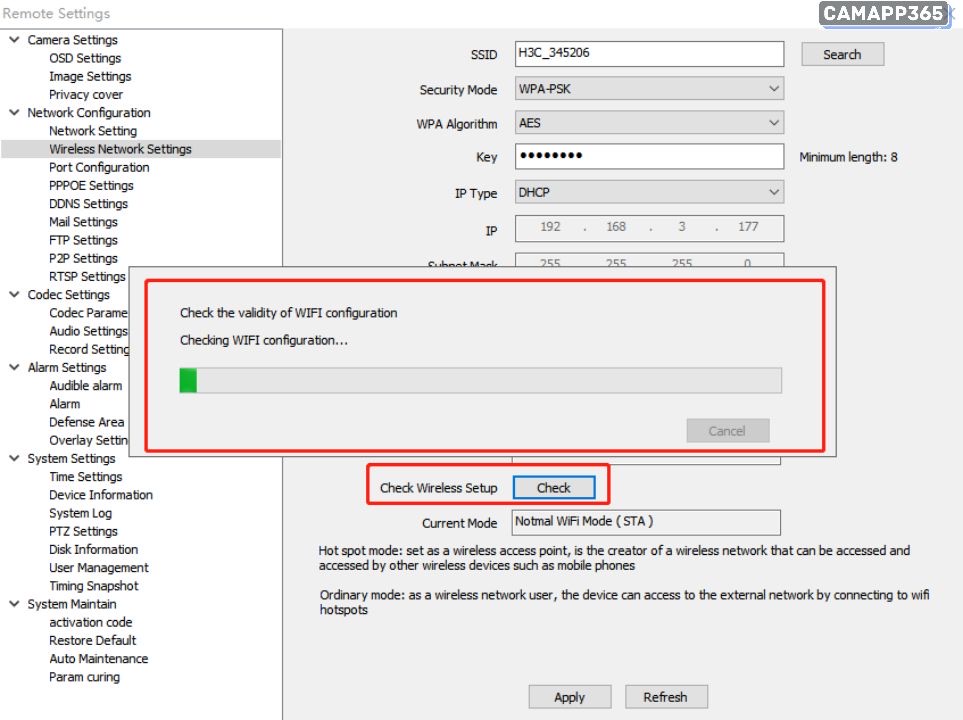
Normal wifi and wifi hotspot mode switching: a When the camera is powered on, the camera will automatically switch to wifi hotspot direct connection without plugging in the network cable;
When the camera is powered on first in the network cable or plugged in the network cable first, the camera will switch to normal wifi mode. C Manually force switch between normal wifi and wifi hotspot camera will restart
Port setting
HTTP/signaling/data port modification in the corresponding access software, need to manually add to modify the port number, otherwise it can not be effectively accessed (non-professionals do not recommend modification, so as not to add device failure)
Mail settings
enable and configuration methods
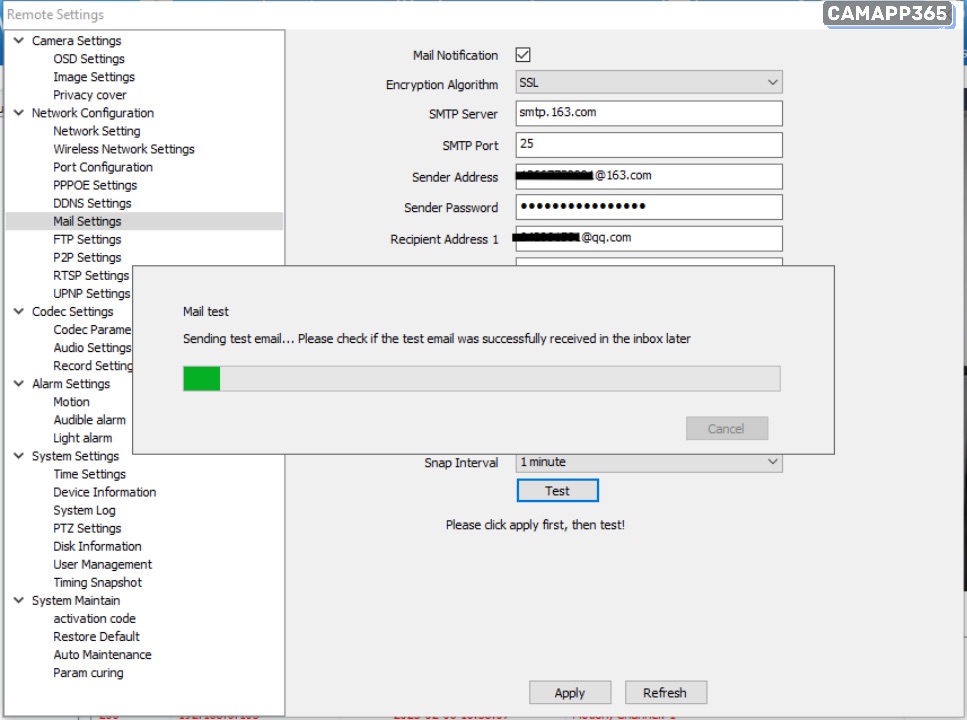
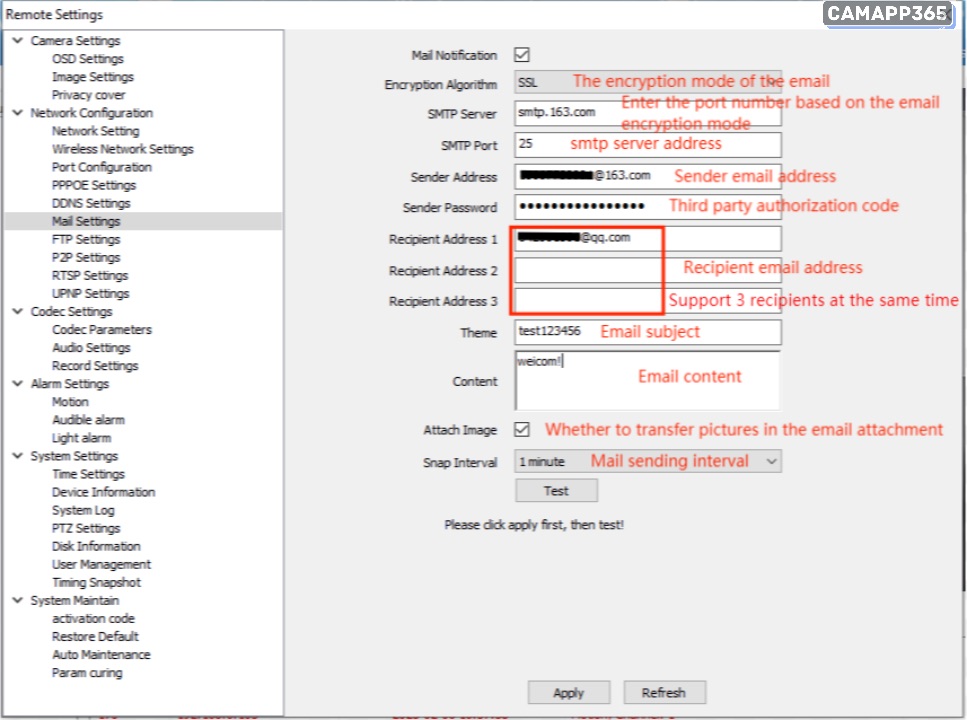
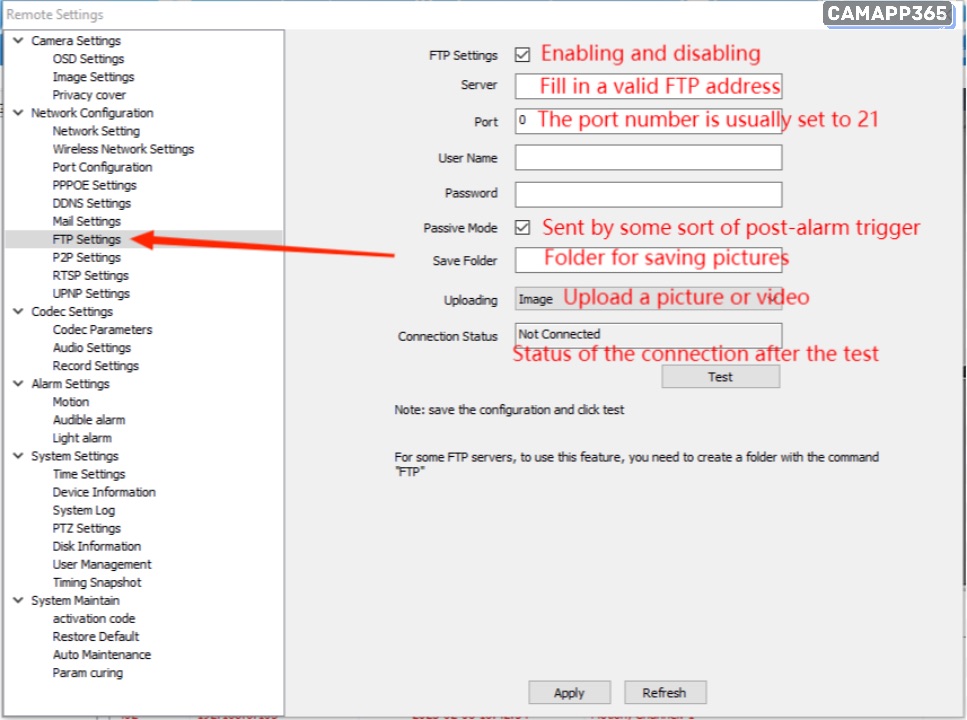
FTP settings
Encoding settings
encoding parameters
Modify the format and appropriate parameters of the video picture to achieve the best effect.
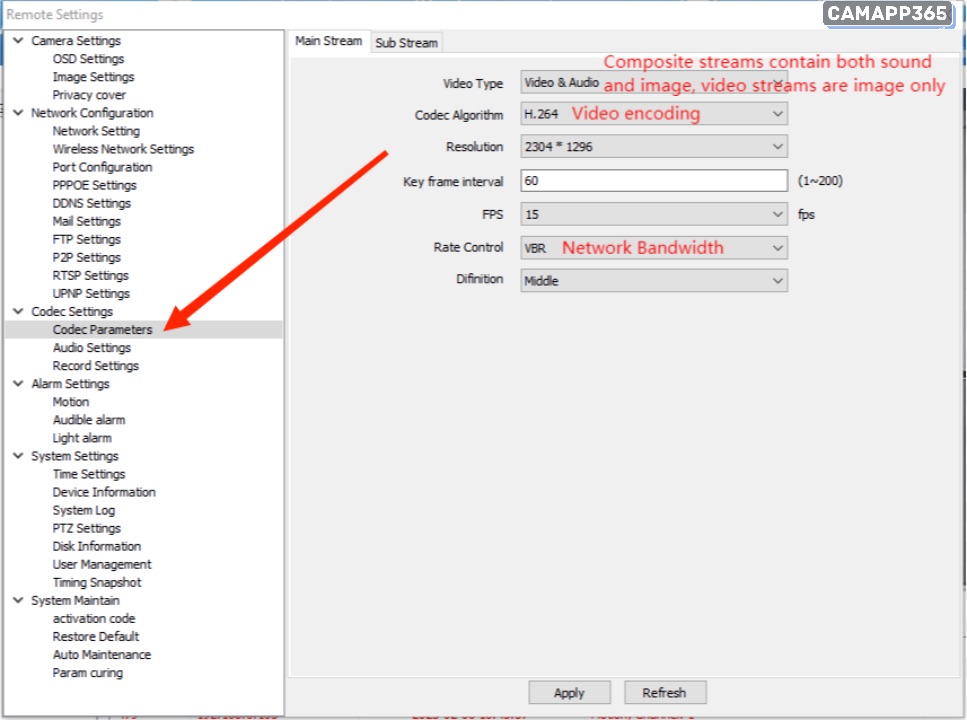
audio settings
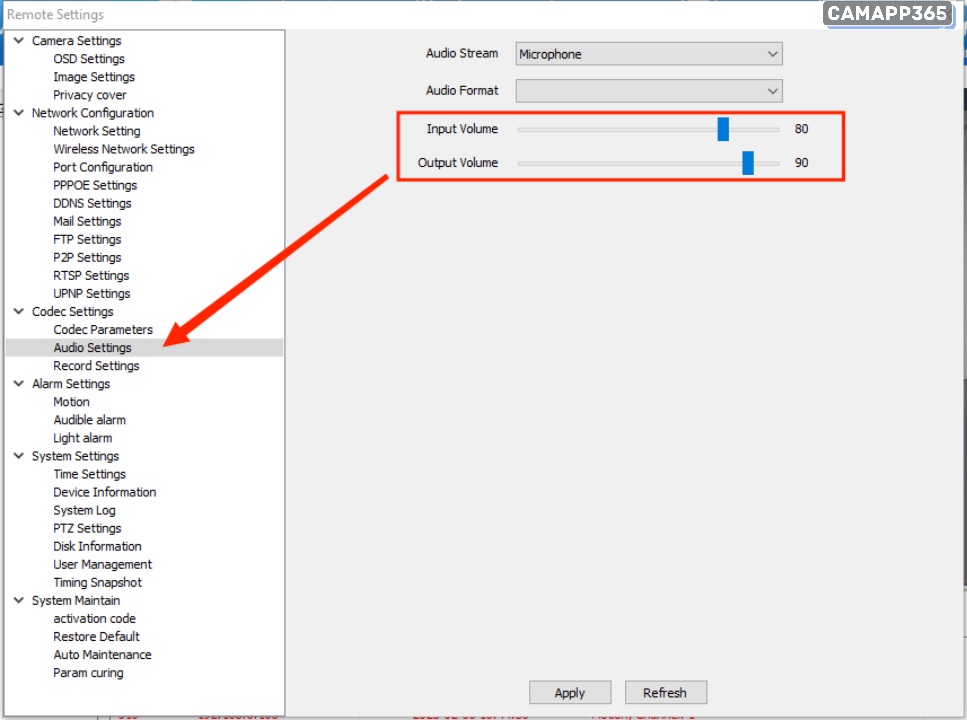
input volume refers to the size of the camera microphone recording, the larger the value, the louder the playback sound of the monitoring device; The output volume refers to the sound played by the camera horn, the higher the number, the louder the sound played by the camera.
Alarm settings
Motion detection
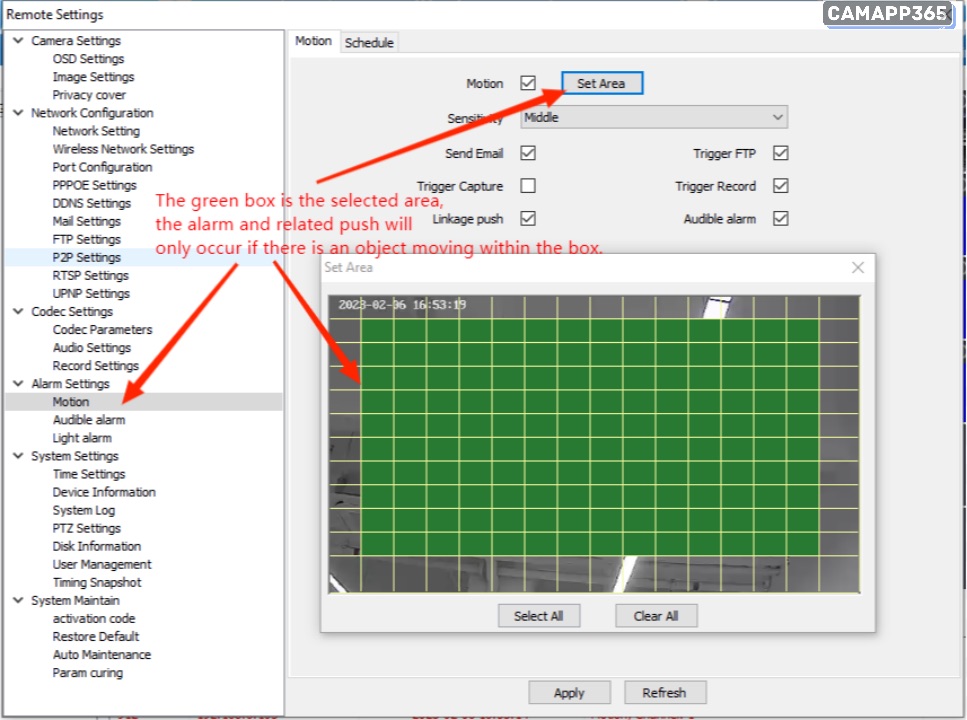
Refers to the way to enable or disable motion detection, and the way to trigger the motion detection alarm is to trigger the email (capture a picture when the alarm is sent to the specified mailbox by email, and the mailbox must be set up first);
Trigger FTP (capture a picture when alarming, and send the picture to the FTP terminal through the set FTP server); Linkage push (refers to whether to receive camera alarm reminders, the subscription function on the home page needs to enable linkage push);
Trigger capture (a picture will be captured when a moving signal is detected, and the captured picture can be viewed in the message function on the home page); trigger recording (recording in different colors after detecting a moving signal);
Select the area (refers to the selected area on the screen with a movement signal will alarm, the selected area is subject to the green box)
Client logs
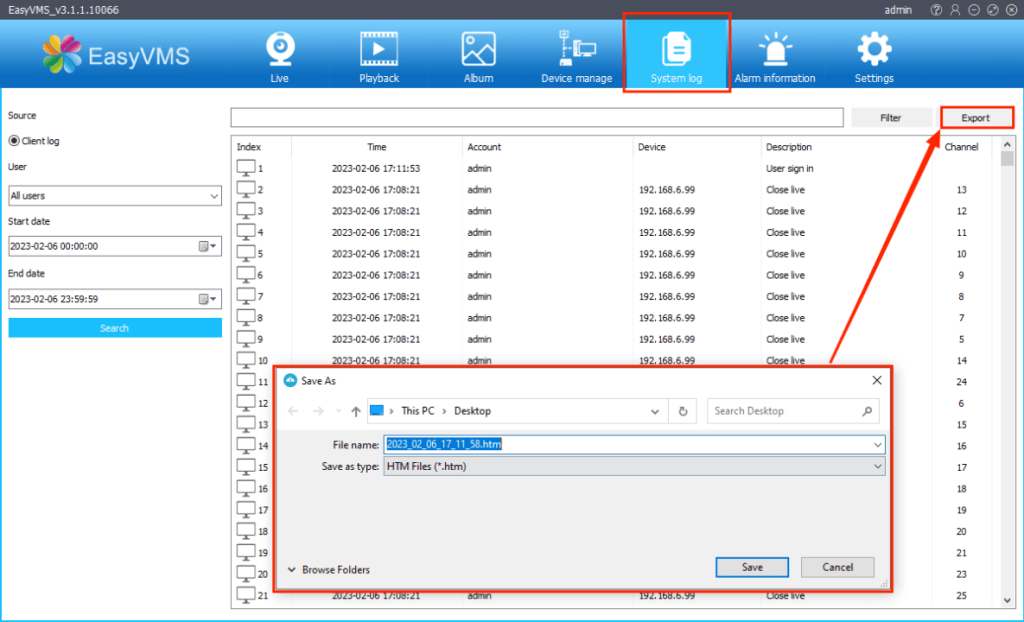
Enter the system log interface, select the client log, select the user, start time, end time and other conditions to filter, click the [Query] button, you can query all the operation log information according to the conditions, each log information includes the operation user name, machine IP, time, description and other information.
Click the Export button to save the operation information as a .csv format file, as shown in the following figure. :
Electronic photo album
The electronic album is mainly used for the management of local channel capture and post-recording files, and users can search for viewing and deleting a series of operations according to different filter types.
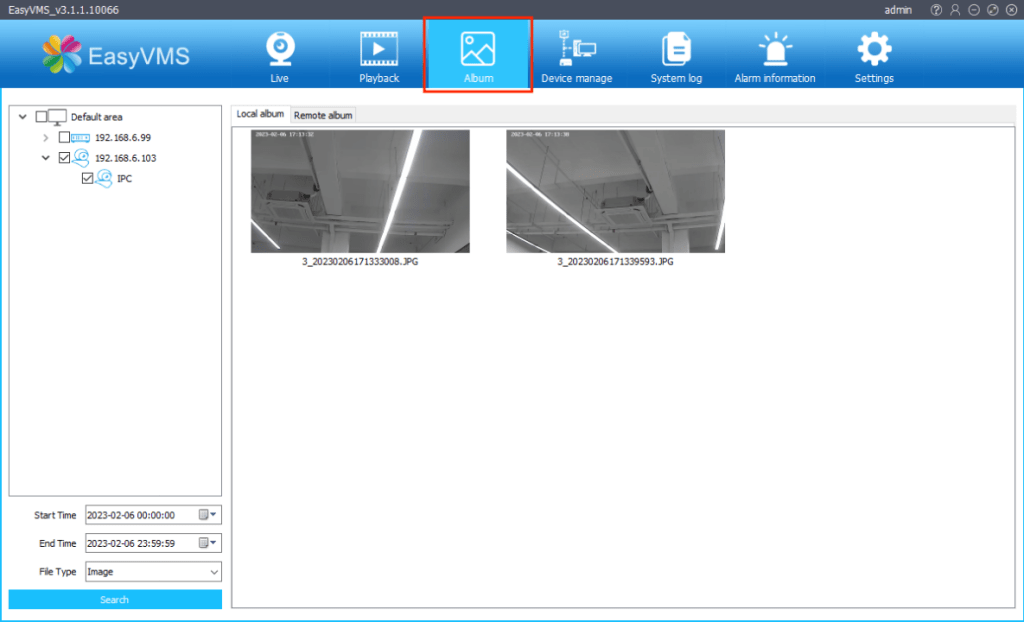
Search by device, select any device, and search for local pictures and videos under that device.
Search by date, select a date (e.g. June 5) to search for local images and videos under that date.
Search by media type, select the image/video type (e.g. Video) to search all local video files.
In addition, you can delete and jump the playback operation of the picture/video, and directly select the file and right-click to execute.
Alarm information
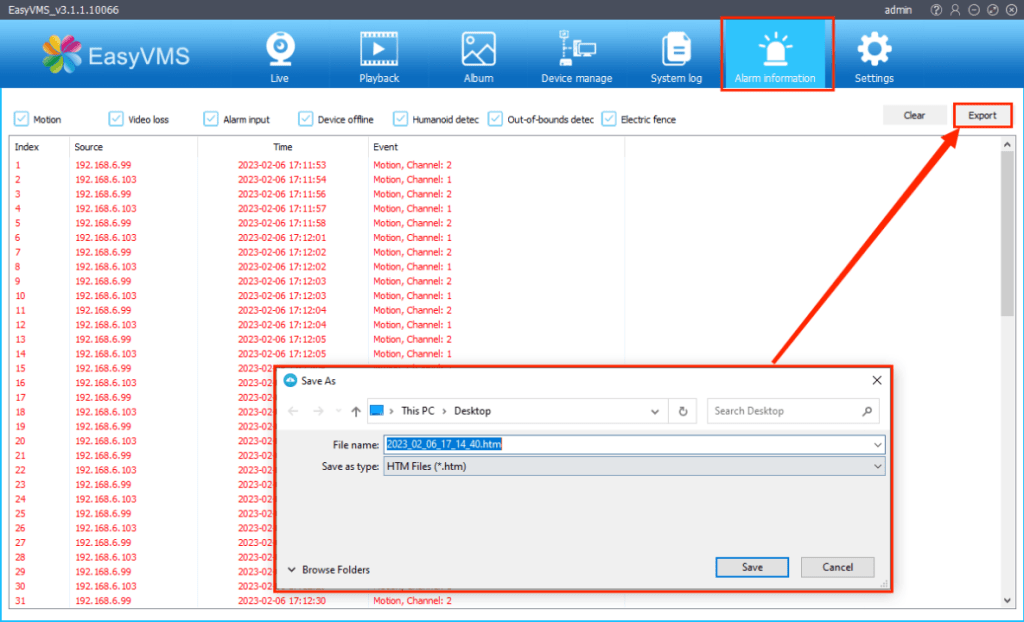
The alarm information interface records all types of alarm information of the software, including motion detection, video loss, alarm input, heartbeat loss, etc., and users can view, export and backup operations on various alarm information.
View alarm information
Select the alarm information type (for example, only check Video Loss and Alarm Input) to view all categories of alarm information: click the [Export] button, select the save path, and export the alarm information to the local computer.
