GSurf Pro Setup and User Guide, Thank you for using Grandstream GSurf_Prov2 Network Video Surveillance System. Based on TCP/IP, Gsurf_Prov2 utilizes C/S architecture on distributed system, managing up to 10*36 channels. It can effectively reduce the network traffic and cameras’ workload by providing the transferring mechanism. Also, users could search and download the recording files remotely via the file management. Featuring functions of electronic map, preview, search, recording, alarm, playback, PTZ and etc., Gsurf_Prov2 is a powerful monitoring and recording system with intuitive interface as well as easy operation.
This user manual is designed to help you understand how to integrate your cameras and digital video servers with GSurf_Prov2 software.
Note
This document is subject to change without notice. The latest electronic version of this user manual is available for download here:
http://www.grandstream.com/support
Reproduction or transmittal of the entire or any part, in any form or by any means, electronic or print, for any purpose without the express written permission of Grandstream Networks, Inc. is not permitted.
PRODUCT OVERVIEW
Feature Highlights
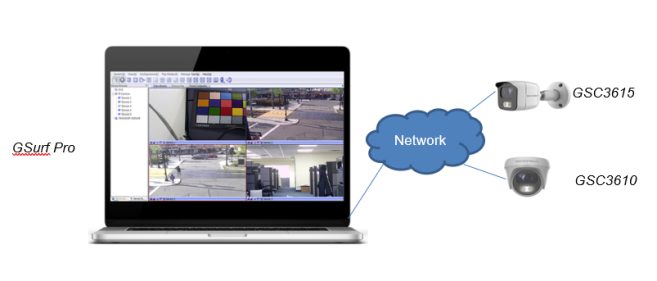
Figure 1: GSurf_Prov2 Overview
GSurf Pro Setup and User Guide
Read More : XMEYE VMS PC CLIENT Setup Guide
INSTALLATION GUIDE
Minimum Computer System Requirement
|
SERVER: – Operating System: Windows 2003/2008 Server; Windows XP |
|
CLIENTS: – Operating System: Windows XP SP2/SP3; Windows Vista; Windows 7 32bit/64bit; Windows 8/10 |
Note
UPS is required for SERVER to prevent database or video record file corruption caused by power outage.
Install Gsurf_Prov2
Click to run the GSurf_Prov2 installation .exe file. Follow the instructions in the prompted windows to start installation. Once done, the following screen will show.
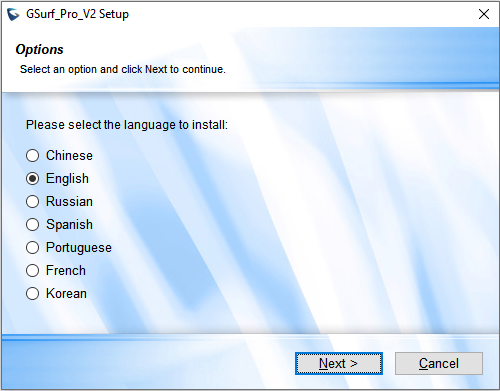
Figure 2: GSurf_Prov2 Installation
Uninstall Gsurf_Prov2
To uninstall GSurf_Prov2, in your windows PC Start Menu->Programs->GSurf_Prov2, click on Uninstall GSurf_Prov2 to start uninstall process. Or you could uninstall the program from your windows PC’s Control Panel.
Login Gsurf_Prov2
Click to run GSurf_Prov2. The login page will prompt for your User ID and Password. The administrator User ID and Password are both set to admin at the factory default settings.
For security purpose, please change the password after the first time you log in to GSurf_Prov2.
Figure 3: GSurf_Prov2 Login
Gsurf_Prov2 Main Window
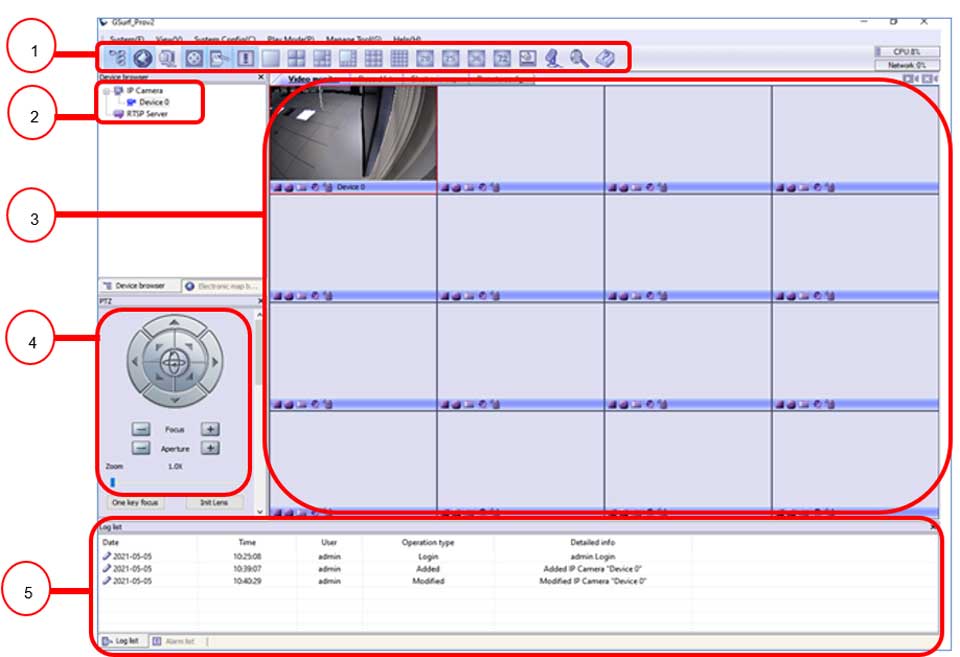
The GSurf_Prov2 user interface is designed for ease-of-use to offer quick access to cameras and recording in the system. Please refer to the following figure and table for main window descriptions.
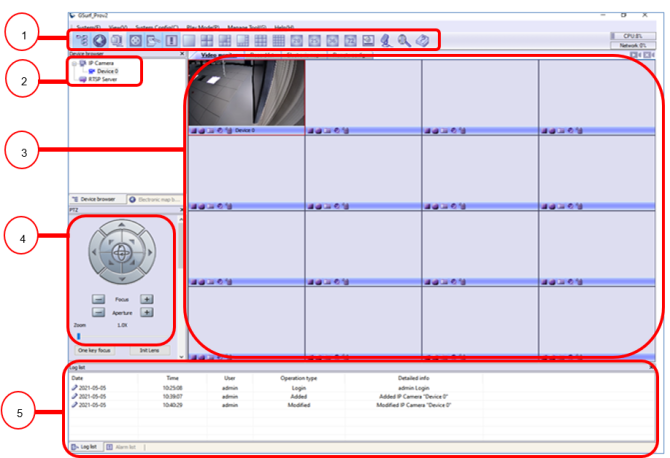 Figure 4: GSurf_Prov2 Main Window
Table 1: Gsurf_Prov2 Main Window Items
|
1 |
Toolbar |
Quick access to designated functions |
|
2 |
Device Browser |
View, add and manage devices; view electronic map |
|
3 |
Video Display |
Display up to 72 video streams. Double clicking on one video will display its primary stream in full window. |
|
4 |
PTZ Control |
PTZ control (PTZ device is required on the camera) |
|
5 |
Log List |
View operation log and alarm log |
Gsurf_Prov2 Toolbar
Table 2: GSurf_Prov2 Toolbar Icons
|
|
Browse and manage the connected DVS or cameras |
|
|
Open Electronic Map Browser. Right click to add a new map |
|
|
Open Group View panel, manage groups and video channels. |
|
|
Open RS-485 panel for PTZ control |
|
|
Display log list |
|
|
Display alarm list |
|
|
Choose different number of channels to be displayed on the main window (max number 72). |
|
|
Open/hide play bar in each video display window. |
|
|
Send audio (broadcasting) to selected device in the list |
|
|
Search all the cameras’ IP within the same LAN |
|
|
Show GSurf_Prov2 software information |
Gsurf_Prov2 Video Play Bar
In the video display window, each video channel has a play bar on the bottom.
 Figure 5: GSurf_Prov2 Video Display Window – Play Bar
Table 3: GSURF_Prov2 Video Play Bar Icons
|
|
Stop the displayed video in the channel |
|
|
Start recording the video in the channel. By default, the recorded video file will be saved in directory C:\Record |
|
|
Capture a snapshot of the current video in the channel. By default, the captured snapshot will be saved in directory C:\Snapshot |
|
|
Turn on/off sound of the current channel. The default setting is off |
|
|
Turn on/off two-way audio of the current channel. The default setting is off |
CONFIGURATION GUIDE
After installing GSurf_Prov2, it must be configured for your network cameras or digital video servers. This section describes how to configure GSurf_Prov2, as well as how to set up auto recording, motion detection, alarms and etc.
Add/Delete Device
Add Device
1. In the top Menu bar, click System Config(C)->Device Config(D).
2. In the Device Configuration window, click Add button to open the Add Device dialog.
3. Enter the device information.
4. Click Ok to save.
After successfully adding the device, users could view the video by double-clicking on the device name in the Device browser panel on the left.
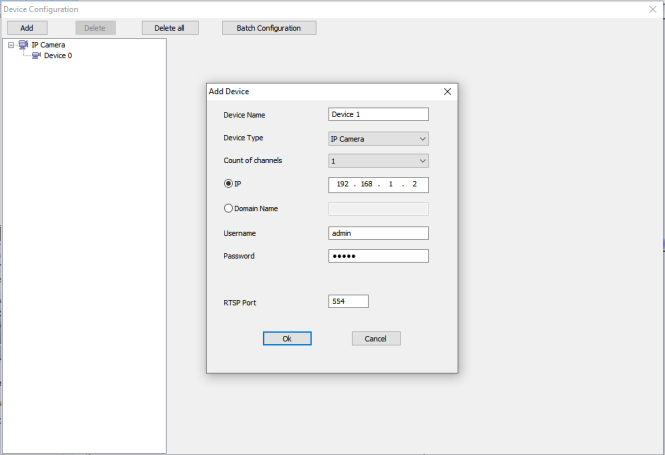 Figure 6: Add Device
 Figure 7: Video Display After Adding Device
Delete Device
1. In the top Menu bar, click System Config(C)->Device Config(D).
2. In the Device Configuration window, Select the device to be deleted.
3. Click Delete button.
4. Or, users could click on Delete all to remove all the added devices.
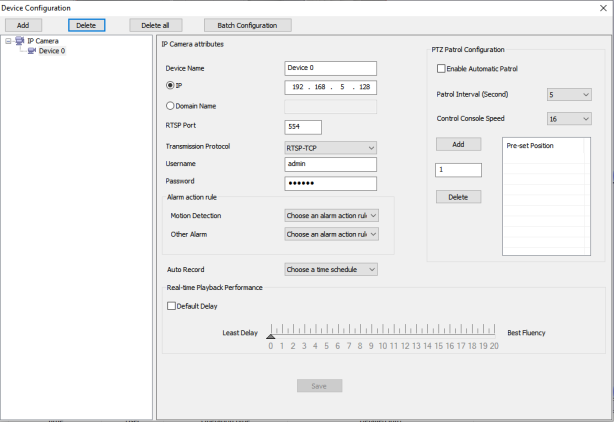
Figure 8: Delete Device
Search Device
The built-in Search tool in GSurf_Prov2 allows user to search all the DVS and IP Camera devices within the same LAN. Additionally, users could modify the IP address for the devices listed in the searching result.
Search Device
1. In the GSurf_Prov2 toolbar, click ![]() button.
button.
2. In the Search tool, click Search button. A list of surveillance devices will display in the list.
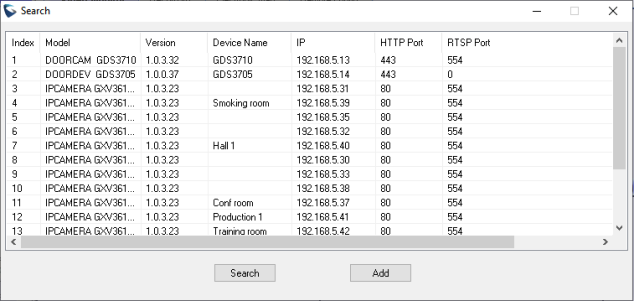
Figure 9: GSurf_Prov2 Search Tool – Search Devices
Configure Time Schedule
The GSurf_Prov2 time schedule is used to configure automatic recording. Up to 10 schedules can be configured.
1. In the top Menu bar, click System Config(C)->Time Schedule(T).
2. The Time Schedule window will pop up.
3. Select a schedule on the left panel to be configured.
4. Select the time frame for each day. The scheduled interval will be marked in blue (See Figure 10: Gsurf_Prov2 Time Schedule).
5. Click Save button.
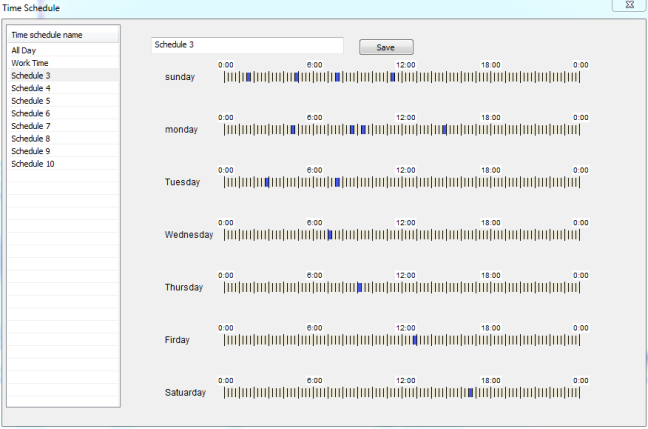 Figure 10: Gsurf_Prov2 Time Schedule
6. To assign this schedule to a device, open System Config->Device Config.
7. Select the device from which you would like to record the videos.
8. In Auto Record option, select schedule from the drop down list.
9. Click Save button.
This channel will then start automatically recording as specified in the designated time schedule.
Additionally, users could select Batch Configuration to assign the same time schedule to multiple devices.
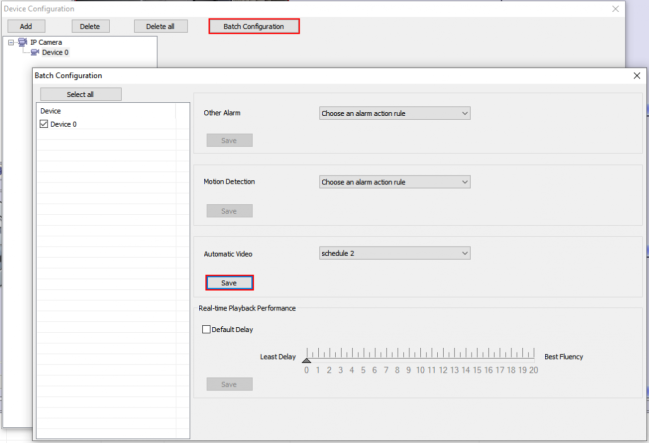 Figure 11: GSurf_Prov2 Auto Record Time Schedule
Configure Alarm Triggers and Rules
Grandstream’s network cameras and digital video servers support motion detection and alarm events. They can report motion detection or alarm events to GSurf_Prov2. On the GSurf_Prov2 side, it can be configured to take actions, i.e., to notify such events to users. Up to 10 rules can be set up with different alarm actions. The instructions below will assist you with this setup.
1. In the top Menu bar, click System Config->Alarm Config.
2. In the Alarm action rule window, select the Alarm index and configure the action.
3. Click Save button to save the settings.
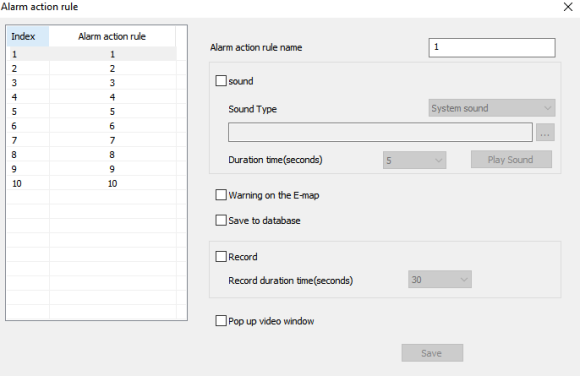
Figure 12: GSurf_Prov2 Alarm Action Rule
4. To assign this alarm action rule to a device, open System Config->Device Config.
5. In the Device Configuration window, select the device.
6. Select an Alarm action rule for Motion Detection to monitor motion detection events. Or to Other Alarm for other types of conditions such as abnormal reboot.
7. Click Save button to save the settings.
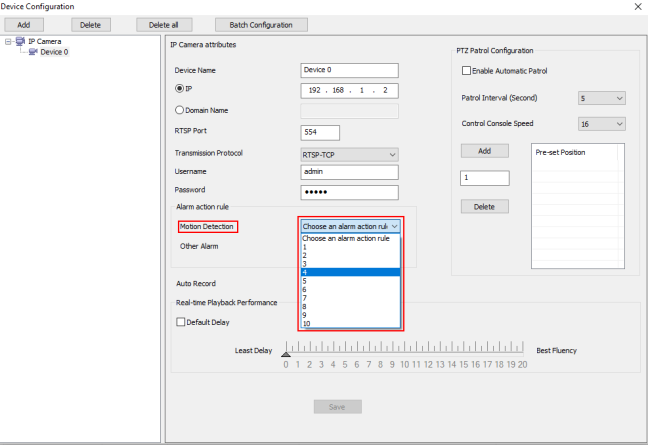 Figure 13: Assign Alarm Action Rule To Device
Additionally, users could select Batch Configuration to assign the same alarm action to multiple devices.
Local Configuration
Click on System Config->Local Config to configure software and local recording features for GSurf_Prov2.
Software Configuration
Configure log reserved days, video window layout and startup options.
Record Config
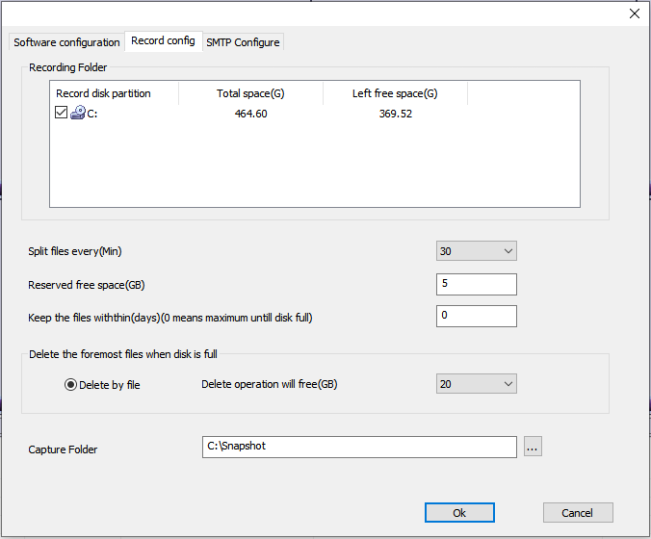 Figure 14: GSurf_Prov2 Local Configure – Record Configure
Device Configuration
Click System Config->Device Config, the device configuration window will prompt for users to add, delete and edit devices. Once a device is selected, users could configure the device properties, alarm action rule and record option.
Language Display
In the GSurf_Prov2 interface, users could switch language at any time. Go to System Config->Language and select the language to be displayed.
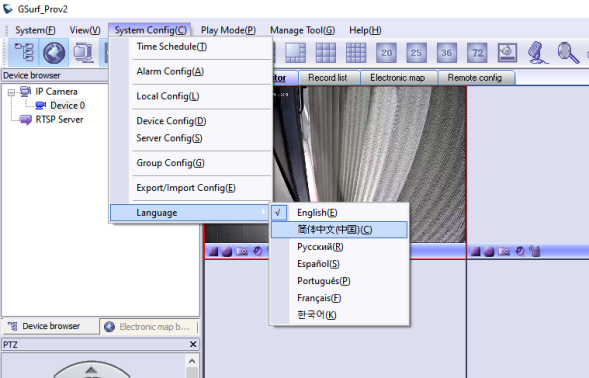
Figure 15: Language Display
Record Configuration
Manual Record
In the video display window, click on the Record button  to start recording.
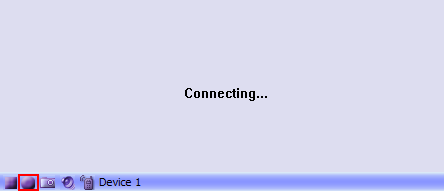 Figure 16: Manual Record
Automatic Record
The automatic record will be running in the background. The recording time is specified in Auto Record option after selecting device under System Config->Device Config.
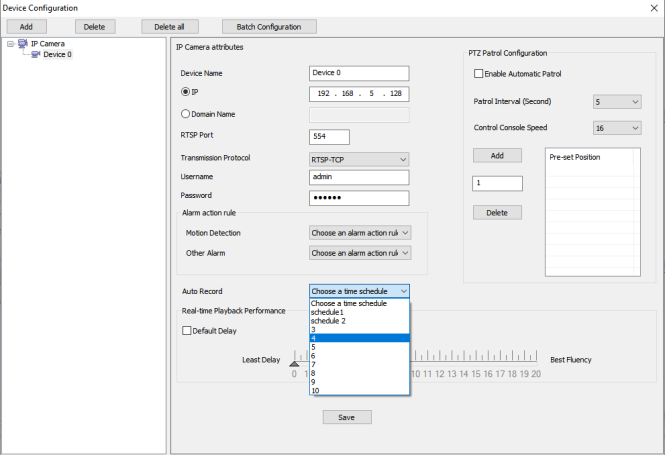 Figure 17: Automatic Record
Note
It is recommended to use continuous recording only and not combine it with recording by motion detection.
Replay
Both the GSurf_Prov2 Replay v2 (GXV36xx Models) and Replay v3 (For GSC36xx Models) tools provide the ability to replay recorded videos. These tools also provide a search function which allows you to perform a search based on start time, end time, IP address, channel and etc. To replay the recorded video, in the top Menu bar, go to Manage Tool->Replay Tool to open the Replayer. Select time, device, channel, file type and disk to search the video. Then click on the video file to play.
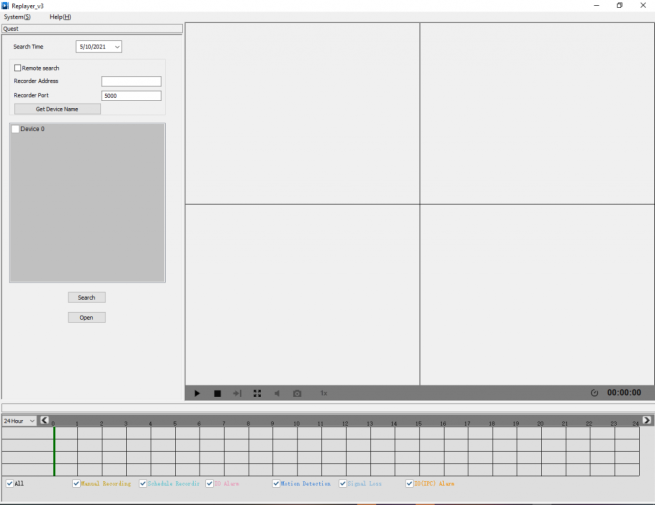 Figure 18: Replayer v3
In the Replayer, users could also open up the Time selection tab to specify the recorded files by filtering the start time. All the configured start time will be marked in green in the time chart.
Electronic Map
E-map is an important feature in video surveillance system to provide users a visual overview of the cameras in your installation. A map is an image file on which you place cameras and views. GSurf_Prov2 supports an electronic map for users to identify the locations of your cameras and the status of their alarms.
To configure E-map on GSurf_Prov2, open the map browser by clicking ![]() in the toolbar.
in the toolbar.
Add Map
1. In the Electronic map browser, right click and Add map option will show up.
2. Choose a map image from your local PC to upload. Then it will be displayed in the electronic map field.
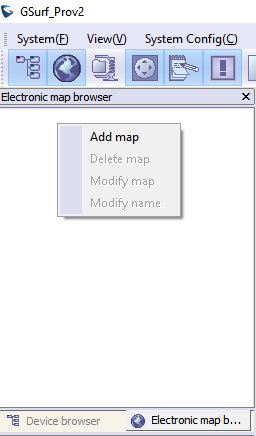
Figure 19: Add Map
Note
The supported image files are bmp, jpg or gif. GSurf_Prov2 will display the electronic map in full resolution. And the users can use the scroll bars to view the whole image.
Add Device to Map
1. Open your map in the main window.
2. In the left side panel, click on Device browser so your devices will show in the list.
3. Click on the device/channel, drag and drop it to the preferred destination on the map.
4. An icon with the device name and the channel number will now be shown on the map. Right click on the icon to change the icon settings.
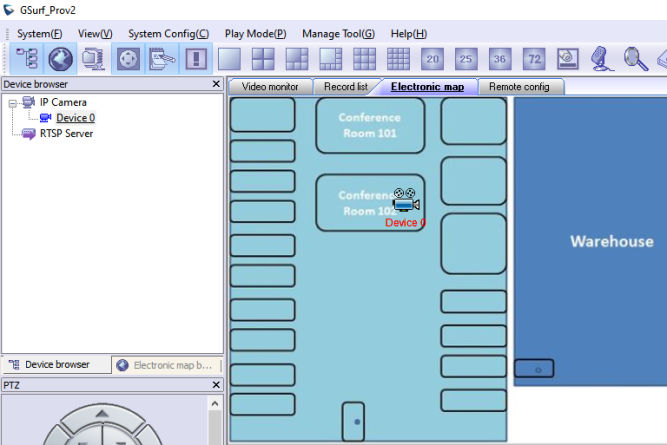 Figure 20: Add Map Alarm
Set Alarm on Map
1. After adding the device to the map, go to System Config->Alarm Config to configure alarm action rule. Make sure the option Warning on the E-map is checked.
2. Go to System Config->Device Config. Select your device and configure the alarm action rule set up in step 1.
3. When GSurf_Prov2 receives an alarm report, the corresponding icon on the map will flash in red .
Lock/Unlock Map
To avoid changing the positions of cameras on the map accidently, the users can lock the map after adding all devices.
Right click on the map, lock/unlock option will be available in the pop-up menu, When the map is unlocked, users could drag devices to the map. When the map is locked, double-clicking on the camera will open up a new window for real time video from this camera.
Remove Device from Map
On the map, right click on the icon and click Delete Icon to remove the device from the map.
Remote Configuration
The IP Camera devices can be remotely accessed via web browser. Select a device on the left side panel and click on Remote config tab to access the camera’s web GUI.
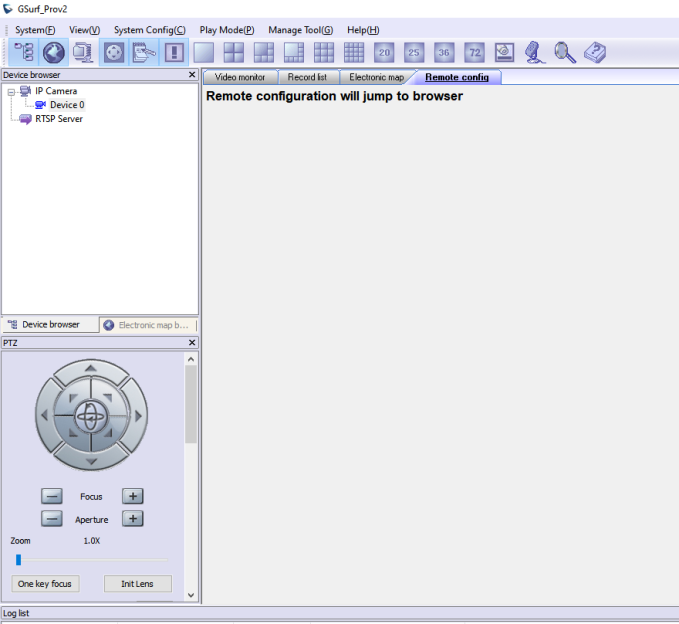 Figure 21: Remote Configuration
PTZ Control
In the toolbar, click ![]() to open PTZ control panel. If the connected devices are PTZ cameras or have a PTZ device connected, users can use the console to adjust the focus, brightness, contrast, rotating speed, IRIS, and also pan/tilt the devices.
to open PTZ control panel. If the connected devices are PTZ cameras or have a PTZ device connected, users can use the console to adjust the focus, brightness, contrast, rotating speed, IRIS, and also pan/tilt the devices.
Note
Before using PTZ control, PTZ device needs to be set up in RS-485 port and properly configured.
Video Monitor
Individual View
Drag the device from the device browser to video display window to watch the video immediately.
Group View/Patrol Mode
1. In the tool bar, click on ![]() to open the Group view panel.
to open the Group view panel.
2. Drag the device in Device browser panel to the group in Group view panel.
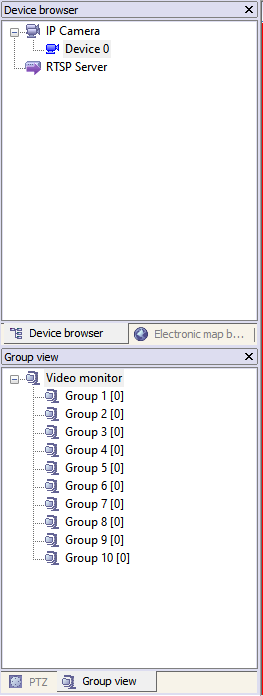 Figure 22: Add Device To Group
3. Right click on the group to configure the group attributes. Check the Allow Patrol option and configure Pause time which is the patrol interval for the group.
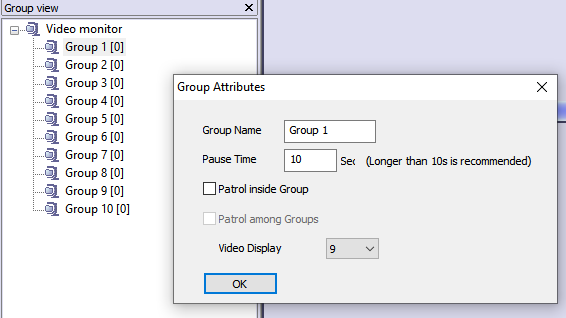
Figure 23: Configure Group Attributes For Patrol Mode
4. Click Ok to save the settings.
5. In the top Menu bar, click on Play Mode->Patrolling View to start playing videos from different groups in a loop.
Synchronize Device Time
In the top Menu bar, click on Manage tool->Synchronize device time. Then users could sync up the device time with local PC time.
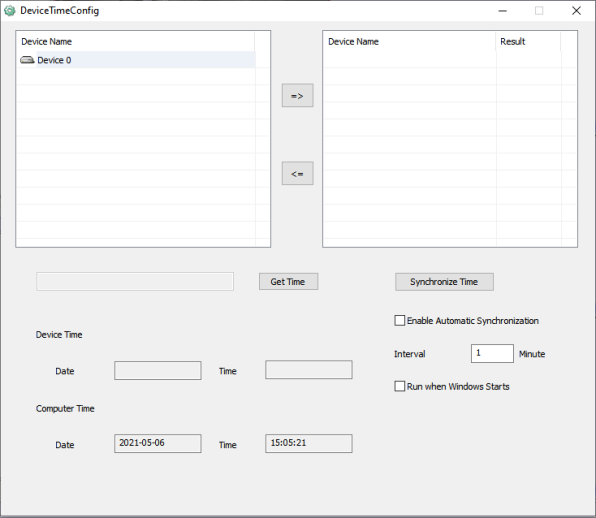
Figure 24: Device Time Configuration
Convert Video Format
The recorded video is saved in H264 format, which might not be supported by certain video players. An AVI converter tool is provided in GSurf_Prov2. Click on Manage tool->AVI Conversion Tool to open the converter. Add video to be converted and the output file will be saved in the configured directory in AVI format.
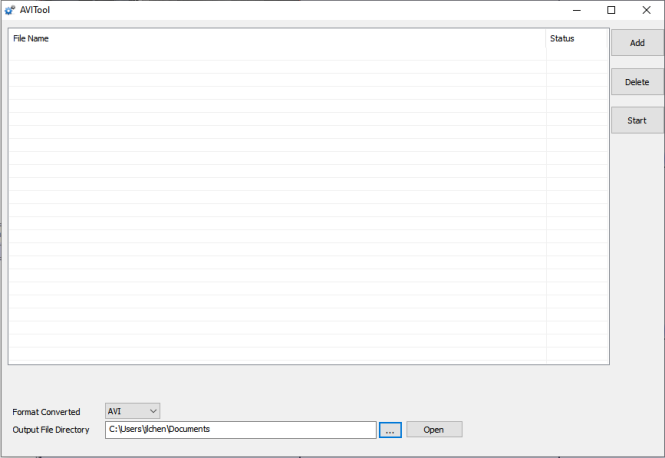 Figure 25: Media Convert Tool
User Management
The GSurf_Prov2 administrator can add, modify and delete users as well as issue users different privilege levels.
1. Click on Manage tool->User Manage.
2. In the User Manage window, users could add, edit and delete users. A list of configuration authorities is provided so each user could be assigned with different privileges.
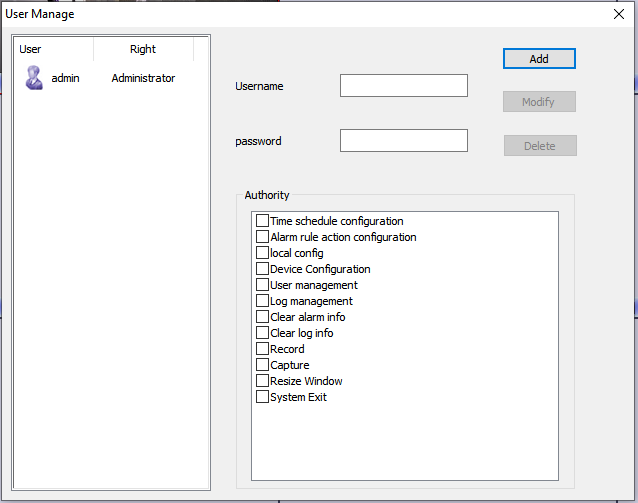
Figure 26: User Management
Import/Export Configuration
The GSurf_Prov2 configuration can be imported or exported for backup and restore purpose. Click on System Config->Export/Import Config to open the import/export window. Users could also select the configurations for the backup file.
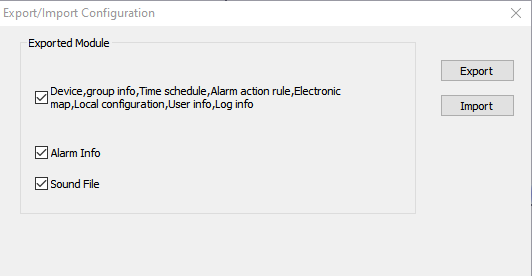
Figure 27: Configuration Import and Export
GSURF_PROV2 TRANSFER SERVER
The GSurf_Prov2 embedded transfer server can cooperate with client side to effectively reduce the workload on the front-end cameras. The surveillance system utilizes the transfer server as the medium to monitor the devices in a distributed manner.
Server Side
1. Open the Transfer server from Manage Tool->Tran Server. A login window will pop up.
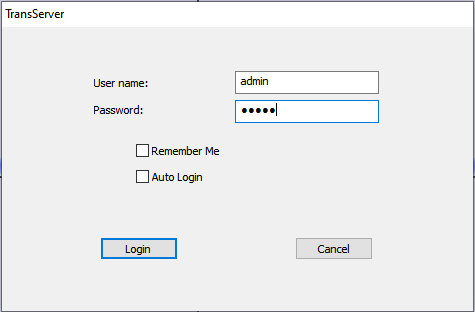
Figure 30: Transfer Server Login
2. After login, click on Config->System Config to open the following server configuration window. The listening IP address is the PC’s IP address. For the port number, it is recommended to use default value or big value.
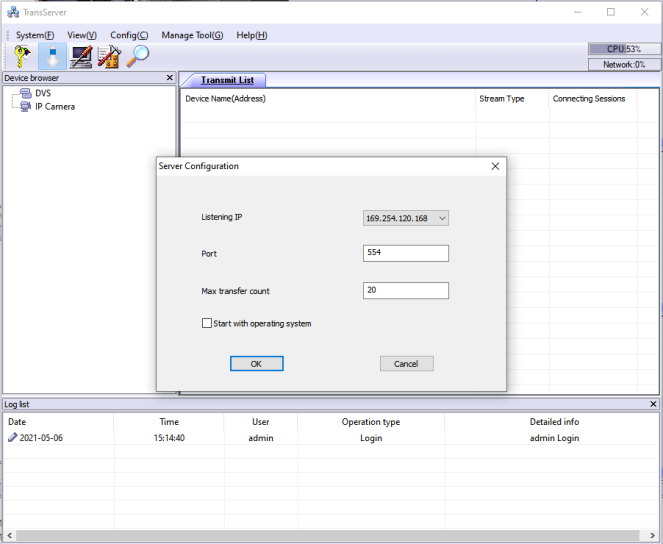 Figure 28: Transfer Server Configuration
3. Click on ![]() to open the search tool.
to open the search tool.
4. In the search tool, press Search button to get a list of devices in the same LAN.
5. Select the devices in the result list and click Add.
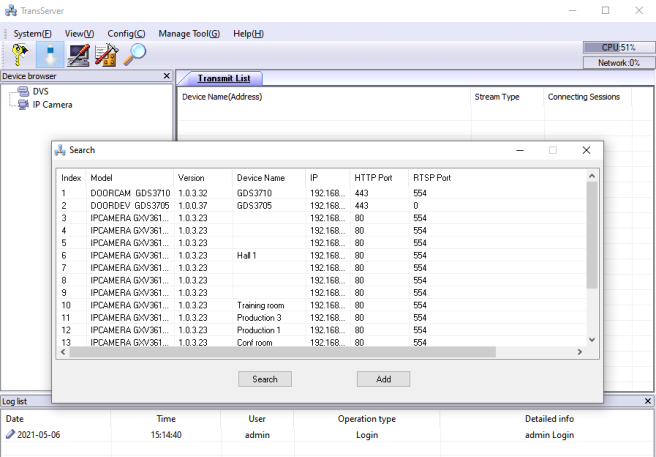 Figure 29: Add Devices to Transfer List
6. Those devices will then be displayed in the transfer list.
The main display window will show the traffic status when the traffic starts.
Client Side
The client side is the GSurf_Prov2 RTSP server.
1. In the Device browser, right click on RTSP server.
2. Click Server Config to add devices to the local list.
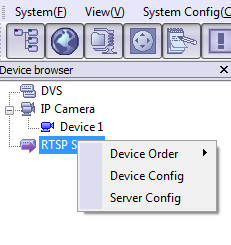 Figure 30: RTSP Server
GSURF_PROV2 FILE SERVER
Server Side
The file server can provide the record files in local disk to other hosts within the network for search, download and replay. To configure the GSurf_Prov2 as the file server, go to Manage Tool->File Server. Click on the Configuration button to set up listening IP and port. Then start the server.
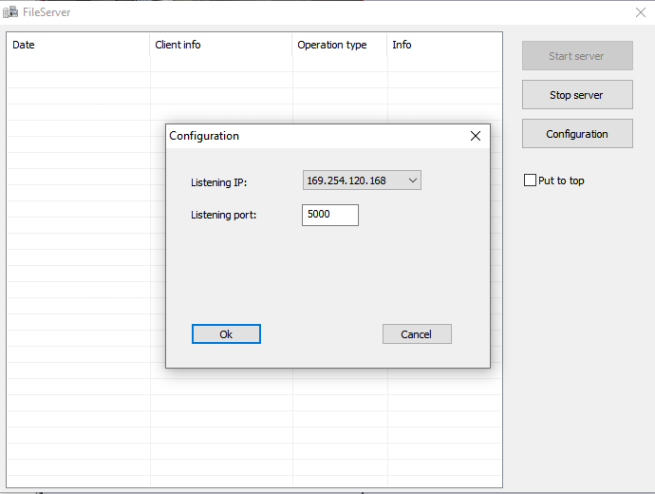 Figure 31: GSurf_Prov2 File Server
Client Side
The client side is the replay tool in the GSurf_Prov2. Go to Manage Tool->Replay Tool to open the Replayer. Once searching is done, the record files can be downloaded and played locally.
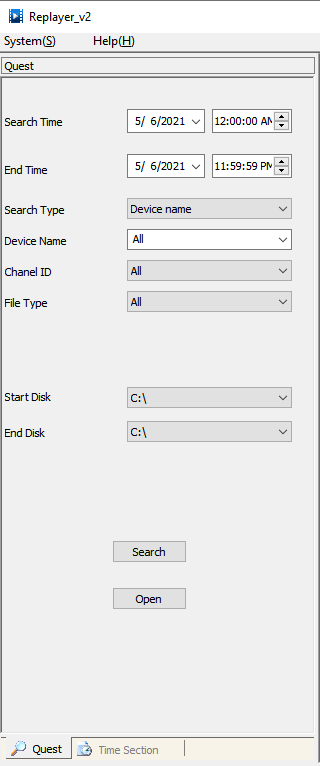
Figure 32: Replayer Remote Search
HTTP SERVER
GSUpgrade Tool
This HTTP server allows user to configure a local HTTP server on the same machine running GSurf Pro which can be used to execute firmware update from this tool on IP Cameras either one by one or via batch upgrade by selecting them all. Go to Manage Tool->HttpServer. Click on the Configuration button to set up listening IP and port. Then start the server.
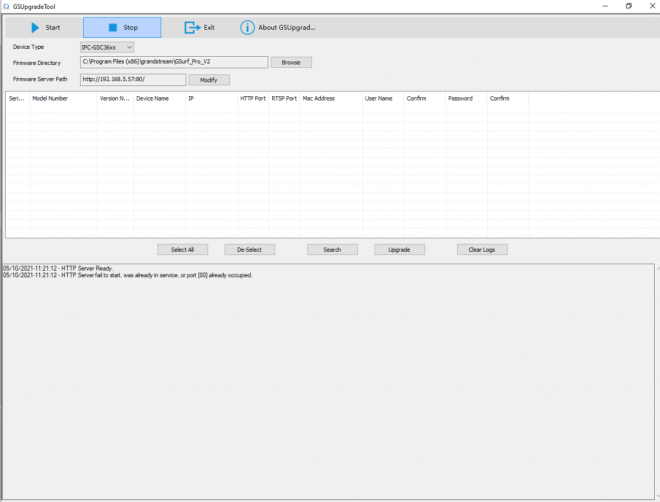 Figure 33: GSurf_Prov2 HTTP Server
FREQUENTLY ASKED QUESTIONS
Q: How many cameras does GSurf_Prov2 support?
A: The GSurf_Prov2 can support up to 10 groups or 72 channels cameras at the same time. However, when using HD camera (720P and up), the maximum number might be limited by the PC processor. When displaying multiple videos, the GSurf_Prov2 will adjust the display to secondary stream to increase system resource efficiency. If users click on one of the video, the display will be automatically converted to primary stream for better quality.
Q: Does GSurf_Prov2 have any requirement on the PC where it’s installed?
A: Yes. Please refer to section [Minimum Computer System Requirement] for details. Before installing GSurf_Prov2, it is recommended to evaluate the system requirement (network traffic, disk space, file directory and etc.).
Q: Is there any requirement on the transfer server?
A: In most of the cases, the transfer server will have large amount of network flow going through. Therefore, it is recommended to use the machine with Gigabyte network interface card.
Q: What are the factors that might affect the disk space?
A: The disk space is mainly affected by the primary stream bit rate. Normally HD video will take more space than standard definition video.
Q: I have configured the alarm action on GSurf_Prov2 already but I still didn’t get alarm. Why?
A: Besides configuring alarm action on GSurf_Prov2 side, the alarm has to be activated on the camera side and configured to report to the alarm center. Users could configure this by directly accessing camera’s web GUI or via GSurf_Prov2’s remote configure interface.
EXPERIENCING THE GRANDSTREAM GSURF_PRO
Please visit our website: http://www.grandstream.com to receive the most up- to-date updates on firmware releases, additional features, FAQs, documentation and news on new products.
We encourage you to browse our product related documentation, FAQs and User and Developer Forum for answers to your general questions. If you have purchased our products through a Grandstream Certified Partner or Reseller, please contact them directly for immediate support.
Our technical support staff is trained and ready to answer all of your questions. Contact a technical support member or submit a trouble ticket online to receive in-depth support.
Thank you again for using Grandstream GSurf_Prov2 Network Video Surveillance System.
